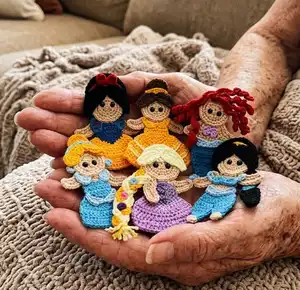
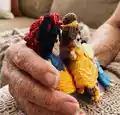
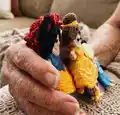
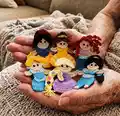
Make a charming set of princess appliques inspired by classic fairy-tale characters. This pattern guides you step-by-step to crochet Snow White, Cinderella, Belle, Ariel, Rapunzel and Jasmin as flat appliques with hair and tiny details. You will enjoy clear row-by-row instructions and helpful assembly photos to place each piece perfectly. Perfect for decorating blankets, bags, gifts, or crafting a tiny collection to display or give away.
Progress Tracker
0% Complete
— Notes :
Info :
-If you are going to sew the appliques it is better to sew all the pieces together then to attach the applique on the blanket. -If you will stick with hot glue gun you can lay them on the blanket secure the pieces with pins and then glue them 1 by 1. -If you wish you can use crochet eyes instead of safety eyes. Just make MR and make 5 sc into the ring, join with sl.st on top of 1st st. -The head instructions for all the princess are same. Make 6 pieces in total for each princess. -The hand instructions for all the princess are same, Make 2 pieces for each one, which is 12 pieces in total. -The numbers in the end of each row shows how many stitches you must have when you finish it.
— Head :
Info :
- With beige color yarn
Rnd 1 :
Start with MR, secure with slip knot, ch 1, make 12 dc into the ring, join with sl.st on top of 1st st. (12)
Rnd 2 :
ch 3, dc in base of initial ch-3, 2 dc in each st around, join with sl.st on top of 1st st. (24)
Rnd 3 :
ch 3, 2 dc in next st, *dc in next st, 2 dc in next st * rep from * to * till the end, join with sl.st on top of 1st st. (36) FO.
Info :
Insert the eyes in 3rd and 9th st of rnd 1 of head. On the bottom center. (See picture 1 and 2)
— Hands :
Info :
(make 2 for each princess) - With beige color yarn
Row 1 :
ch 10, sc in 2nd ch from hook, hdc in next 3 chs, 2 hdc in next ch, hdc in next 3 chs, 5 hdc in last ch, continue on opposite side, hdc in next 3 sts, hdc2tog in next st, hdc in next 2 sts, 2 sc in last st, join with sl.st on top of 1st st. FO. (22)
— Snow White applique :
HAIR - Info :
-With black yarn
Row 1 :
ch 11, dc in 3rd ch from hook, dc in next 7 chs, 5 dc in last ch, continue on opposite side, dc in next 8 sts, ch 1, turn (21)
Row 2 :
dc in base of initial ch 1, dc in next 7 sts, 2 dc in each of next 5 sts, dc in next 8 sts, ch 1, turn(26)
Row 3 :
dc in base of initial ch-1, dc in next 7 sts, *2 dc in next st, dc in next st * rep from * to * 5 times, dc in next 8 sts, ch 1, turn (31)
Row 4 :
dc in base of initial ch 1, dc in next 8 sts, *2 dc in next st, dc in next 2 sts * rep from * to * 5 times, dc in next 7 sts. FO (36)
FRINGE - Right fringe :
With black yarn. Right fringe with RS facing you Row 1: ch 14, sc in 2nd ch from hook, sc in next ch, hdc in next 3 chs, dc in next 2 chs, 2 dc in next ch, dc in next 4 chs, 5 dc in last ch, continue on opposite side, dc in next 5 sts, hdc in next 3 sts, sc in next 3 sts, 2 sc in last st, join with sl.st on top of 1st st. FO. (31)
FRINGE - Left fringe :
With black yarn. Left fringe with RS facing you Row 1: ch 14, sc in 2nd ch from hook, sc in next 2 chs, hdc in next 3 chs, dc2tog, dc in next 4 chs, 5 dc in last ch, continue on opposite side, dc in next 3 sts, 2 dc in next st, dc in next 2 sts, hdc in next 2 sts, sc in next 3 sts, 2 sc in last st, join with sl.st on top of 1st st. (30)
HEADBAND :
With red color yarn Row 1: ch 21, sc in 2nd ch from hook, sc in next ch, hdc in next 3 chs, dc in next 8 chs, hdc in next 3 chs, sc in next 3 chs. FO. (19)
Bow of headband :
Row 1: ch 20, dc in 3rd ch from hook, dc in each ch till end. FO. (18) Leave longer tail for sewing. Fold both ends and sew them together then wrap the longer tail around to form the bow. (See picture 6)
Dress and body - Row 1 :
Start with blue color yarn. Row 1: ch 2, 3 sc in 2nd ch from hook, ch 1, turn (3)
Dress - Row 2 :
inc 1, sc in next st, inc 1, ch 1, turn (5)
Dress - Row 3 :
inc 1, sc in next 3 sts, inc 1, ch 1, turn (7)
Dress - Row 4 :
inc 1, sc in next 5 sts, inc 1, ch 1, turn (9)
Dress - Row 5-8 :
sc in each st across, ch 1, turn (9)
Dress - Row 9 :
dec 1, sc in next 5 sts, dec 1, ch 1, turn (7)
Dress - Row 10 :
sc in each st across, ch 1, turn (7)
Dress - Switch to beige :
Row 11: dec 1, sc in next 3 sts, dec 1, ch 1, turn (5)
Dress - Row 12 :
sc in each st across. FO. (5) (See picture 7)
SK - row 1 :
Insert your hook in the last st of row 5 of body and pull a loop, ch 1, 2 sc in base of initial ch 1, sc in next 4 sts, 3sc in the hole of ch we made our first 3 sts of body's row 1 , sc in next 4 sts, 2 sc in next st, ch 1, turn
SK - row 2 :
2 dc in base of initial ch 1, dc in next 5 sts, hdc in next 3 sts, dc in next 5 sts, 2 dc in last st, ch 1, turn
SK - row 3 :
2 dc in base of initial ch 1, dc in next 6 sts, hdc in next 3 sts, dc in next 6 sts, 2 dc in last st, ch 1, turn
SK - row 4 :
dc in base of initial ch 1, dc in each st across, ch 1, turn (19)
SK - row 5 :
dc in base of initial ch 1, dc in next 5 sts, 2 hdc in next st, hdc in next 5 sts, 2 hdc in next st, dc in next 6 sts, ch 1, turn
SK - row 6 :
dc2tog, dc in next 4 sts, hdc2tog, hdc in next 5 sts, hdc2tog, dc in next 4 sts, dc2tog, ch 1, turn
SK - row 7 :
dc in base of initial ch 1, dc in each st across. FO. (See picture 8)
Dress puffs - Row 1 :
-make it with blue color. Row 1: ch 6, dc in 4th ch from hook, 2 dc in next ch, dc in last ch, ch 3, sl.st in the same last ch again, ch 1, turn
Dress puffs - Row 2 :
3 dc around the post of ch 3 we made in prev row, sc in next 4 sts, 3 sc in next ch-3 sp. FO. Take piece of red color yarn and yarn needle and make straight lines on the blue piece. (See picture 9-10)
— Joining Snow White :
Infos :
Joining pieces together of Snow white applique: (See pictures 11 and 12)
— Cinderella Princess Applique :
Dress - Row 1 :
Start with blue color yarn. ch 2, 3 sc in 2nd ch from hook, ch 1, turn (3)
Row 2 :
inc 1, sc in next st, inc 1, ch 1, turn (5)
Row 3 :
inc 1, sc in next 3 sts, inc 1, ch 1, turn (7)
Row 4 :
inc 1, sc in next 5 sts, inc 1, ch 1, turn (9)
Row 5-8 :
sc in each st across, ch 1, turn (9)
Row 9 :
dec 1, attach beige color, sc in next 5 sts work in BLO, swich to blue color, dec 1, ch 1, turn (7)
Switch :
Switch to beige color, cut the blue yarn
Row 10 :
sc in each st across, ch 1, turn (7)
Row 11 :
dec 1, sc in next 3 sts, dec 1, ch 1, turn (5)
Switch :
Switch to light color yarn
Row 12 :
sc in each st across. FO. (5) (See pictures 13)
Puff of the dress :
the same as SNOW WHITE- make with light blue color. Do not make the straight lines.
Puff of dress belly :
with light blue color yarn Row 1: ch 8, sl.st in 2nd ch from hook, sc in next ch, hdc in next ch, 2 dc in next ch, hdc in next ch, sc in next ch, sl.st in last ch. FO. (See picture 14)
Hair bun and second fringe :
make 2 pieces- 1st is for the bun and 2nd for the fringe – with yellow color yarn: Rnd 1: ch 4, 5 dc in 4th ch from hook, ch 3, turn (6) Rnd 2: dc in base of initial ch 3, 2 dc in each of next 4 sts, 2 dc in 3rd ch of turning ch. FO. (12) (See picture 15)
Hair of Cinderella - Row 1 :
with yellow color yarn ch 17, sc in 2nd ch from hook, sc in next ch, hdc in next 2 chs, *2 dc in next ch, dc in next ch * rep from * to * 2 times, 2 dc in next ch, hdc in next 2 chs, sc in next 2 sts, sl.st in lass t, ch 1, turn
Switch :
Switch to sky blue color yarn
Row 2 :
skip the 1st st, sc in next 3 sts, hdc in next 11 sts, sc in next 3 sts, sl.st in last st. FO. (See picture 16)
Fringe :
with yellow color yarn Row 1: ch 10, sc in 2nd ch from hook, sc in next ch, hdc in next 5 chs, dc in next ch, 5 dc in last ch, continue on opposite side, dc in next 2 sts, hdc in next st, sl.st in next st, hdc in next 3 sts, 2 hdc in last st, join with sl.st on top of 1st st. FO. (See picture 17)
EAR :
with beige color yarn Rnd 1: ch 4, 5 dc in 4th ch from hook. FO.
EARING :
with blue color yarn Start with MR, make 5 sc into the ring, join with sl.st on top of 1st st. (See picture 18)
Joining :
Joining Cinderella's pieces together. (See picture 19 and 20)
— Princess Bell applique :
Body of Bell :
with yellow color yarn Rows 1-9 : the same as SNOW WHITE Row 10: switch to beige color yarn Sc in each st across, ch 1, turn (7) Row 11: dec 1, dc in next 3 sts, dec 1, ch 1, turn (5) Row 12: sc in each st across. FO. (5)
Skirt of Bell's dress - Row 1 :
with yellow color yarn ch 13, V-stitch in 5th ch from hook, *skip 2 sts, V-st in next ch * rep from * to * 2 times, skip 1 ch, dc in last ch, ch 3, turn
Row 2 :
6 dc in each ch-sp, dc in 3rd ch of turnig ch-3, ch 3, turn
Row 3 :
dc in next 18 sts, dc in 3rd ch of turning ch, ch 1, turn
Switch :
Switch to light yellow color yarn
Row 4 :
sc in base of initial ch 1, *sc in next st, hdc in next st, 2 dc in each of next 2 sts, hdc in next st, sc in next st * rep from * to * 3 times, sc in 3rd ch of turning ch, ch 2, turn
Switch :
Switch to darker yellow color yarn
Row 5 :
FPDC in next 7 sts, FPSC in next 2 sts, * FPDC in next 6 sts, FPSC in next 2 sts * rep from * to * 2 times, ch 1, turn
Row 6 :
sc in base of initial ch 1, hdc in next st, dc in next 5 sts, hdc in next st, * sc in next st, hdc in next st, 2 dc in next st * rep from * to * 2 times, sc in turning ch, ch 3, turn
Switch :
Switch to light yellow color yarn
Row 7 :
dc in next 7 sts, sc in next st, * sc in next st, dc in next 6 sts, sc in next st * rep from * to * 2 times, dc in last st, ch 1, turn
Row 8 :
sc in base of initial ch 1, hdc in next st, dc in next 14 sts, 2 dc in next st, dc in next 2 sts, hdc in next st, sc in next st, sl.st in next st, hdc in next st, 2 dc in next st, dc in next 3 sts, hdc in next st, sc in next 2 sts, sl.st in next st, dc in next 7 sts. FO. (See picture 21-22)
Sleeve of dress :
with dark yellow yarn Ch 14, sc in 2nd ch from hook, sc in next ch, hdc in next ch, 2 dc in next ch, hdc in next ch, sc in next ch, sl.st in next ch, sc in next ch, hdc in next ch, 2 dc in next ch, hdc in next ch, sc in next 2 chs. FO. (See picture 23)
Right fringe :
with brown color yarn Row 1: ch 10, sc in 2nd ch from hook, sc in next ch, hdc in next 2 chs, 2 hdc in next ch, hdc in next 3 chs, 5 hdc in last ch, continue on opposite side, hdc in next 6 sts, sc in next 2 chs, join with sl.st on top of 1st st. FO. (See picture 24)
Left fringe :
Row 1: ch 10, sc in 2nd ch from hook, sc in next ch, hdc in next 2 chs, hdc2tog, hdc in next 2 chs, 5 hdc in last ch, continue on opposite side, hdc in next 6 sts, sc in next 2 sts, join with sl.st on top of 1st st. (See picture 24)
Hair bun :
with brown color yarn: Rnd 1: ch 4, 5 dc in 4th ch from hook, ch 3, turn (6) Rnd 2: dc in base of initial ch 3, 2 dc in each of next 4 sts, 2 dc in 3rd ch of turning ch. FO. (12) (See picture 24)
Curly pony tale :
with brown color yarn { Ch 16, sc in 2nd ch from hook, * sc in next 4 chs, 2 sc in next ch * rep from * to * 2 times, sc in next 2 chs, (1st curly tale is done) } rep from { to } 4 or 5 times. (See picture 24)
Headband :
with yellow color yarn Ch 11, dc in 4th ch from hook, dc in each ch across. FO.
Joining :
Joining pieces together of princess Bell ( See picture 25 and 26 )
— Ariel - Mermaid Princess applique :
Hair of Ariel - Long lock :
With red color yarn Long lock of hair (make 5 or 6 pieces- I made 5 pieces) Ch 30, dc in 3rd ch from hook, * dc in next 3 sts, 2 dc in next st * rep from * to * 6 times, dc in next 3 sts. FO.
Hair of Ariel - Short lock :
Ch 23, dc in 3rd ch from hook, *dc in next 3 sts, 2 dc in next st * rep from * to * 4 times, dc in next 4 sts.FO. (See picture 27)
Body of Ariel - Row 1 :
with blue color yarn Row 1: ch 4, 4 dc in 4th ch from hook, ch 1, turn (5)
Row 2 :
2 dc in base of initial ch 1, dc in next 3 sts, 2 dc in last st, ch 1, turn (7)
Row 3 :
dc in base of initial ch 1, dc in each st across, ch 1, turn (7)
Row 4 :
2 dc in base of initial ch 1, dc in next 5 sts, 2 dc in last st, ch 1, turn (9)
Row 5 :
dc in base of initial ch 1, dc in each st across, ch 1, turn (9)
Row 6 :
2 dc in base of initial ch 1, dc in next 7 sts, 2 dc in last st, ch 1, turn (11)
Row 7 :
dc in base of initial ch 1, dc in each st across, ch 1, turn (11)
Row 8 :
sc2tog, sc in next 7 sts, sc2tog, ch 1, turn (9)
Row 9 :
sc2tog, sc in next 5 sts, sc2tog, ch 1, turn (7)
Switch :
Switch to beige color
Row 10 :
work in FLO. sc in base of initial ch 1, sc in each st across, ch 1, turn (7)
Row 11-15 :
sc in base of initial ch 1, sc in each st across, ch 1, turn (7)
Row 16 :
dec 1, sc in next 3 sts, dec 1, ch 1, turn (5)
Row 17 :
sc in base of initial ch 1, sc in each st across, ch 1, turn. FO. (5) (See picture 28)
Tail of Ariel :
Insert your hook in the ch space formed in the 1st row, pull a loop, * ch 5, 1 tr, 1 picot, 2 tr, ch 5, sl.st in same ch-sp, * rep 2 times. FO. (See picture 29)
Belly of Ariel :
with light blue color yarn Ch 15, dc in 4th ch from hook, dc in next ch, hdc in next ch, sc in next 2 chs, sl.st in next ch, sc in next 2 chs, hdc in next ch, dc in next 2 chs, dc in last ch, ch 3, sl.st in last ch again. FO. (See picture 30)
Top of Ariel :
with purple color yarn Ch 4, 3 dc , ch 3, sl.st in same ch, ch 3, 3 dc in same ch, ch 3, sl.st all in 4th ch from hook. FO. (See picture 31)
— Joining pieces together :
Info :
1. Place your head on a flat surface and take some pins. Take locks of the hair and pin them on the ends of upper part of head. 2. Sew/stick them after you decide how you would like to place them. 3. Take the top, body and hands. Sew the top on the upper part of body on beige/skin tone part. 4. Now sew/stick the hands on both sides of body. (See picture 32 or pictures below)
— Rapunzel Princess applique :
Hair braid of Rapunzel :
make 3 pieces( I made 2 of them with dark yellow and 1 of them with light yellow color yarn ) Ch 35, dc in 3rd ch from hook, dc in next 28 chs, hdc in next 2 chs, sc in next ch, sl.st in last ch. FO.
Flowers of hair :
make 4-5 with different colors Ch 2, 5 sc in 2nd ch from hook, join with sl.st on top of 1st st. Take the stripes we just made and place them on flat surface. Pin them in one place, secure them with pins and now make a braid. Sew the flowers onto the braid. (See picture 33)
Fringes :
with light yellow color yarn Ch 9, sc in 2nd ch from hook, sc in next 2 chs, hdc in next 4 chs, 5 hdc in last ch, continue on opposite side, hdc in next 4 sts, sc in next 3 sts, join with sl.st on top of 1st st. FO. (See picture 34)
Hair of Rapunzel - Rnd 1 :
light yellow color yarn ch 4, 5 dc in 4th ch from hook, ch 3, turn (6)
Rnd 2 :
dc in base of initial ch 3, 2 dc in each of next 4 sts, 2 dc in 3rd ch of turning ch. Ch 3, turn (12)
Rnd 3 :
dc in base of initial ch-3, *dc in next st, 2 dc in next st * rep from * to * 5 times, dc in 3rd ch of turning ch. FO. (18) (See picture 35)
Dress :
Dress is the same as SNOW WHITE just change colors-make body with dark purple and skirt with light purple Body rows 1-12 make with dark purple and beige for neck SK rows 1-7 make with light purple. (See picture 36)
Joining Rapunzel :
1. Take the braid, fringe and hair. Take the semi-circle hair part and sew it on upper part of head. 2. Sew fringes on both side of head, Sew the braid behind head on lower side when the fringe ends. 3. Take body and hands and sew the hands on body, then sew head on body. (See picture 37)
— Jasmin Princess Applique :
Body - Legs Row 1 :
with blue color yarn Start from legs. First we will make 2 piece and then join them in 1 body piece Legs (make 2 pieces) Row 1: ch 4, sc in 2nd ch from hook, sc in next 2 chs, ch 1, turn (3)
Row 2 :
sc in base of initial ch 1, sc in next 2 sts, ch 1, turn (3)
Row 3 :
2 sc in base of initial ch-1, sc in next st, 2 sc in last st, ch 1, turn (5)
Row 4-5 :
sc in base of initial ch-1, sc in each st across, ch 1, turn (5)
Row 6 :
2 sc in base of initial ch-1, sc in next 4 sts, ch 1, turn (6)
Row 7-10 :
sc in base of initial ch-1, sc in each st across, ch 1, turn. (6) FO.
Join legs Row 11 :
Insert your hook in 1st st of right leg and pull a loop, ch 1, sc in base of initial ch-1, sc in next 5 sts, attach 2nd leg, sc in next 6 sts of 2nd leg, ch 1, turn (12)
Row 12-13 :
sc in base of initial ch-1, sc in each st across, ch 1, turn (12)
Row 14 :
dec 1, sc in next 8 sts, dec 1, ch 1, turn (10)
Row 15 :
sc in base of initial ch-1, sc in each st across, ch 1, turn (10)
Row 16 :
dec 1, sc in next 6 sts, dec 1, ch 1, turn (8)
Switch :
Switch to beige color yarn
Row 17-23 :
sc in base of initial ch-1, sc in each st across, ch 1, turn (8)
Row 24 :
dec 1, sc in next 4 sts, dec 1, ch 1, turn (6)
Row 25-26 :
sc in base of initial ch-1, sc in each st across, ch 1, turn (6) Fasten off. (See picture 38)
Belly of Jasmin :
with light blue color yarn Ch 15, dc in 4th ch from hook, dc in next ch, hdc in next ch, sc in next 2 chs, sl.st in next ch, sc in next 2 chs, hdc in next ch, dc in next 2 chs, dc in last ch, ch 3, sl.st in last ch again. FO. (See picture 39)
Hair of Jasmin - Big circle :
with black color yarn Rnd 1: Start with MR, secure with slip knot, ch 1, make 12 dc into the ring, join with sl.st on top of 1st st. (12) Rnd 2: ch 3, dc in base of initial ch-3, 2 dc in each st around, join with sl.st on top of 1st st. (24) Rnd 3: ch 3, 2 dc in next st, *dc in next st, 2 dc in next st * rep from * to * till the end, join with sl.st on top of 1st st. (36) Rnd 4: ch 2, hdc in next st, 2 hdc in next st, *hdc in next 2 sts, 2 hdc in next st * rep from * to * 11 times, join with sl.st on top of 1st st. (48)
Small circle :
Rnd 1: Start with MR, secure with slip knot, ch 1, make 12 dc into the ring, join with sl.st on top of 1st st. (12) Rnd 2: ch 3, dc in base of initial ch-3, 2 dc in each st around, join with sl.st on top of 1st st. (24)
Oval piece of hair :
Row 1: ch 9, sc in 2nd ch from hook, sc in next 3 chs, hdc in next 3 chs, 5 dc in last ch, continue on opposite side, hdc in next 3 sts, sc in next 3 sts, 2 sc in last st, join with sl.st on top of 1st st. Row 2: ch 1, 2 sc in base of initial ch-1, sc in next 3 sts, hdc in next 3 sts, 2 hdc in each of next 2 sts, 2 dc in next st, 2 hdc in each of next 2 sts, hdc in next 3 sts, sc in next 3 sts, 2 sc in each of rem 2 sts, join with sl.st on top of 1st st.
Hairband and headband :
make the hair band with blue color and the headband with yellow color yarn Ch 5, hdc in 3rd ch from hook, hdc in next 2 chs. FO.
Fringe of Jasmin :
With black yarn Right fringe with RS facing you Row 1: ch 14, sc in 2nd ch from hook, sc in next ch, hdc in next 3 chs, dc in next 2 chs, 2 dc in next ch, dc in next 4 chs, 5 dc in last ch, continue on opposite side, dc in next 5 sts, hdc in next 3 sts, sc in next 3 sts, 2 sc in last st, join with sl.st on top of 1st st. FO. (31) Left fringe with RS facing you Row 1: ch 14, sc in 2nd ch from hook, sc in next 2 chs, hdc in next 3 chs, dc2tog, dc in next 4 chs, 5 dc in last ch, continue on opposite side, dc in next 3 sts, 2 dc in next st, dc in next 2 sts, hdc in next 2 sts, sc in next 3 sts, 2 sc in last st, join with sl.st on top of 1st st. (30) (See picture 40)
Jasmin crop top :
with light and sky blue color yarn Row 1: ch 11, dc in 4th ch from hook, dc in next 2 chs, ch 1, sc in next 2 chs, ch 1, dc in next 3 chs, ch 3, sl.st in the last ch again. FO. Now take light blue color and insert your hook in the 1st st of row 1, pull a loop and ch 4, sc in 2nd ch from hook, sc in next 2 chs, sl.st in next st of row 1. Repeat the same for the other side. (See picture 41 and 42)
Feet :
with beige color yarn (make 2 pieces) Start with MR and make 6 sc into it.
Joining All the pieces together :
Take big circle of hair and the head. Sew head onto the circle so the bottom of the circle is covered and the upper side is popping above the head. Take headband – yellow piece and sew it onto center right above the head onto the hair. Take right and left fringe and sew them on both sides of face. Make sure the headband is popping out behind the fringes. Fringes are bit longer fold bottom part behind the head. Now take the small circle and oval piece and hairband- blue piece. Join the circle with oval using the hairband. Sew the small hair piece to head. Sew belly onto the body right when we switch to beige color. It must be placed as V shaped. Take crop top piece, hands and body and sew the crop top onto hands and body. It will join the hands and body.
This princess applique collection turns simple yarn and a 3.5mm hook into tiny storybook friends you can treasure or gift. Make a full set or mix and match colorways to create your own royal court. These charming figures are perfect for blankets, bags, gifts and small decorative projects. 🧶👑✨