🧢 Beautiful ✨ Detailed πŸ’ Adorable

Positive Potato Amigurumi Pattern

Positive Potato Amigurumi Pattern
3.9β˜… Rating
2-3 Hours Time Needed
2.6K Made This
βœ‚οΈ

Beginner Friendly Level

Perfect for those just starting their crochet journey, with clear instructions and simple techniques

⏱️

Bite-Sized Project

Finishes in 2-4 hoursβ€”perfect for an afternoon of creative relaxation.

🧸

Cute Companion

An adorable friend to cherish, handcrafted with love to bring comfort and joy for years to come.

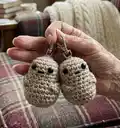
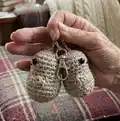
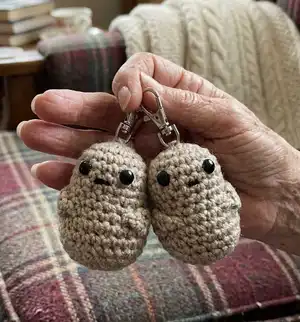
About This Positive Potato Amigurumi Pattern

This pattern creates a tiny, charming 'Positive Potato' amigurumi that measures approximately 7 cm (2.75"). It is designed to be quick and simple, perfect for crafting multiple keychains or small gifts. The potato holds a small printed 'saying' and has tiny arms, safety eyes (or embroidered eyes for small children) and a stitched mouth. The pattern uses basic crochet stitches and straightforward shaping for an easy and satisfying make.

Positive Potato Amigurumi Pattern crochet pattern - detailed view of completed project

Includes a printable sheet of encouraging sayings and step-by-step assembly notes. Suitable for classroom projects, gifts, or a cheerful pocket pal.

Why You'll Love This Positive Potato Amigurumi Pattern

I absolutely love this pattern because it is so quick to make and brings instant smiles with minimal effort. I enjoy that each potato can be personalised with a different printed saying, adding a charming, heartfelt touch. The design is forgiving and beginner-friendly, making it easy to produce a whole collection in one afternoon. I also love that the finished size makes these perfect for keychains, gifts, or little rewards for kids β€” practical and sweet!

Positive Potato Amigurumi Pattern step 1 - construction progress Positive Potato Amigurumi Pattern step 2 - assembly progress Positive Potato Amigurumi Pattern step 3 - details and accessories Positive Potato Amigurumi Pattern step 4 - final assembly and finishing

Switch Things Up

I love changing up the yarn colour to create themed potatoes; try pastel shades for a softer look or bright shades for bold, playful pals.

You can make tiny versions by using finer yarn and a smaller hook to create keychain minis, or use chunky yarn and a larger hook for a squishy, cuddle-sized potato.

I often swap safety eyes for embroidered eyes and mouth to make them safe for very young children and to give a handmade, stitched look.

Try adding tiny accessories like a crocheted hat, bow, or a small scarf to personalise each potato for different occasions.

Use different sayings from the printable sheet or write your own tiny messages to make themed sets for birthdays, teacher gifts, or encouraging notes.

If you want more stability for a keyring, sew a small fabric loop into the top before closing and attach the clasp through that loop.

I like to experiment with embroidery on the body to add freckles, blush spots, or little patterns so each piece feels unique.

For a more eco-friendly version, use scrap yarn left from other projects to make a colourful troupe of potatoes without buying new yarn.

If you want a weighted base so the potato sits upright, add a small pouch of rice or poly pellets inside the bottom before fully stuffing and closing.

I also enjoy turning this pattern into a classroom craft by pre-cutting the sayings and having kids help assemble and pin the arms, making it a collaborative and fun activity.

Finally, consider making a set with different sayings and packaging them in small gift bags for quick, heartfelt presents that bring a smile.

Common Mistakes & How to Fix Them

βœ— Not placing the marker after round 2 can make it hard to track rounds; place a stitch marker at the end of round 2 and move it after every round to keep your count accurate. βœ— Overstuffing the potato will distort the shape and make the final stitches hard to close; stuff gradually and top up only until the shape looks natural before finishing off. βœ— Forgetting to insert the safety eyes in the right rows will misplace the face; place eyes between rows 5 and 6 with 3 sts between them before continuing to crochet. βœ— Leaving very short yarn ends when finishing the arms makes sewing difficult; leave a long yarn end when fasten off so you can sew and secure the arms firmly. βœ— Skipping the tape reinforcement on the printed sayings can cause tearing; place a piece of sticky tape across the saying to strengthen it before cutting and attaching.

Positive Potato Amigurumi Pattern

Make these adorable 'Positive Potato' keychain amigurumi with a quick, simple crochet pattern that is perfect for gifts and classroom projects. You will enjoy the sweet, compact design and the printable sayings that give each potato a cheerful message. The pattern is fast to work up and requires minimal materials, making it ideal for making multiples. Follow the clear steps and assemble with ease to create a 7 cm (2.75") pocket-sized friend.

Beginner Friendly 2-3 Hours

Materials Needed for Positive Potato Amigurumi Pattern

β€” Main Fabric

  • 01
    20g 8ply (DK) yarn in beige or any potato coloured yarn (any yarn and crochet hook can be used as size is unimportant)
  • 02
    Black yarn for embroidering the mouth (small amount)
  • 03
    2 x 8mm safety eyes (or embroidery if for a child under 3)
  • 04
    Printable paper sayings (printed and taped for reinforcement)

β€” Tools Required

  • 01
    Crochet hook size 3.5mm (UK 9, US 4)
  • 02
    2 x 8mm safety eyes (or needle and black yarn to embroider eyes for young children)
  • 03
    Scissors
  • 04
    Yarn needle for sewing and weaving in ends
  • 05
    Stitch marker
  • 06
    Polyester stuffing
  • 07
    Small clip or clasp for attaching to backpacks or keyrings (optional)
  • 08
    Pins for holding sayings and arms in place
  • 09
    Sticky tape to strengthen printed sayings

Progress Tracker

0% Complete

β€” Body :

Round 1 :

6 dc into magic circle (6)

Round 2 :

2 dc in each round (12). PM and move after every round

Round 3 :

(dc, 2 dc) around (18)

Round 4-8 :

dc around (5 rounds)

Info :

Place eyes between rows 5 and 6 with 3 sts in between.

Round 9 :

(dc 5, 2 dc) around (21)

Round 10 :

dc around (21)

Round 11 :

(dc 6, 2 dc) around (24)

Round 12 :

dc around (24)

Round 13 :

(dc 6, dc dec) around (21)

Round 14 :

(dc 5, dc dec) around (18)

Round 15 :

(dc, dc dec) around (12)

Info :

Stuff potato

Round 16 :

(dc dec) around (6). Top up stuffing, cut yarn and thread through the last 6 sts and pull up tight. FO

β€” Arms/hand :

Info :

Make 2

Round 1 :

Leaving a long end, ch 3, turn

Round 2 :

dc in 2nd ch from hook, dc (2). Turn

Round 3-4 :

ch 1, dc 2

Round 5 :

dc dec, FO leaving a long end of yarn

β€” Printable Sayings & Assembly :

Info :

Print the sheet of 'sayings'. Cut out your chosen 'saying' leaving a margin on each side. Place a piece of sticky tape across the 'saying' to strengthen it.

Info :

Centre the 'saying' on the body of the potato, place the arms on each side so that the hands are on the margin of the 'saying'. Pin the arms in place and using the long yarn end, stitch firmly across the end.

Info :

Using the long end of yarn, at the hand end, and holding the 'saying' in place, push the needle through the 'saying' in the middle of the margin and secure the end firmly by weaving through the body.

Info :

Make a mouth using black yarn.

Info :

Attach a clasp or keyring chain (optional).

Assembly Instructions

  • Place and center the printed 'saying' on the front of the potato body and pin in place so it sits evenly across the mid section.
  • Position the two arms on either side of the saying so the hands rest on the paper margin; pin the arms and stitch firmly across the ends using the long yarn tails.
  • Using the long yarn tail from each arm, push the needle through the paper saying in the middle of the margin and weave the yarn into the body to secure the paper tightly.
  • Embroider a small mouth with black yarn centered between the eyes, using simple backstitches to create a neat expression.
  • Attach safety eyes between rows 5 and 6 with 3 stitches between them before stuffing (or embroider eyes for children under 3), then finish off and secure backs.
  • If desired, sew or attach a small clip or clasp to the top of the potato for a keychain or bag charm, ensuring it is securely fastened.

Important Notes

  • πŸ’‘Place safety eyes between rows 5 and 6 with 3 stitches between them; secure tightly and consider embroidering for children under 3.
  • πŸ’‘Stuff gradually and shape as you go to avoid lumps and maintain a natural potato form.
  • πŸ’‘Use sticky tape to reinforce printed sayings before cutting to prevent tearing during handling and attachment.
  • πŸ’‘Leave long yarn ends when finishing the arms to make sewing and securing them to the body much easier.
  • πŸ’‘Move your stitch marker after every round to keep accurate stitch counts and avoid accidental increases or decreases.

These little Positive Potatoes are designed to spread smiles and encouragement wherever they go. They are small, adorable, and quick to make β€” perfect for gifting or classroom rewards. Make a bunch, add unique sayings, and share a tiny boost of positivity with friends and family! 🧢😊

You ask,

we answer.

FAQs

What size will the finished piece be?

The finished amigurumi measures approximately 7 cm (2.75") tall when using 8ply/DK yarn and a 3.5mm hook as recommended.

Can I use different yarn weights for this pattern?

Yes, you can use different yarn weights, but this will affect the final size; adjust your hook size accordingly to maintain a neat fabric.

Do I need prior crochet experience for this pattern?

This pattern is beginner friendly and uses basic stitches (chain, single crochet and decreases), so it is suitable for beginners familiar with these techniques.

How long does this project typically take to complete?

Most crocheters complete one Positive Potato in about 2-3 hours, depending on experience and whether you print and prepare sayings.

Are the sayings washable or durable?

The printed sayings are reinforced with sticky tape for strength; however they are paper-based so avoid washing the toy and consider laminating for extra durability.