🧢 Beautiful ✨ Detailed πŸ’ Adorable

Bunny Hand Puppet Amigurumi Pattern

Bunny Hand Puppet Amigurumi Pattern
4.7β˜… Rating
5-7 Hours Time Needed
1.8K Made This
βœ‚οΈ

Intermediate Level

Ideal for those with basic crochet experience, featuring slightly more advanced stitches and techniques to expand your skills.

⏱️

Weekend Treat

Takes 5-7 hours, making it an enjoyable project to finish over a couple of days.

🧸

Cute Companion

An adorable friend to cherish, handcrafted with love to bring comfort and joy for years to come.

About This Bunny Hand Puppet Amigurumi Pattern

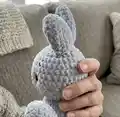
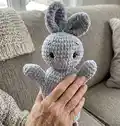
This pattern teaches you how to crochet a soft bunny hand puppet using super bulky plush yarn and a 4.5 mm hook. You will crochet the head, ears, arms and body, then add embroidered features and assemble everything into a lovable puppet. The instructions include exact rounds, placing eyes, and finishing techniques so you can follow along with confidence.

Bunny Hand Puppet Amigurumi Pattern crochet pattern - detailed view of completed project

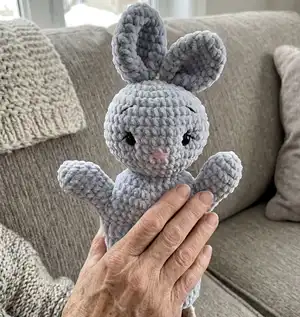
Clear round-by-round instructions make shaping easy and predictable. Photos and tips for indenting eyes, embroidering facial features, and attaching parts help you get neat, professional results.

Why You'll Love This Bunny Hand Puppet Amigurumi Pattern

I absolutely love this pattern because it transforms soft plush yarn into an irresistibly cuddly puppet that children adore. I enjoy the quick shaping of the head and bodyβ€”it gives immediate satisfaction as the toy takes form. The embroidery steps let me add personality with tiny details like eyelashes and a cute nose. I also appreciate that the pattern is compact yet versatile, so I can easily customize colors and create a whole puppet family.

Bunny Hand Puppet Amigurumi Pattern step 1 - construction progress Bunny Hand Puppet Amigurumi Pattern step 2 - assembly progress Bunny Hand Puppet Amigurumi Pattern step 3 - details and accessories Bunny Hand Puppet Amigurumi Pattern step 4 - final assembly and finishing

Switch Things Up

I like to experiment with different colors β€” try pastel shades for a sweet nursery puppet or bright, bold hues for a playful character.

I often change yarn weight and hook size to make mini keychain versions or larger cuddle-sized puppets; just remember to adjust safety eyes and stuffing accordingly.

I sometimes replace safety eyes with embroidered eyes for baby-safe toys; it looks softer and is safer for young children.

I add tiny crocheted accessories like scarves, hats, or little pockets to give each puppet its own personality and charm.

I recommend swapping the facial embroidery styles β€” a small smile, different eyebrow shapes or eyelash lengths can completely change the expression.

I like to use variegated yarns for the body to create subtle texture shifts without changing colors manually.

If I want a sturdier puppet for performances, I reinforce the neck seam and use a slightly tighter tension to keep the shape durable.

I often make matching sets β€” a bunny, a fox and a bear β€” using the same body base but changing ear and face shapes to create different animals.

I also sometimes add a thin piece of felt inside the mouth area to make puppets easier to animate for little hands.

For gifting, I package the puppet with a tiny crocheted blanket or card that matches the color scheme β€” it makes the present extra special.

Common Mistakes & How to Fix Them

βœ— Forgetting to leave a tail for sewing on pieces like the ears and body; always leave a long tail to securely sew parts in place. βœ— Placing safety eyes too high or too low makes the face look off-balance; mark and count stitches between eyes and position between rounds 10 and 11. βœ— Overstuffing the ears or arms will distort the shape and make sewing difficult; do not stuff ears and keep arms unstuffed as instructed. βœ— Skipping stitch counts during increases and decreases causes uneven shaping; count stitches at the end of each round to ensure accuracy.

Bunny Hand Puppet Amigurumi Pattern

Create a cuddly bunny hand puppet using plush yarn and simple amigurumi techniques. This pattern guides you step-by-step through crocheting the head, ears, arms and body, plus embroidery and assembly tips. Perfect as a handmade gift or a playful puppet for storytime. You will have a charming 28 cm (11") puppet to love and share.

Intermediate 5-7 Hours

Materials Needed for Bunny Hand Puppet Amigurumi Pattern

β€” Main Fabric

  • 01
    Super bulky plush yarn - Himalaya Dolphin Baby (120 m - 100 g) or (131 yd - 3.52 oz); Gray color (1 skein, No 80351)
  • 02
    Sport cotton yarn - Yarn Art Jeans (160 m - 50 g) or (175 yd - 1.76 oz) for embroidery and small details
  • 03
    Black thin yarn for embroidery eyebrows and eyelashes (small amount)
  • 04
    Pink thin yarn for embroidery nose (small amount)
  • 05
    Gray color yarn for sewing pieces (small amount)
  • 06
    Fiber filler for stuffing the head
  • 07
    Plastic safety eyes 8 mm (1 pair)

β€” Tools Required

  • 01
    Crochet hook 4.5 mm
  • 02
    Large needle
  • 03
    Knitting markers

Progress Tracker

0% Complete

β€” Head :

Info :

Use the gray plush yarn, hook 4.5 mm.

R 1 :

7 sc in MR (7)

R 2 :

inc * 7 (14)

R 3 :

inc * 14 (28)

R 4 :

(3 sc, inc) * 7 (35)

R 5 :

(4 sc, inc) * 7 (42)

R 6 :

(13 sc, inc) * 3 (45)

R 7-11 :

45 sc (5 rounds)

R 12 :

(13 sc, dec) * 3 (42)

R 13 :

(4 sc, dec) * 7 (35)

R 14 :

(3 sc, dec) * 7 (28)

Info :

Insert safe plastic eyes. Fix eyes between 10 and 11 rounds from the head's top. The distance between the eyes is 9 sc.

Info :

Stuff the head with fiber filler.

R 15 :

(2 sc, dec) * 7 (21)

R 16 :

(1 sc, dec) * 7 (14)

R 17 :

dec * 7 (7)

Info :

Draw the yarn through 7 loops and tighten. Cut and secure the yarn.

β€” Ears :

Info :

Use the gray plush yarn and crochet hook 4.5 mm. Make 2 details.

R 1 :

7 sc in MR (7)

R 2 :

inc * 7 (14)

R 3 :

sc (14)

R 4 :

(1 sc, inc) * 7 (21)

R 5-8 :

21 sc (4 rounds)

R 9 :

(1 sc, dec) * 7 (14)

R 10 :

14 sc, sl st

Info :

Leave the tail for sewing. Cut the yarn. Don't stuff the piece.

Info :

Fold in half and then quadruple and sew on top of the head at a distance of 1-2 cm from each other.

β€” How to Indent Amigurumi Eyes :

Info :

Use the gray cotton yarn. Take the thread. Pull it through the back of the head and pull it out above the left eye. Leave the tail on back head's part.

Info :

Pass the needle from below under the left eye and pull out under the right eye. Make sure that the yarn falls from the inside of the left eye.

Info :

Next, pass the needle from above the right eye, making sure that the thread lies on the inside of the eye. And pull out the needle in the same place behind the head.

Info :

Tighten both threads so that the eyes are sunken. Tie a knot, hide the tail inside the head.

β€” Embroidery :

Info :

Use the pink yarn and a large needle. Embroider nose as shown on photos.

Info :

Use the thin black yarn and a large needle. Embroider eyelashes as shown on photos.

Info :

Embroider eyebrows as shown on photos.

β€” Arms :

Info :

Use the gray plush yarn. Crochet hook 4.5 mm. Make 2 pieces. Do not stuff.

R 1 :

6 sc in MR (6)

R 2 :

inc * 6 (12)

R 3 :

(2 sc, inc) * 4 (16)

R 4-5 :

16 sc (2 rounds)

R 6 :

(2 sc, dec) * 4 (12)

R 7-9 :

12 sc (3 rounds)

Info :

Make sl st, cut the yarn. Don't stuff. Make 2 pieces.

β€” Body :

Info :

Use the gray plush yarn. Crochet hook 4.5 mm. Leave the tail for sewing, begin crochet without sl st. Make 24 ch, sl st in the first loop. Make a circle.

R 1 :

24 sc

R 2 :

(3 sc, inc) * 6 (30)

R 3 :

(4 sc, inc) * 6 (36)

R 4 :

(5 sc, ins) * 6 (42)

R 5 :

crochet together with arm - 7 sc, 13 sc only on the body, 7 sc together with another arm, 15 sc only on the body (42)

Info :

Crochet sc2tog on both sleeves sides to avoid holes.

R 6 :

sc2tog, crochet only on the arm - 4 sc, sc2tog, 12 sc only on the body, sc2tog, 4 sc only on the another arm, sc2tog, 14 sc only on the body (38)

R 7 :

dec, 2 sc, dec, 12 sc, dec, 2 sc, dec, 14 sc (34)

R 8 :

34 sc, ch

R 9-14 :

34 dc (6 rounds)

Info :

Sew the body to the head as shown in the photos.

Assembly Instructions

  • Insert and fix plastic eyes between rounds 10 and 11 from the head's top, leaving a spacing of 9 single crochet stitches between them.
  • Fold each ear in half, then fold again (quadruple) and sew each ear on top of the head about 1-2 cm apart using the long tail left for sewing.
  • When you reach R5 of the body, crochet the arms together with the body as directed: 7 sc together with arm, 13 sc only on the body, 7 sc together with the other arm, 15 sc only on the body to create arm openings and attach arms seamlessly.
  • After completing the body rounds, sew the body to the head around the neck opening, matching edges and using mattress or whipstitch to secure evenly.
  • Indent the eyes by passing gray cotton thread through the back of the head, pulling through above the left eye, passing under and out to create sunken eyes, then tighten both threads and hide tails inside the head.

Important Notes

  • πŸ’‘Leave a long tail for sewing on pieces such as ears and the body to make assembly secure and easier.
  • πŸ’‘Do not stuff ears or arms as instructed; stuffing will distort their intended shape and attachment.
  • πŸ’‘Use stitch markers when joining pieces and when counting rounds to keep track of increases and decreases.

This adorable Bunny Hand Puppet Amigurumi is a quick, joyful project that turns soft plush yarn into a charming playmate. Make one for storytime, gifts, or to start a cuddly collection of puppet friends. Celebrate handmade fun and creativity with every stitch! 🧢🐰✨

You ask,

we answer.

FAQs

What size will the finished piece be?

The finished hand puppet measures approximately 28 cm (11") tall when made with the recommended super bulky plush yarn and 4.5 mm hook.

Can I use different yarn weights for this pattern?

Yes, you can change yarn weight, but this will affect the final size and texture; choose an appropriate hook and expect significant size differences if you change weight.

Do I need prior crochet experience for this pattern?

This pattern is rated intermediate; you should be comfortable with basic amigurumi techniques including magic ring, increases, decreases, and crocheting pieces together.

How long does this project typically take to complete?

Most crocheters finish this project in about 5-7 hours, depending on experience and how much time you spend on embroidery and assembly.