🧢 Beautiful ✨ Detailed πŸ’ Adorable

Pooh Phone Pouch Pattern

Pooh Phone Pouch Pattern
4.7β˜… Rating
5-7 Hours Time Needed
3.7K Made This
βœ‚οΈ

Intermediate Level

Ideal for those with basic crochet experience, featuring slightly more advanced stitches and techniques to expand your skills.

⏱️

Weekend Treat

Takes 5-7 hours, making it an enjoyable project to finish over a couple of days.

✨

Stylish Touch

An elegant detail to elevate any look, combining traditional techniques with contemporary design sensibilities.

About This Pooh Phone Pouch Pattern

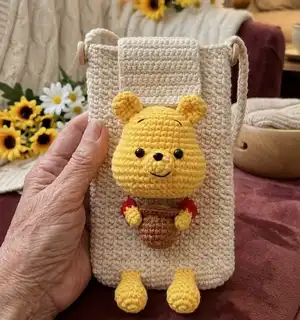
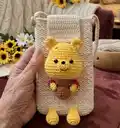
This pattern creates a textured crocheted phone pouch decorated with a small Pooh amigurumi and accessories. You will make the bag in spirals, a buttoned lid, a shoulder strap, and separate amigurumi parts to attach. Instructions include rounds for the head, ears, muzzle, legs, arms, honey pot and jars with clear finishing steps.

Pooh Phone Pouch Pattern crochet pattern - detailed view of completed project

Designed for sport weight yarn and a 2.3 mm hook, the finished pouch measures approximately 17 cm by 10 cm. The pattern uses single crochet construction worked in spirals and provides placement notes for eyes and assembly tips.

Why You'll Love This Pooh Phone Pouch Pattern

I absolutely love this pattern because it pairs a useful everyday accessory with a tiny, lovable character that brings the piece to life. I enjoy how the structured pouch and soft amigurumi combine tactile textures, making the project fun and rewarding. I love that you can customize colours and small details to create your own version of Pooh and make it uniquely yours. I also appreciate that the pattern is compact but varied β€” you practice shaping, joining, and finishing techniques all in one small project.

Pooh Phone Pouch Pattern step 1 - construction progress Pooh Phone Pouch Pattern step 2 - assembly progress Pooh Phone Pouch Pattern step 3 - details and accessories Pooh Phone Pouch Pattern step 4 - final assembly and finishing

Switch Things Up

I love how easy it is to customize this pouch by changing colors to match your wardrobe or create different characters.

I often swap the beige pouch color for pastel shades to make a softer look or bright colors for a playful version.

You can make a mini keychain version by using thinner yarn and a smaller hook to create a tiny Pooh applique.

If you want a sturdier pouch, try lining the inside with lightweight fabric or adding a thin interfacing for structure.

I sometimes replace the safety eyes with embroidered eyes for a fully handmade and child-safe option.

To change the size, adjust the foundation chain and work proportionally more or fewer rounds; larger yarn and hook gives a chunky pouch.

Try adding pockets or an inner loop for earbud storage to increase functionality for daily use.

I like to add a zipper instead of a buttoned lid for extra security when I carry my phone in a bag.

Mixing yarn texturesβ€”such as cotton for the pouch and acrylic for the amigurumiβ€”creates an interesting tactile contrast.

For gifting, embroider a name or add a small crocheted heart for a personal touch that makes the pouch extra special.

Common Mistakes & How to Fix Them

βœ— Not using a small enough hook can make the stitches loose and cause the pouch to stretch; use the recommended 2.3 mm hook and maintain consistent tension for a firm fabric. βœ— Skipping stitch counts on the bag foundation or forgetting to continue on the opposite side of the chain creates uneven edges; mark the start of the round and count stitches after Rnd 1 carefully. βœ— Forgetting to stuff the head before closing leads to a flattened shape; stuff gradually and firmly before closing Rnd 21-22 to keep the head round. βœ— Placing safety eyes too close or too far apart changes expression and fit on the pouch; place the eyes between rows 11-12, leaving 6 stitches between them as instructed. βœ— Sewing pieces without pinning or checking placement can result in crooked attachments; pin or use fabric glue to position parts before final sewing for correct alignment.

Pooh Phone Pouch Pattern

Make a charming Pooh Phone Pouch that combines a textured phone sleeve with a small Pooh amigurumi applique. You will follow step-by-step rounds for the bag, lid, strap and all Pooh parts so you can recreate the adorable design. This pattern uses sport weight yarn and a small 2.3 mm hook for neat, compact stitches. Perfect as a handmade gift or a cute accessory to carry your phone with personality.

Intermediate 5-7 Hours

Materials Needed for Pooh Phone Pouch Pattern

β€” Main Fabric

  • 01
    Sport weight yarn (Jeans from YarnArt) - main beige for pouch (approx 100g)
  • 02
    Yellow sport weight yarn - Pooh head, ears, muzzle, legs and details (approx 50g)
  • 03
    Brown sport weight yarn - honey jars and small details (approx 20g)
  • 04
    Red sport weight yarn - small amounts for Pooh arms (approx 10g)
  • 05
    Small amount of black yarn or thread for mouth and eyebrow details

β€” Tools Required

  • 01
    Crochet hook size 2.3 mm
  • 02
    Two 6 mm safety eyes
  • 03
    Two 15 mm buttons (for strap closure or decoration)
  • 04
    Polyester fiberfill for stuffing amigurumi pieces
  • 05
    Stitch markers
  • 06
    Yarn needle for sewing pieces
  • 07
    Scissors
  • 08
    Fabric glue for securing head and honey to pouch (optional)
  • 09
    Pins for assembly

Progress Tracker

0% Complete

β€” Materials :

Infos :

Yarn: sport yarn (I used Jeans from YarnArt). Hook: Size 2.3 mm. Two 6 mm safety eyes, two 15 mm button. Polyester fiberfill. Stitch markers. Size: If you use yarn as me, the phone pouch will be: Length: 17 cm Width: 10 cm

Info :

There are 2 ways to make a single crochet: v-stitch (yarn over single crochet) and x-stitch (yarn under single crochet). I use x-stitch (yarn under single crochet). Work in spirals.

β€” Bag :

Info :

Make 24 ch, start in the second ch from hook

Rnd 1 :

22 sc, 3 sc in the last stitch, continue on the other side of the foundation chain, 21 sc, inc (48)

Rnd 2 :

inc, 21 sc, 3 inc, 21 sc, 2 inc (54)

Rnd 3 :

inc, 24 sc, 3 inc, 24 sc, 2 inc (60)

Rnd 4 :

60 sc (60)

Rnd 5 :

(1 ch, skip 1 stitch, 1 sc in the next stitch)*30 (60)

Rnd 6 :

(1 sc in the space of 1 ch, 1 sc in the next stitch)*30 (60)

Info :

From here: the odd rounds (7, 9, 11, 13, 15…) will be made same round 5, the even rounds (8, 10, 12, 14, 16…) will be made same round 6. And stop after finish the 48th round.

β€” Lid of pouch :

Info :

Identify the 14 stitches in the middle of the 46th round

Rnd 1 :

14 sc, turn

Rnd 2-13 :

14 sc. Cut and weave the yarn. Sew the button into the lid of pouch.

β€” Make shoulder - strap :

Rnd 1 :

Make 3 ch, start in the second ch from hook: 2 sc, turn

Rnd 2 :

2 sc, turn

Info :

Crochet repeat 2 sc until the shoulder-strap is about 113 cm. Fasten off and weave the yarn. Sew the shoulder - strap and button into the pouch.

β€” Head :

Info :

Start in yellow

Rnd 1 :

6 sc in the magic ring (6)

Rnd 2 :

6 inc (12)

Rnd 3 :

(1 sc, inc)*6 (18)

Rnd 4 :

(inc, 2 sc)*6 (24)

Rnd 5 :

(3 sc, inc)*6 (30)

Rnd 6 :

1 sc, inc, (4 sc, inc)*5, 3 sc (36)

Rnd 7-10 :

36 sc (36)

Rnd 11 :

7 sc, 7 inc, 7 sc, 7 inc, 8 sc (50)

Rnd 12-15 :

50 sc (50)

Rnd 16 :

7 sc, dec, 10 sc, dec, 7 sc, dec, 10 sc, dec, 8 sc (46)

Rnd 17 :

7 sc, dec, 8 sc, dec, 7 sc, (dec, 8 sc)*2 (42)

Rnd 18 :

7 sc, (dec, 2 sc)*2, dec, 7 sc, (dec, 2 sc)*2, dec, 8 sc (36)

Rnd 19 :

(dec, 4 sc)*6 (30)

Rnd 20 :

(3 sc, dec)*6 (24)

Info :

Stuff the head

Rnd 21 :

12 dec (12)

Rnd 22 :

6 dec, slst. (6)

Info :

Stuff the head. Fasten off and weave the yarn.

Info :

Put in the eyes between rows 11-12, leaving 6 stitches space between them.

Info :

Use fabric glue to pin the head into the pouch.

β€” EAR (make 2) :

Info :

Start yellow

Rnd 1 :

6 sc in the magic ring (6)

Rnd 2 :

6 inc (12)

Rnd 3-4 :

12 sc (12)

Rnd 5 :

(1 sc, dec)*4, slst (8)

Info :

Fasten the yarn, leaving a long tail for sewing. Don’t stuff the ear, flatten and fold the top of the ear. Put in the ears between rows 3-7.

β€” MUZZLE :

Info :

Start in yellow

Rnd 1 :

6 sc in the magic ring (6)

Rnd 2 :

6 inc (12)

Rnd 3 :

12 sc, slst. (12)

Info :

Fasten off and leaving a long tail for sewing. Sew the nose between rows 1-3 and sew the mouth between rows 2-3 of the muzzle with black.

Info :

Put in the muzzle between rows 11-16. Sew the eyebrow between rows 5-7 with black.

β€” LEG (make 2) :

Info :

Start in yellow

Rnd 1 :

6 sc in the magic ring (6)

Rnd 2 :

6 inc (12)

Rnd 3 :

(2 sc, inc)*4 (16)

Rnd 4-5 :

16 sc (16)

Rnd 6 :

(2 sc, dec)*4 (12)

Rnd 7 :

(2 sc, dec)*3 (9)

Rnd 8-9 :

9 sc (9)

Info :

Slst and fasten the yarn, leaving a long tail for sewing. Stuff up to the 5th row of the leg. Sew the legs at row 4.

β€” ARM (make 2) :

Info :

Start in yellow

Rnd 1 :

7 sc in the magic ring (7)

Rnd 2-4 :

7 sc (7)

Info :

Change to red

Rnd 5-7 :

7 sc (7)

Info :

Slst and fasten off the yarn, leaving a long tail for sewing. Don’t stuff the arm.

β€” HONEY :

Info :

Honey: start in yellow

Rnd 1 :

7 sc in the magic ring (7)

Rnd 2 :

7 inc (14)

Info :

Slst, fasten off and weave yarn.

β€” Jars :

Info :

Jars: start in brown

Rnd 1 :

8 sc in the magic ring (8)

Rnd 2 :

8 inc (16)

Rnd 3 :

(3 sc, inc)*4 (20)

Rnd 4-6 :

20 sc (20)

Rnd 5 :

(3 sc, dec)*4 (16)

Rnd 6 :

(dec, 6 sc)*2 (14)

Info :

Stuff the jars

Rnd 7 :

working through both the front loop of the honey and the back loop of the jars: 14 inc (28). Slst, fasten off and weave the yarn.

β€” Assembling :

Item :

Sew the legs at row 4.

Item :

Use fabric glue to paste the honey into the pouch.

Item :

Sew the arms into the pouch and the honey.

Item :

Use fabric glue to paste the head into the pouch.

Assembly Instructions

  • Sew the legs at row 4.
  • Use fabric glue to paste the honey into the pouch.
  • Sew the arms into the pouch and the honey.
  • Use fabric glue to paste the head into the pouch.

Important Notes

  • πŸ’‘Work the bag in spirals and keep consistent tension to avoid gaps or stretching.
  • πŸ’‘Place safety eyes between rows 11-12 and leave 6 stitches between them for correct facial placement.
  • πŸ’‘Stuff the head firmly before closing rounds 21-22 to achieve a round shape, but do not overstuff small parts like ears or arms.
  • πŸ’‘Pin or use fabric glue to test head and honey placement on the pouch before sewing to ensure correct alignment.

This adorable Pooh Phone Pouch is a cute and functional accessory you will love making and gifting. It pairs a textured pouch with a tiny handmade Pooh for charming everyday style. Whether for yourself or a friend, this sweet project brightens any outfit and day. 🧢🐻✨

You ask,

we answer.

FAQs

What size will the finished piece be?

The finished phone pouch measures approximately 17 cm in length and 10 cm in width when using the recommended yarn and hook size.

Can I use different yarn weights for this pattern?

Yes, you can use different yarn weights, but it will change the final size; use an appropriate hook for your chosen yarn and adjust stitch counts if necessary.

Do I need prior crochet experience for this pattern?

This pattern is rated intermediate and assumes familiarity with single crochet, increases, decreases, working in spirals, and basic amigurumi assembly techniques.

How long does this project typically take to complete?

Most crocheters finish this project in about 5-7 hours, depending on experience and how much time is spent on detailed finishing and assembly.