🧶 Beautiful ✨ Detailed 💝 Adorable

Pompompurin Amigurumi Pattern

Pompompurin Amigurumi Pattern
4.2★ Rating
5-7 Hours Time Needed
3.8K Made This
✂️

Beginner Friendly Level

Perfect for those just starting their crochet journey, with clear instructions and simple techniques

⏱️

Weekend Treat

Takes 5-7 hours, making it an enjoyable project to finish over a couple of days.

🧸

Cute Companion

An adorable friend to cherish, handcrafted with love to bring comfort and joy for years to come.

About This Pompompurin Amigurumi Pattern

This pattern creates a soft, squishy Pompompurin amigurumi with a tiny beret and sweet facial details. The design is worked in simple rounds and assembled with felt features and minimal sewing. You will make individual small pieces for arms, legs, ears and a beret, then attach them to the body/head. The instructions are written to guide you step-by-step for a neat finish.
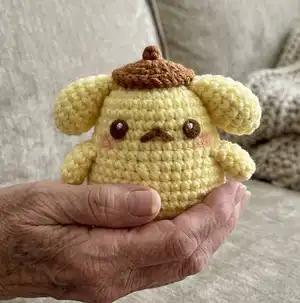
Pompompurin Amigurumi Pattern crochet pattern - detailed view of completed project

Worked in standard amigurumi techniques using magic rings, increases and decreases. Perfect as a weekend make or a heartfelt handmade gift.

Why You'll Love This Pompompurin Amigurumi Pattern

I absolutely love this pattern because it captures the sweet charm of Pompompurin in a small, approachable amigurumi. I enjoy how the simple shaping yields a very expressive, cuddly character with minimal materials. The beret and felt facial pieces are delightful finishing touches that make every doll unique. Making multiples is quick and addictive, and I always enjoy gifting them to friends who adore cute plushies.

Pompompurin Amigurumi Pattern step 1 - construction progress Pompompurin Amigurumi Pattern step 2 - assembly progress Pompompurin Amigurumi Pattern step 3 - details and accessories Pompompurin Amigurumi Pattern step 4 - final assembly and finishing

Switch Things Up

I love how easy it is to customize this Pompompurin pattern — try different colors to create friends or themed versions.

I often swap the brown beret for pastel shades to make seasonal or themed characters for holidays and gifts.

To make a mini keychain version, use a thinner yarn and smaller hook and reduce stuffing for a flat, lightweight result.

If you want a jumbo plush, use bulky yarn and a larger hook; increase stuffing and slow down shaping for the best results.

I sometimes add embroidered eyebrows or mouth details instead of felt for a softer look and machine-washable finish.

Try different eye styles: safety eyes for durability, tiny felt circles for a cute flat look, or French knots for a stitched expression.

For posable arms, insert a small wire before closing the arm and secure the wire ends inside the body so they don't poke out.

Add accessories like a tiny scarf, bag, or crocheted props to give personality and make each doll unique.

I recommend experimenting with blush intensity — a little goes a long way for a tender, charming face.

If you enjoy a fuzzy texture, swap part of the yarn for a plush or eyelash yarn for ears or body accents to add tactile contrast.

Common Mistakes & How to Fix Them

✗ Skipping the magic ring or closing it improperly will leave a hole at the start; always tighten the MR and weave the tail securely. ✗ Forgetting to stuff as you go causes gaps or lumps when shaping the head; add stuffing gradually to keep even shape. ✗ Counting rounds incorrectly can change the whole silhouette; mark the first stitch of each round and recount after increases or decreases. ✗ Pulling stitches too tight on plush yarn makes stiff fabric; maintain gentle, even tension for soft, squishy texture.
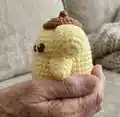
Pompompurin Amigurumi Pattern

Create an adorable Pompompurin amigurumi with clear, photo-friendly instructions and simple shaping. This pattern walks you through each piece — body, head, arms, ears, legs, beret and tail — with easy-to-follow rounds and assembly guidelines. You'll finish a squishy, gift-ready plush that makes a charming handmade keepsake. Perfect for gifting or decorating your space with a cute, cafe-inspired character.

Beginner Friendly 5-7 Hours

Materials Needed for Pompompurin Amigurumi Pattern

— Main Fabric

  • 01
    Yellow yarn - main color for body, arms, ears, legs and tail
  • 02
    Brown yarn - for beret and facial felt color accents (use brown felt for eyes and mouth)
  • 03
    Optional: small amount of pink blush for rosy cheeks

— Tools Required

  • 01
    Crochet hook (see yarn label for recommended hook size)
  • 02
    Tapestry needle for sewing and weaving ends
  • 03
    Scissors and glue
  • 04
    Stuffing (polyester fiberfill)
  • 05
    Brown felt for eyes and mouth
  • 06
    Optional: pink blush for cheeks
  • 07
    Optional: safety pins for pinning pieces in place before sewing

Progress Tracker

0% Complete

— Abbreviations :

Infos :

R - Round. MR - Magic Ring. ch - chain. sc - single crochet. inc - increase. dec - decrease. slst - slip stitch. st(s) - stitch(es).

— Materials :

Infos :

Yellow yarn for main body and parts. Brown yarn for beret and accents. Crochet hook (refer to yarn label). Tapestry needle. Scissors and glue. Stuffing. Brown felt for eyes and mouth. Optional: pink blush for rosy cheeks.

— Arms and Ears :

Arms (P1) :

Use yellow yarn.

Round 1 :

5sc in a MR (5)

Round 2-4 :

5sc (3 rounds) (5)

Info :

Do not stuff, fasten off and leave a long tail.

Ears (P2) :

Use yellow yarn.

Round 1 :

5sc in a MR (5)

Round 2 :

(inc) x 5 (10)

Round 3 :

(sc, inc) x 5 (15)

Round 4 :

15sc (15)

Round 5 :

(3sc, dec) x 3 (12)

Round 6 :

12sc (12)

Info :

Stuff as you go.

Round 7 :

(2sc, dec) x 3 (9)

Round 8 :

(sc, dec) x 3 (6)

Info :

Flatten the opening and crochet 3sc through both layers of sc. Fasten off and leave a long tail.

— Legs, Tail, Beret :

Legs + Tail (P3) :

Use yellow yarn.

Round 1 :

6sc in a MR (6)

Round 2 :

6sc (6)

Info :

Fasten off and leave a long tail.

Beret (P4) :

Use brown yarn.

Round 1 :

6sc in a MR (6)

Round 2 :

(inc) x 6 (12)

Round 3 :

(sc, inc) x 6 (18)

Round 4 :

(2sc, inc) x 6 (24)

Round 5 :

24slst (24)

Info :

Fasten off and leave a long tail.

Info :

We will now work on the beret's stalk: Make ch4. Start crocheting on the 3rd ch from hook: 2sc. Fasten off and leave a long tail. Sew the stalk on the beret (in the middle of MR).

— Body and Head :

Infos :

The body and head will be crocheted in one go, starting from the body to the head. We will start with a chain. Stitches are worked around both sides of the foundation chain.

Let's Start :

Ch9, start crocheting on the 2nd ch from hook.

Round 1 :

inc, 6sc, 3sc in the last ch. Continue on the other side of the foundation chain: 7sc (18)

Round 2 :

2inc, 6sc, 3inc, 6sc, inc (24)

Round 3 :

(sc, inc) x 2, 6sc, (sc, inc) x 3, 7sc, inc (30)

Round 4 :

(2sc, inc) x 2, 6sc, (2sc, inc) x 3, 8sc, inc (36)

Round 5-6 :

36sc (2 rounds) (36)

Round 7 :

(5sc, inc) x 6 (42)

Round 8-10 :

42sc (3 rounds) (42)

Round 11 :

(5sc, dec) x 6 (36)

Round 12-14 :

36sc (3 rounds) (36)

Round 15 :

(4sc, dec) x 6 (30)

Round 16-18 :

30sc (3 rounds) (30)

Info :

Stuff as you go.

Round 19 :

(3sc, dec) x 6 (24)

Round 20 :

(sc, dec) x 8 (16)

Round 21 :

8dec (8)

Info :

Fasten off and leave a long tail. Sew the hole closed and weave in the yarn tails.

— Eyes and Mouth :

Infos :

Use brown felt for eyes and mouth pieces.

Eyes :

I cut my felt around 2sts high, you can cut it into whatever shape or size you like. Make two.

Mouth :

I cut my felt around 3sts wide, you can cut it into whatever shape or size you like.

— Assembly :

Info :

You can pin the parts with safety pins before sewing.

Instruction :

Sew the legs at the bottom side of the body.

Instruction :

Sew the arms at the side of the body (around R12-13).

Instruction :

Sew the ears at the side of the head (around R19-20).

Instruction :

Sew the beret on the top of the head.

Instruction :

Sew the tail at the back (around R7).

Instruction :

Optional: Sew a small 'x' below the tail.

Instruction :

Glue the eyes and mouth on the face.

Instruction :

Use pink blush for the rosy cheeks.

Instruction :

Weave in all the yarn tails and you're done!

Assembly Instructions

  • You can pin the parts with safety pins before sewing to check placement and symmetry.
  • Sew the legs at the bottom side of the body, spacing them evenly so the toy stands upright.
  • Sew the arms at the side of the body around rounds 12-13, angling them slightly forward for a natural pose.
  • Sew the ears at the side of the head around rounds 19-20 and shape them so they sit symmetrically.
  • Sew the beret on the top center of the head and attach the stalk in the middle of the MR.
  • Sew the tail at the back around round 7, and optionally sew a small 'x' below the tail for a decorative stitch.
  • Glue or sew the felt eyes and mouth onto the face, then add pink blush for rosy cheeks and weave in all yarn tails.

Important Notes

  • 💡Work with consistent tension and check gauge visually to keep the amigurumi proportionate.
  • 💡Stuff the head and body gradually while shaping to avoid lumps and to maintain the silhouette.
  • 💡Use safety pins to pin pieces in place before sewing to ensure even placement and symmetry.

This adorable Pompompurin is sweet, squishy, and perfect for gifting or display. 🧶 Follow every round carefully and enjoy the mindful process of creating a cute companion. 🧸 Share with friends or keep it as a cheerful handmade keepsake — happy crocheting! ✨

You ask,

we answer.

FAQs

What size will the finished piece be?

The finished amigurumi measures approximately 12-15 cm tall when using recommended yarn and a suitable hook; exact size may vary with yarn weight and tension.

Can I use different yarn weights for this pattern?

Yes, you can use different yarn weights, but this will change the final size. Choose an appropriate hook size for your yarn and adjust stuffing and sewing accordingly.

Do I need prior crochet experience for this pattern?

This pattern is rated beginner friendly, so basic knowledge of magic ring, single crochet, increases and decreases is all you need to complete it successfully.

How long does this project typically take to complete?

Most crocheters finish this project in about 5-7 hours, depending on experience, assembly time, and whether you customize details like felt features.