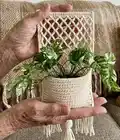
🧢 Beautiful ✨ Detailed πŸ’ Adorable

Pocket Wall Hanging Pattern

Pocket Wall Hanging Pattern
4.2β˜… Rating
5-7 Hours Time Needed
2.8K Made This
βœ‚οΈ

Intermediate Level

Ideal for those with basic crochet experience, featuring slightly more advanced stitches and techniques to expand your skills.

⏱️

Weekend Treat

Takes 5-7 hours, making it an enjoyable project to finish over a couple of days.

🏑

Cozy Accent

A warm touch for your space that transforms ordinary corners into inviting nooks filled with handmade charm.

About This Pocket Wall Hanging Pattern

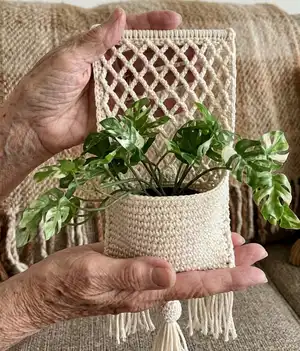
This pattern creates a textured Pocket Wall Hanging featuring a diamond stitch panel and a functional front pocket for small items or plants. The design includes step-by-step instructions for the diamond stitch, pocket shaping, tassels, and finishing. The finished piece measures approximately 8" x 17" with tassels and uses worsted weight yarn for a sturdy, modern look.

Pocket Wall Hanging Pattern crochet pattern - detailed view of completed project

You'll work front post treble techniques to create the diamond texture and finish with simple tassels and a wooden dowel hanger. The pattern includes a materials list, gauge, and helpful tips for assembly and hanging.

Why You'll Love This Pocket Wall Hanging Pattern

I absolutely love this pattern because it transforms simple stitches into a stunning textured wall pocket that is both decorative and functional. I enjoy the rhythmic motion of the FPtr and FPtr2tog stitches as they build the diamond lattice β€” it feels meditative and rewarding. I love that the pocket is roomy enough for a small plant or mail, and the tassels add a playful finishing touch. I also appreciate that this project is approachable yet interesting, offering a satisfying weekend-long project with a beautiful result.

Pocket Wall Hanging Pattern step 1 - construction progress Pocket Wall Hanging Pattern step 2 - assembly progress Pocket Wall Hanging Pattern step 3 - details and accessories Pocket Wall Hanging Pattern step 4 - final assembly and finishing

Switch Things Up

I love changing colors to create different moods β€” try gradient or ombre shades for a modern look.

I often swap the worsted yarn for a bulkier yarn and larger hook to make a chunky, more dramatic wall pocket.

For a delicate, mini version I use lighter fingering weight yarn with a smaller hook and create a tiny pocket for jewelry.

I sometimes add macrame-style knots or beads between diamond rows for extra texture and interest.

Try lengthening or shortening the pocket depth by adding or removing rows in the pocket section to fit different items.

I like to replace the wooden dowel with a painted branch or metal rod for a rustic or industrial finish respectively.

Change tassel length and quantity to alter the visual weight β€” more, longer tassels make it boho; fewer, shorter tassels keep it minimal.

I also experiment with lining the pocket with fabric for heavier items or to create a clean interior finish.

Pair two or three smaller hangings together in a gallery arrangement for a high-impact display that feels custom and layered.

I sometimes embroider small motifs (leaves or initials) onto the pocket face for personalization and handmade charm.

Try mixing fiber types β€” a cotton blend for the pocket with a fluffier wool for the diamond panel gives lovely contrast in texture.

If you want to make it more functional, add small internal stitches or loops inside the pocket to hold plant pots or keys in place securely.

Common Mistakes & How to Fix Them

βœ— Skipping the turning chain instructions can change stitch height and distort rows; always work the correct ch 1 for sc/FPtr rows or ch 2 for dc rows and do not count them as stitches. βœ— Forgetting to work FPtr2tog correctly will break the diamond pattern; follow the FPtr2tog sequence carefully and keep track of where you skip stitches while working the 'V' shape. βœ— Not working into the back bump for the foundation chain can make the edge uneven; start in the 2nd ch from the hook and work into the back bump of each ch for a clean edge. βœ— Failing to fold and sew the pocket layers precisely will cause misalignment; pin or use a tapestry needle and sew the two layers together along the edges to create a neat pocket. βœ— Overstuffing the pocket with heavy items can sag the hanging and pull at the wall; use light items or secure the sides to the wall with hidden tacks for extra support.

Pocket Wall Hanging Pattern

Make a stylish pocket wall hanging to display small plants or treasured items. This pattern guides you through a textured diamond panel, a sturdy pocket, and decorative tassels. Youll get clear stitch instructions, materials list, and finishing tips to create a beautiful handmade accent for your home. Perfect for gifting or adding a cozy touch to any wall.

Intermediate 5-7 Hours

Materials Needed for Pocket Wall Hanging Pattern

β€” Main Fabric

  • 01
    Worsted weight yarn (size 4) - 225 yards light grey (Craftsmart Value in Mushroom) - main color

β€” Tools Required

  • 01
    Crochet hook size 5.0 mm
  • 02
    Yarn needle
  • 03
    Wooden dowel
  • 04
    A small brass or wooden bead
  • 05
    Tacks or pins (optional, for securing to the wall)

Progress Tracker

0% Complete

β€” Main Panel :

Round 1 :

row 1: ch 30. Starting in the 2nd ch from the hook, sc into the back bump of each ch (29)

Info :

Turning chain instructions: At the start of each row, ch 1 for sc rows and FPtr rows, ch 2 for dc rows. Do not count the turning chains as stitches.

Info :

diamond stitch begins: Video Note: After completing a FPtr or FPtr2tog, make sure you skip a st before working sc 3.

Round 2 :

row 2: dc into each st (29)

Round 3 :

row 3: Work a FPtr into the 2nd st from the right of row 1. [Skip a st and then sc into the next 3 sts of row 2. FPtr2tog by working into the same st as the last FPtr st worked, skip the next 3 sts of row 1, and then work into the 4th st] 6 times. When you have 5 sts left in the row, skip a st and then sc into the next 3 sts of row 2. FPtr into the same st as the last FPtr worked from row 1, but stop before completing the stitch (with 2 loops left on the hook). Work a sl st by inserting your hook into the last stitch of the row, pulling up a loop and then pulling that loop through both loops on the hook (29)

Round 4 :

row 4: dc into each st (29)

Round 5 :

row 5: sc 2. FPtr2tog by working around the first FPtr from row 3 and then around the following FPtr2tog (around the entire upside down "V"). [Skip a st and then sc into the next 3 sts of row 4. FPtr2tog by working around the last FPtr2tog from row 3 that you just worked around and then around the following FPtr2tog from row 3] 5 times. When there are 7 stitches left in the row, skip a st and then sc into the next 3 sts of row 4. FPtr2tog by working around the last FPtr2tog from row 3 that you just worked around and then around the final FPtr from row 3. Skip a st and then sc into the last 2 sts (29)

Round 6 :

row 6: dc into each st (29)

Round 7 :

row 7: FPtr around the first FPtr2tog from row 5. [Skip a st and then sc into the next 3 sts of row 6. FPtr2tog by working around the last FPtr2tog you just worked around and then around the following FPtr2tog from row 5] 6 times. When you have 5 sts left in the row, skip a st and then sc into the next 3 sts of row 6. FPtr around the last FPtr2tog that you just worked around from row 5, but stop before completing the stitch (with 2 loops left on the hook). Work a sl st by inserting your hook into the last stitch, pulling up a loop and then pulling that loop through both loops on the hook (29)

Round 8-39 :

rows 8-39: repeat the same sequence [rows 4-7] 8 times (29)

Info :

*pattern continues on next page...

β€” Pocket :

Round 40-42 :

row 40-42: sc into the BLO of each st (29)

Round 43 :

row 43: [sc 9, inc, sc 9, inc, sc 9] into the BLO of each st (31)

Round 44 :

row 44: sc into the BLO of each st (31)

Round 45 :

row 45: [sc 10, inc, sc 9, inc, sc 10] into the BLO of each st (33)

Round 46 :

row 46: sc into the BLO of each st (33)

Round 47 :

row 47: [sc 10, inc, sc 11, inc, sc 10] into the BLO of each st (35)

Round 48 :

row 48: sc into the BLO of each st (35)

Round 49 :

row 49: [sc 17, inc, sc 17] into the BLO of each st (36)

Round 50 :

row 50: sc into the BLO of each st (36)

Round 51 :

row 51: [sc 17, inc, sc 18] into the BLO of each st (37)

Round 52-67 :

rows 52-67: sc into the BLO of each st (37)

Infos :

fasten off and weave in ends. fold the pocket section up to overlap the diamond pattern. using your yarn needle, create the pocket by sewing the two layers together along the edges. fasten off and weave in ends.

Info :

NOTES: This pocket wall hanging is not meant for very large or heavy items. If the items inside your pocket are a bit too heavy, use tacks to pin either edge of the wall hanging to the wall, placing the tacks just below the inside of the pocket to hide them. This will make the wall hanging a bit more flush with the wall and add stability.

β€” Tassels :

Tassels (P1) :

cut 30 strands of 5.5 inch yarn, and 7 strands of 8.5 inch yarn. use 2 strands of the 5.5 inch yarn for each tassel. There will be 15 tassels placed on every other stitch, starting in one corner. to make a tassel, fold the 2 strands in half. Insert your hook up through the back of the stitch and pull up a loop of the strands. Pull the ends through the loop and tighten. make a tassel using one strand of the 8.5 inch yarn on top of each of the 7 center tassels you already created. take one strand from each long tassel (or both if your bead is larger), and thread through the bead. Make a knot underneath the bead if you need to. trim the remaining long strands not used in the bead to make them level with the shorter strands. attach the dowel to the top edge by threading the yarn around the dowel and through each stitch with a yarn needle. weave in any loose ends. TIP: To keep the yarn used for hanging your finished work on the wall from pinching the corners of your work, secure the yarn to each end of the wooden dowel.

β€” Stitch Techniques & Notes :

Info :

Recommended supplies: 5 mm crochet hook. 225 yds of light grey yarn (size 4) (Craftsmart Value in Mushroom). Yarn needle. Wooden dowel. A small brass or wooden bead. 2"x2" Gauge: 8 stitches x 6 rows (diamond stitch), 9 stitches x 11 rows (pocket). Dimensions: 8" x 17" (with tassels).

Info :

Pattern Key: ch = chain. sc = single crochet. BLO = back loop only. inc = increase. FPtr = front post treble crochet. FPtr2tog = front post treble crochet two together. st = stitch. sl st = slip stitch.

Info :

FPtr: 1: YO twice and inserting from the front, weave hook behind and around the post of the stitch. 2: YO and pull up a loop. 3: YO and pull through the first 2 loops on the hook. 4: YO and pull through the next 2 loops on the hook. 5: YO and pull through the last 2 loops on the hook.

Info :

FPtr2tog (Makes an upsidedown "V"): 1: Work a FPtr steps 1-4 around the post of the first required st, leaving 2 loops left on the hook. 2: YO twice and weave hook around the post of the next required stitch. 3: YO and pull up a loop. 4: YO and pull through first 2 loops on the hook. 5: YO and pull through next 2 loops on the hook. 6: YO and pull through all 3 loops left on the hook.

Assembly Instructions

  • Fold the pocket section up to overlap the diamond pattern, aligning the edges evenly before sewing the layers together.
  • Using your yarn needle, sew the pocket by stitching the two layers together along the side edges so the pocket opening remains at the top.
  • Attach the wooden dowel to the top edge by threading the yarn around the dowel and through each stitch with a yarn needle, then secure and weave in ends.
  • Add tassels by inserting tassel loops through the fabric edge every other stitch, attach center long tassels with a bead threaded through the long strands, knotting underneath the bead if needed.

Important Notes

  • πŸ’‘Use the turning chain guidance: ch 1 for sc and FPtr rows, ch 2 for dc rows, and do not count turning chains as stitches.
  • πŸ’‘This pocket wall hanging is not meant for very large or heavy items; use hidden tacks under the pocket to secure the edges to the wall for extra stability.
  • πŸ’‘Fasten off and weave in ends after finishing the pocket section and after attaching tassels and the dowel to ensure a clean finish.

This Pocket Wall Hanging pattern shows you how to combine texture and function into a beautiful wall accent. Create a cozy display for small plants, keys, or mail with a textured diamond panel and roomy front pocket. Add playful tassels and a wooden dowel for a modern, handmade touch! 🧢✨

You ask,

we answer.

FAQs

What size will the finished piece be?

The finished wall hanging measures approximately 8" x 17" including tassels, when worked to the specified gauge.

Can I use a different yarn weight or hook size?

Yes, you can change yarn weight and hook size, but this will change the final dimensions and gauge; swatch first to adjust proportions and stitch counts as needed.

How are the tassels attached and finished?

Tassels are formed from folded strands pulled through the fabric edge and tightened; center long strands are threaded through a bead and knotted underneath for decoration.

Do I need experience with front post stitches?

This pattern uses FPtr and FPtr2tog techniques to create the diamond lattice and is best suited for crocheters familiar with front post stitches or willing to learn those steps provided in the pattern.