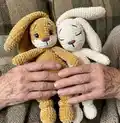
About This Plush snuggler BUNNY Amigurumi Pattern
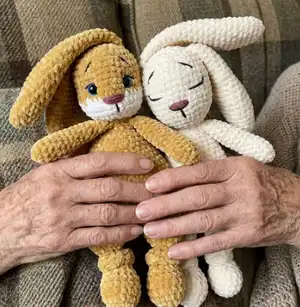
This pattern creates a plush snuggler bunny approximately 41 cm / 16" tall using plush chenille yarn. It includes full, round-by-round instructions for legs, body, arms, ears, tail and head with clear stitch counts. You can use safety eyes or embroider the eyes, nose and brows for a child-safe toy. The design is built in spiral rounds and finished with simple embroidery details for personality.
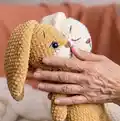
Designed to use chunky plush yarn for a soft, cuddly texture, this pattern shows assembly steps and finishing touches. Photo references and placement tips for eyes and embroidery are included to help you achieve the best expression.
Why You'll Love This Plush snuggler BUNNY Amigurumi Pattern
I absolutely love this pattern because the plush chenille yarn creates an irresistibly soft toy that kids and adults will hug right away. I enjoy the combination of simple amigurumi shaping with a little embroidery work to give the face a gentle personality. The pattern is flexible — I often experiment with color placement to make each bunny unique. Sewing the parts together and seeing the character appear is one of my favorite parts of the process.
Switch Things Up
I love how easy it is to customize this pattern by changing colors — try a pastel palette for a nursery-friendly bunny or bright, bold colors for a playful look.
You can make a mini version for a keychain by using thinner yarn and a smaller hook, or go larger with bulky yarn for a big cuddle buddy.
I often add a tiny crocheted scarf or bow to personalize each bunny and give it a seasonal or gift-ready look.
Try embroidering different facial expressions: move the eyes or change the brow angle to create sleepy, surprised, or happy bunnies.
If you prefer posable limbs, consider adding a length of craft wire inside the arms before stuffing to gently pose the arms.
I sometimes mix yarn textures — plush body with cotton inner ears — for a subtle contrast that reads well in photographs.
Swap safety eyes for embroidered eyes if you need a completely child-safe toy; the pattern includes placement guidance to help you stitch them accurately.
To make siblings or a set, vary the head color only, or change ear length and tail size for visual interest across toys.
I recommend trying different stuffing amounts if you want a floppy lovey versus a more structured toy—less stuffing makes a softer, more cuddly snuggler.
For gifts, stitch a small hanging loop into the top of the head or add a removable outfit so the bunny can be dressed and displayed.
Common Mistakes & How to Fix Them
✗ Skipping stitch markers during the assembly and body joining can lead to misaligned pieces; use markers to keep track of the start of the round and the joining points.
✗ Forgetting to stuff gradually will result in lumps or flat areas; add filler slowly and shape as you go to maintain smooth, even curves.
✗ Pulling stitches too tight on plush yarn can distort the texture and make sewing difficult; keep a relaxed tension and practice on a swatch if needed.
✗ Placing safety eyes too high or too low changes the expression dramatically; count stitches carefully and check placement between rounds 10 and 11 before securing.
✗ Cutting the yarn too early when making two legs will prevent joining correctly; make the second leg without cutting the thread until instructed for the assembling round.