🧶 Beautiful ✨ Detailed 💝 Adorable

Plush snuggler BUNNY Amigurumi Pattern

Plush snuggler BUNNY Amigurumi Pattern
4.3★ Rating
5-7 Hours Time Needed
1.2K Made This
✂️

Intermediate Level

Ideal for those with basic crochet experience, featuring slightly more advanced stitches and techniques to expand your skills.

⏱️

Weekend Treat

Takes 5-7 hours, making it an enjoyable project to finish over a couple of days.

🧸

Cute Companion

An adorable friend to cherish, handcrafted with love to bring comfort and joy for years to come.

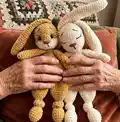
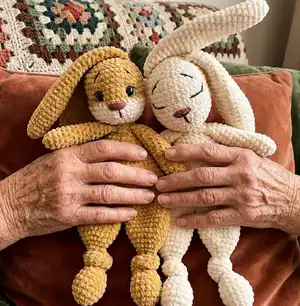
About This Plush snuggler BUNNY Amigurumi Pattern

This pattern creates a plush snuggler bunny approximately 41 cm / 16 in tall, using chunky plush yarn for a soft cuddly finish. The design uses simple amigurumi shaping worked in spiral rounds and includes instructions for embroidery details. It features separate parts—legs, body, arms, head, ears and tail—and clear assembly steps.

Plush snuggler BUNNY Amigurumi Pattern crochet pattern - detailed view of completed project

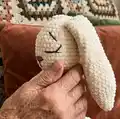
Worked predominantly in single crochet with increases and decreases for shaping, the pattern includes placement notes for safety eyes and embroidered facial details. Youll find step-by-step rounds and helpful finishing instructions to complete a beautiful handmade toy.

Why You'll Love This Plush snuggler BUNNY Amigurumi Pattern

I absolutely love this pattern because the plush yarn makes the bunny irresistibly soft and huggable. I enjoy how the simple rounds transform into a charming character with personality through embroidery and small details. Sewing the parts together and adding the tiny tail and knotted legs is a satisfying finishing touch that makes the toy feel handmade and thoughtful. I love sharing this design because it is both comforting to make and makes a perfect gift for children or a sweet nursery decoration.

Plush snuggler BUNNY Amigurumi Pattern step 1 - construction progress Plush snuggler BUNNY Amigurumi Pattern step 2 - assembly progress Plush snuggler BUNNY Amigurumi Pattern step 3 - details and accessories Plush snuggler BUNNY Amigurumi Pattern step 4 - final assembly and finishing

Switch Things Up

I love how easy it is to customize this bunny by changing yarn colors — swap the main and secondary colors for a two-tone effect or make the whole bunny one color for a minimalist look.

To change the finished size, experiment with yarn weight and hook size: bulky yarn with a larger hook makes a chunkier cuddly bunny, while sport or DK yarn with a smaller hook makes a smaller, more detailed doll.

I often add embroidered cheeks or freckles with contrasting thread to give the face extra personality and warmth.

Swap safety eyes for embroidered eyes to make the toy safer for babies, using dark thread to stitch the eye shapes and highlights.

Try adding tiny crocheted clothes, a scarf, or a removable hat to create seasonal outfits or gifts that match the recipient.

For a posable version, consider threading thin floral wire through the arms so they can be bent into different positions — secure the wire ends inside the body so they dont poke out.

If you want a weighted bottom so the bunny sits better, add a small bag of plastic pellets inside the lower body before stuffing the rest of the toy.

I sometimes add surface embroidery accents on the body or ears to create a textured pattern — use simple backstitching or French knots to keep it subtle and sweet.

Change the nose color or shape to create different expressions — a smaller nose or a triangular embroidered nose gives a very different look.

Play with stitch tension and stuffing levels to affect the firmness and drape of the finished toy; tighter tension and more stuffing yields a firmer, more sculpted bunny, while loose tension makes it softer and squishier.

Common Mistakes & How to Fix Them

✗ Skipping stitch counting during increases and decreases will create uneven shaping; count stitches at the end of each round to ensure you match the pattern tally. ✗ Forgetting to stuff gradually leads to lumps and a misshapen head or body; add stuffing in small amounts while shaping and check the contour frequently. ✗ Attaching safety eyes too early or too close together can alter facial placement; follow the placement note and attach eyes between rounds 10 and 11 leaving 8 stitches between them. ✗ Not hiding or securing thread ends can cause loose stitches later; weave in ends inside the head or body securely and knot where appropriate before trimming.

Plush snuggler BUNNY Amigurumi Pattern

Make a soft, cuddly Plush Snuggler Bunny to gift or keep. This pattern walks you through each part — legs, body, arms, head, ears and tail — with clear rounds and finishing tips. Youll love the plush yarn texture and gentle shaping that create a snuggly companion. Perfect for makers who enjoy detailed assembly and cute embroidered features.

Intermediate 5-7 Hours

Materials Needed for Plush snuggler BUNNY Amigurumi Pattern

— Main Fabric

  • 01
    Wolans Yarns BUNNY BABY plush yarn 100g / 120m (131yds) - Main color (I used shade 100-18) - 2 skeins recommended
  • 02
    Wolans Yarns BUNNY BABY plush yarn 100g / 120m (131yds) - Secondary color for head (I used shade 100-02) - small amount (use one skein if you want a contrasting head)
  • 03
    If making the toy with one color you need 2 skeins of the same yarn
  • 04
    Yarn analogues: Yarn Art DOLCE (100g / 120m), Premier Yarns PARFAIT CHUNKY (100g / 120m), Katia BAMBI (100g / 120m), King Cole YUMMY (100g / 120m), Universal Yarn BELLA CHENILLE (100g / 120m), Cygnet JELLY CHUNKY CHENILLE (100g / 120m)

— Tools Required

  • 01
    Crochet hook size 4.0 mm (G6)
  • 02
    Toy filling or scraps of fabric or yarn for stuffing
  • 03
    Stitch markers
  • 04
    Tapestry needle for sewing and weaving ends
  • 05
    Scissors
  • 06
    Thread for sewing details
  • 07
    Rose/pink thread for embroidery nose
  • 08
    16 mm toy safety eyes OR dark thread for embroidered eyes
  • 09
    Pins for assembly (optional)

Progress Tracker

0% Complete

— LEGS (make 2) :

Info :

Use the main color yarn. Magic ring.

Round 1 :

6sc inside MR (6)

Round 2 :

6inc (12)

Round 3 :

(1sc, inc) x6 (18)

Round 4-6 :

18sc (18)

Round 7 :

(4sc, dec) x3 (15)

Round 8 :

(3sc, dec) x3 (12)

Info :

Add some filler.

Round 9 :

(2sc, dec) x3 (9)

Round 10 :

(1sc, dec) x3 (6)

Round 11-25 :

6sc (6)

Round 26 :

(1sc, inc) x3 (9)

Round 27 :

(2sc, inc) x3 (12)

Round 28 :

(3sc, inc) x3 (15)

Round 29 :

(4sc, inc) x3 (18)

Round 30 :

(5sc, inc) x3 (21)

Round 31 :

(6sc, inc) x3 (24)

Rounds 32-36 :

24sc (24)

Info :

Cut the yarn. Make the second leg in the same way, but don’t cut the thread at the end.

— BODY :

Assembling round 1 :

join the 2nd leg with 1st leg (insert hook and make sc in the point where stitch 24 of the last round ended), 23sc of 1st leg, join with the leg 2 (insert hook and make sc in the point where stitch 24 of last round ended), 23sc of 2nd leg (48)

Rounds 2-5 :

48sc (48)

Round 6 :

(6sc, dec) x6 (42)

Rounds 7-8 :

42sc (42)

Round 9 :

(5sc, dec) x6 (36)

Rounds 10-11 :

36sc (36)

Round 12 :

(4sc, dec) x6 (30)

Rounds 13-14 :

30sc (30)

Round 15 :

(3sc, dec) x6 (24)

Rounds 16-17 :

24sc (24)

Round 18 :

(2sc, dec) x6 (18)

Rounds 19-20 :

18sc (18)

Round 21 :

(1sc, dec) x6 (12), sl st.

Info :

Cut the yarn. Make knots on the legs.

— ARMS (make 2) :

Info :

Use the main color yarn. Magic ring.

Round 1 :

6sc inside MR (6)

Round 2 :

(1sc, inc) x3 (9)

Round 3 :

(2sc, inc) x3 (12)

Rounds 4-6 :

12sc (12)

Round 7 :

10sc, dec (11)

Round 8 :

9sc, dec (10)

Rounds 9-16 :

10sc (10)

Info :

Fold and crochet the edges together 5sc. Cut the yarn.

Info :

Make the second arm in the same way in rounds 1-6.

Round 7 :

dec, 10sc (11)

Round 8 :

dec, 9sc (10)

— HEAD :

Info :

Start with secondary color yarn. Magic ring.

Round 1 :

6sc inside MR (6)

Round 2 :

6inc (12)

Round 3 :

(1sc, inc) x6 (18)

Round 4 :

(2sc, inc) x6 (24)

Round 5 :

(3sc, inc) x6 (30)

Round 6 :

(4sc, inc) x6 (36)

Rounds 7-8 :

36sc (36)

Info :

Change yarn to the main color.

Rounds 9-15 :

36sc (36)

Info :

If you use the safety eyes, attach them between rounds 10 and 11 (leave 8 stitches between the eyes).

Round 16 :

(4sc, dec) x6 (30)

Round 17 :

(3sc, dec) x6 (24)

Info :

Fill the head with filler.

Round 18 :

(2sc, dec) x6 (18)

Round 19 :

(1sc, dec) x6 (12)

Info :

Add more filler to the head.

Round 20 :

6dec (6)

Info :

Cut the yarn, pull the hole. Hide the end of the thread inside the head.

— EARS (make 2) :

Info :

Use the main color yarn. Magic ring.

Round 1 :

6sc inside MR (6)

Round 2 :

(1sc, inc) x3 (9)

Round 3 :

(2sc, inc) x3 (12)

Round 4 :

(3sc, inc) x3 (15)

Round 5 :

(4sc, inc) x3 (18)

Round 6 :

(5sc, inc) x3 (21)

Round 7 :

(6sc, inc) x3 (24)

Rounds 8-14 :

24sc (24)

Round 15 :

(6sc, dec) x3 (21)

Rounds 16-17 :

21sc (21)

Round 18 :

(5sc, dec) x3 (18)

Rounds 19-20 :

18sc (18)

Round 21 :

(4sc, dec) x3 (15)

Rounds 22-23 :

15sc (15)

Round 24 :

(3sc, dec) x3 (12)

Rounds 25-26 :

12sc (12)

Info :

Fold and crochet the edges together 6sc. Cut the yarn.

— TAIL :

Info :

Use the main color yarn. Magic ring.

Round 1 :

6sc inside MR (6)

Round 2 :

6inc (12)

Round 3 :

12sc (12)

Round 4 :

(2sc, dec) x3 (9)

Info :

Cut the yarn.

— FINISHING THE TOY :

Step 1 :

Sew the head to the body. Sew the arms to the body, leave 4 stitches between the arms. Sew the tail to the back.

Step 2 :

Sew the ears to the head between rounds 17 and 18.

Step 3 :

Embroider the nose with pink thread between rounds 8 and 9. I got a nose 5 stitches wide. You can use any yarn you have (plush or cotton or acrylic). Hide the end of the thread inside the head.

Step 4 :

Embroider the nose, the eyelashes and the brows with dark thread.

Info :

If you don’t use the safety eyes, embroidery the eyes, the nose and the brows with dark thread.

Step 5 :

Tighten the muzzle with the thread of the main color. 1 -> 2 -> 3 -> 4 -> 5 -> 6 -> 7 -> 8

Assembly Instructions

  • Sew the head to the body. Sew the arms to the body, leave 4 stitches between the arms. Sew the tail to the back.
  • Sew the ears to the head between rounds 17 and 18 for correct placement and balance.
  • Attach safety eyes between rounds 10 and 11 leaving 8 stitches between the eyes, or embroider eyes with dark thread if not using safety eyes.
  • Embroider the nose with pink thread between rounds 8 and 9 (about 5 stitches wide) and embroider eyelashes and brows with dark thread, hiding thread ends inside the head.
  • Tighten the muzzle using main color thread following the sequence 1 -> 2 -> 3 -> 4 -> 5 -> 6 -> 7 -> 8 to shape the snout.

Important Notes

  • 💡Use stitch markers to keep track of the start of each round since the toy is crocheted in a continuous spiral without joining rounds.
  • 💡Attach safety eyes between rounds 10 and 11, leaving 8 stitches between the eyes to keep facial proportions accurate.
  • 💡Stuff progressively and evenly, especially the head, to avoid lumps — add more filler after round 17 and before closing round 20.
  • 💡Fold and crochet ear and arm edges together as instructed for a neat finish, and make knots on the legs after assembling the body.
  • 💡Hide and secure all thread ends inside parts to prevent unraveling and to keep the finished toy safe for handling.

This Plush Snuggler Bunny pattern brings soft plush yarn to life with simple shaping and sweet embroidered details. Whether youre making it as a cuddly friend or a special handmade gift, the texture and finish are irresistibly cozy. Happy crocheting — enjoy every stitch and cuddle! 🧶🤗

You ask,

we answer.

FAQs

What size will the finished piece be?

The finished snuggler bunny measures approximately 41 cm / 16 in tall when using the recommended plush yarn and 4.0 mm hook.

Can I use different yarn weights for this pattern?

Yes, you can use different yarn weights, but the final size will change; choose a hook appropriate to your yarn and expect size and texture differences.

Do I need prior crochet experience for this pattern?

This pattern is rated intermediate, so basic experience with single crochet, increases and decreases, and sewing pieces together is recommended.

How long does this project typically take to complete?

Most crocheters complete this project in 5-7 hours, though time may vary based on experience, yarn choice and finishing details like embroidery.