๐Ÿงถ Beautiful โœจ Detailed ๐Ÿ’ Adorable

Plush Snake Amigurumi Pattern

Plush Snake Amigurumi Pattern
4.2โ˜… Rating
2-3 Hours Time Needed
1.9K Made This
โœ‚๏ธ

Beginner Friendly Level

Perfect for those just starting their crochet journey, with clear instructions and simple techniques

โฑ๏ธ

Bite-Sized Project

Finishes in 2-4 hoursโ€”perfect for an afternoon of creative relaxation.

๐Ÿงธ

Cute Companion

An adorable friend to cherish, handcrafted with love to bring comfort and joy for years to come.

About This Plush Snake Amigurumi Pattern

This pattern creates a plush, cuddly amigurumi snake worked in continuous rounds using plush yarn. The design uses only basic stitchesโ€”single crochet, increases and decreasesโ€”so it is easy to follow. Colour changes are included to create contrasting bands for a playful look. The result is a soft, poseable snake perfect for kids and collectors alike.

Plush Snake Amigurumi Pattern crochet pattern - detailed view of completed project

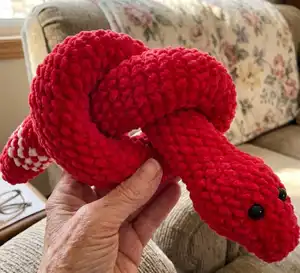
Worked in the round from a small chain base, the snake is stuffed as you go for even shaping. Insert safety eyes between the specified rows and finish by closing the tail securely.

Why You'll Love This Plush Snake Amigurumi Pattern

I absolutely love this pattern because it transforms simple stitches into a delightfully tactile toy that feels great to hold. I enjoy how the plush yarn gives the snake a soft, velvety surface that is perfect for cuddling. The colour banding adds personality and is so satisfying to crochet and watch appear as you work. I also appreciate how beginner-friendly the construction is while still producing a professional-looking finished piece.

Plush Snake Amigurumi Pattern step 1 - construction progress Plush Snake Amigurumi Pattern step 2 - assembly progress Plush Snake Amigurumi Pattern step 3 - details and accessories Plush Snake Amigurumi Pattern step 4 - final assembly and finishing

Switch Things Up

I love changing colors to create different personalities for each snake; try pastel bands for a nursery-friendly version.

I sometimes use variegated plush yarn for an easy multi-colour effect without changing yarns mid-pattern.

I recommend experimenting with scale by using different yarn weights and hook sizes to make minis or larger cuddle-sized snakes.

I often embroider small details like a tongue or tiny spots to give each snake more character.

I like to substitute safety eyes with embroidered eyes for a fully baby-safe toy suitable for small children.

I sometimes add a small loop at the head to turn the snake into a hanging decoration or keyring charm.

I enjoy adding weighted pellets to the belly area for a different drape and feel, placing them inside a small fabric pouch before stuffing.

I also create matching sets in complementary colors to give as themed gifts for baby showers or birthdays.

I recommend trying different poses by stitching through internal rounds to lock a curl or coil in place for display.

I often combine plush yarn with a small crocheted scarf or bow to personalize the snake for holidays or seasons.

Common Mistakes & How to Fix Them

โœ— Filling the toy too tightly will distort the shape and create a long stick-like result; stuff gradually and lightly, checking the shape frequently to achieve a rounded, natural look. โœ— Skipping stitch markers can result in losing track of rounds and misplacing increases or decreases; place a marker at the start of each round and move it as you work to maintain accurate stitch counts.
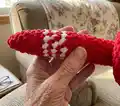
 โœ— Forgetting to insert eyes at the recommended point will make positioning awkward later; insert safety eyes between rows 5 and 6 before you overstuff the head area. โœ— Rushing color changes can leave loose tails or visible joins; finish each color securely and weave in ends neatly or carry the yarn inside the body where possible to hide joins and keep stripes tidy. โœ— Not counting stitches after increases and decreases causes mismatched shaping; count your stitches frequently, especially after rounds with multiple increases or decreases, to ensure consistency.

Plush Snake Amigurumi Pattern

Make a soft, squishy plush snake using easy single crochet stitches and plush yarn. This pattern uses simple increases and decreases to shape a charming snake you can hold and play with. You will love the tactile texture from plush yarn and the color stripes for a playful finish. Perfect for gifting or decorating a cozy corner of your home.

Beginner Friendly 2-3 Hours

Materials Needed for Plush Snake Amigurumi Pattern

โ€” Main Fabric

  • 01
    Plush yarn - main color (pink/red) as shown in photos, amount as needed for a small plush snake
  • 02
    Plush yarn - white for stripe accents, small amount required

โ€” Tools Required

  • 01
    Crochet hook (size suitable for plush yarn, check yarn label)
  • 02
    Stuffing (polyester fiberfill)
  • 03
    Stitch marker
  • 04
    Scissors
  • 05
    Safety eyes (2 pieces) or embroidery for eyes

Progress Tracker

0% Complete

โ€” Snake Pattern :

Info :

4 ch, rotare, from second chain crochet:

Round 1 :

1 . 1 inc, sc, 2 inc, sc, inc (10)

Round 2 :

2. 10 sc

Round 3 :

3. (1 sc, inc, 1 sc, inc, 1 sc)*2 (14)

Round 4 :

4. 14 sc

Round 5 :

5. (1 sc, inc)*7 (21)

Round 6-9 :

6-9. 21 sc

Info :

Incert eyes between 5 and 6 rows

Round 10 :

10.(1 sc, 1 dec)*7 (14)

Info :

Stuff the snake as you go along

Round 11-84 :

11- 84. 14sc (14)

Round 85 :

85. white 14 sc (14)

Round 86 :

86. pink 14sc (14)

Round 87 :

87. white 14sc (14)

Round 88 :

88. pink 14sc (14)

Round 89 :

89. white 14sc (14)

โ€” Pink :

Round 90-91 :

90-91. 14 sc

Round 92 :

92. (5 sc, 1 dec)*2(12)

Round 93 :

93. 12 sc

Round 94 :

94. (2 sc, dec)*3 (9)

Round 95 :

95. 9 sc

Round 96 :

96. (1 sc, dec)*3 (6)

Info :

pull the hole tight

Assembly Instructions

  • Insert safety eyes between rows 5 and 6 before the head is fully stuffed, then secure them according to manufacturer instructions.
  • Stuff the snake gradually as you work from row 10 onward for even shaping, adjusting firmness to avoid a long stick-like shape.
  • When changing colors for the bands, secure yarn tails neatly inside the body or weave them in to avoid visible joins on the plush surface.
  • After finishing the final rounds, pull the remaining hole tight and weave the tail end inside the body to hide the join and secure the stuffing.
  • Use pins to position any shaping or bends before final stitching if you want to fix a curved pose; stitch through several internal stitches to lock the shape.

Important Notes

  • ๐Ÿ’กDo not overstuff the toy; filling too tightly will change the intended shape and make the toy look like a long stick.
  • ๐Ÿ’กInsert safety eyes between rounds 5 and 6 as directed to ensure correct facial placement before excessive stuffing.
  • ๐Ÿ’กUse a stitch marker to mark the start of each round to keep count during increases and decreases.
  • ๐Ÿ’กStuff the snake gradually as you crochet to maintain an even, rounded shape; adjust firmness while checking the silhouette.

This plush snake pattern is a delightful, snuggly addition to any handmade toy collection. Its soft texture and playful color bands make it perfect for gifting or cuddling. Try different colorways to create a collection of charming snakes. ๐Ÿงถ๐Ÿ

You ask,

we answer.

FAQs

What size will the finished piece be?

The finished snake size depends on your yarn and hook. Using plush yarn with a medium crochet hook will produce a small to medium snake about 20-30 cm long, but size will vary.

Can I use different yarn weights for this pattern?

Yes, using different yarn weights will change the final size; thicker yarn with a larger hook will create a chunkier snake while thinner yarn will make a smaller one. Adjust stuffing and hook size accordingly.

Do I need prior crochet experience for this pattern?

This pattern is beginner friendly and uses basic stitches: single crochet, increases, and decreases. Familiarity with crocheting in the round and reading stitch counts is helpful.

How long does this project typically take to complete?

Most crocheters complete this project in 2-3 hours, though time may vary depending on experience, yarn choice, and how carefully you stuff and assemble the toy.