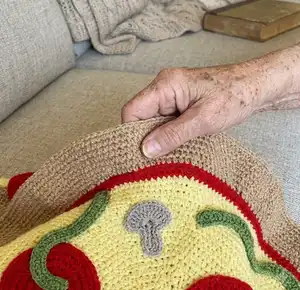
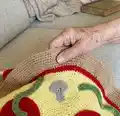
Make a playful pizza-shaped blanket with this detailed crochet pattern. You will work in rounds to create a cheese base, then add pepperoni, olives, peppers, mushrooms and pineapple toppings for a fun finished look. Clear step-by-step round instructions and topping patterns make assembly easy. Perfect for gifting or as a quirky home accent to brighten any room.
Progress Tracker
0% Complete
— Pizza :
Start R1 :
With 5 mm hook and yellow yarn Mc, Ch 3, and then work 11 Dc into the Mc. (12)
Info :
At the end of each round: insert your hook into the top of the Ch 3, Sl St, Ch 3, and then Dc into the same stitch. *The Ch 3 will act as a stitch thus making the Ch3 + Dc= an Inc*
R2 :
Inc in each stitch around (24)
R3 :
Dc 1 (Inc 1, Dc 1) x11 (36)
R4 :
Dc 2 (Inc 1, Dc 2) x11 (48)
R5 :
Dc 3 (Inc 1, Dc 3) x11 (60)
R6 :
Dc 4 (Inc 1, Dc 4) x11 (72)
R7 :
Dc 5 (Inc 1, Dc 5) x11 (84)
R8 :
Dc 6 (Inc 1, Dc 6) x11 (96)
R9 :
Dc 7 (Inc 1, Dc 7) x11 (108)
R10 :
Dc 8 (Inc 1, Dc 8) x11 (120)
R11 :
Dc 9 (Inc 1, Dc 9) x11 (132)
R12 :
Dc 10 (Inc 1, Dc 10) x11 (144)
R13 :
Dc 11 (Inc 1, Dc 11) x11 (156)
R14 :
Dc 12 (Inc 1, Dc 12) x11 (168)
R15 :
Dc 13 (Inc 1, Dc 13) x11 (180)
R16 :
Dc 14 (Inc 1, Dc 14) x11 (192)
R17 :
Dc 15 (Inc 1, Dc 15) x11 (204)
R18 :
Dc 16 (Inc 1, Dc 16) x11 (216)
R19 :
Dc 17 (Inc 1, Dc 17) x11 (228)
R20 :
Dc 18 (Inc 1, Dc 18) x11 (240)
R21 :
Dc 19 (Inc 1, Dc 19) x11 (252)
R22 :
Dc 20 (Inc 1, Dc 20) x11 (264)
R23 :
Dc 21 (Inc 1, Dc 21) x11 (276)
R24 :
Dc 22 (Inc 1, Dc 22) x11 (288)
R25 :
Dc 23 (Inc 1, Dc 23) x11 (300)
R26 :
Dc 24 (Inc 1, Dc 24) x11 (312)
R27 :
Dc 25 (Inc 1, Dc 25) x11 (324)
R28 :
Dc 26 (Inc 1, Dc 26) x11 (336)
R29 :
Dc 27 (Inc 1, Dc 27) x11 (348)
R30 :
Dc 28 (Inc 1, Dc 28) x11 (360)
R31 :
Dc 29 (Inc 1, Dc 29) x11 (372)
R32 :
Dc 30 (Inc 1, Dc 30) x11 (384)
R33 :
Dc 31 (Inc 1, Dc 31) x11 (396)
R34 :
Dc 32 (Inc 1, Dc 32) x11 (408)
R35 :
Dc 33 (Inc 1, Dc 33) x11 (420)
R36 :
Dc 34 (Inc 1, Dc 34) x11 (432)
R37 :
Dc 35 (Inc 1, Dc 35) x11 (444)
R38 :
Dc 36 (Inc 1, Dc 36) x11 (456)
R39 :
Dc 37 (Inc 1, Dc 37) x11 (468)
R40 :
Dc 38 (Inc 1, Dc 38) x11 (480)
R41 :
Dc 39 (Inc 1, Dc 39) x11 (492)
R42 :
Dc 40 (Inc 1, Dc 40) x11 (504)
R43 :
Dc 41 (Inc 1, Dc 41) x11 (516)
R44 :
Dc 42 (Inc 1, Dc 42) x11 (528)
R45 :
Dc 43 (Inc 1, Dc 43) x11 (540)
R46 :
Dc 44 (Inc 1, Dc 44) x11 (552)
R47 :
Dc 45 (Inc 1, Dc 45) x11 (564)
R48 :
Dc 46 (Inc 1, Dc 46) x11 (576)
R49 :
Dc 47 (Inc 1, Dc 47) x11 (588)
R50 :
Dc 48 (Inc 1, Dc 48) x11 (600)
R51 :
Dc 49 (Inc 1, Dc 49) x11 (612)
Info :
How to change colors with Dc: In the last stitch of R51, Dc with the yellow yarn, when there are two loops on your hook, yarn over and pull through with red yarn.
Info :
Sl st. Ch 3. Work one Dc into the same stitch and continue crocheting.
R52 :
Dc 50 (Inc 1, Dc 50) x11 (624)
R53 :
Dc 51 (Inc 1, Dc 51) x11 (636)
Info :
*Change to Brown yarn before you Ch 3*
R54 :
Dc 52 (Inc 1, Dc 52) x11 (648)
R55 :
Dc 53 (Inc 1, Dc 53) x11 (660)
R56 :
Dc 54 (Inc 1, Dc 54) x11 (672)
R57 :
Dc 55 (Inc 1, Dc 55) x11 (684)
R58 :
Dc 56 (Inc 1, Dc 56) x11 (696)
R59 :
Dc 57 (Inc 1, Dc 57) x11 (708)
R60 :
Dc 58 (Inc 1, Dc 58) x11 (720)
Info :
To Finish off: Don’t Ch 3, make a Sl St in the first stitch and finish off. Now to make toppings!
— Toppings :
Pepperonis (P1) :
R1: With red yarn and a 5 mm hook: Mc, Ch 3, and then work 11 Dc into the Mc. (12)
Info :
At the end of each round: insert your hook into the top of the Ch 3, Sl St, Ch 3, and then Dc into the same stitch. *The ch 3 will act as a stitch thus making the Ch3 + Dc= an Inc*
R2 :
Inc in each stitch (24)
R3 :
Dc 1 (Inc 1, Dc 1) x11 (36)
R4 :
Dc 2 (Inc 1, Dc 2) x11 (48)
R5 :
Dc 3 (Inc 1, Dc 3) x11 (60)
R6 :
Dc 4 (Inc 1, Dc 4) x11 (72)
R7 :
Dc 5 (Inc 1, Dc 5) x11 (84)
R8 :
Dc 6 (Inc 1, Dc 6) x11 (96)
R9 :
Dc 7 (Inc 1, Dc 7) x11 (108)
Info :
Sl St into the first stitch and finish off, leave a long tail for sewing
Olives (P1) :
Start: With black yarn and a 4.5 mm hook: Ch 15, insert your hook into the first Ch and Sl St to make a circle.
R1 :
Ch 1, Sc in the same stitch as the Sl St, ScInc in the reaming Chs (30)
Info :
Sl St into the first stitch and finish off, leave a long tail for sewing. *If your olive curls, try with a looser tension*
Peppers (P1) :
R1: With green yarn and a 4.5 mm hook, Ch 60. Starting in the 3rd ch from the hook, Dc 57 across, Dc 3 in the last Ch. *see figures 1-2*
Info :
Rotate the pepper 180°. Sc in each Ch, place Sc 2 in the last Ch, Sl St in the first Dc, *see figures 3-4*. Finish off and leave a long tail for sewing
Small mushrooms (P1) :
*using a 4.5mm hook and warm grey yarn, we will be working in rows, be sure to Ch 1 and turn at the end of each row*
Row 1 :
Ch 6, starting in the 2nd Ch from the hook, Sc across (5)
R2-8 :
Sc across (5) *7 rows* (in the last row, do not Ch1 and turn)
R9 :
Ch 6, turn, Starting in the 2nd Ch from the hook, Sc 5 across Chs, Sc 5 across the stem, Ch 6 (15) (Don’t Ch 1 at the end of this row) *See figures 1-4*
R10 :
Starting in the 2nd Ch from the hook, Sc across (15) *see fig-5*
R11 :
Sc 4, Dec, Sc 3, Dec, Sc 4 (13)
R12 :
Sc 3, Dec, Sc 3, Dec, Sc 3, (11)
R13 :
Sc 4, Dec, Sc 5, (10)
R16 :
Sc 4, Dec, Sc 3 (8) Ch 1
R17 :
Sc around the sides of the mushroom, place 2 Sc in the two cap corners, and the two bottom stem corners, Sl St in the first stitch *see fig-6-9*
Large mushrooms (P1) :
*using a 4.5mm hook and warm grey yarn, we will be working in rows, be sure to Ch 2 and turn at the end of each row*
Row 1 :
Ch 14, starting in the 3rd Ch from the hook, Dc across (12)
R2-R3 :
Dc across (12) *2 rows*
R4 :
Ch 10, turn, starting in the 3rd Ch from the hook, Dc 8 across the Chs, Dc 6 across the stem, Ch 10 (Don’t Ch 2 at the end of this row) *See Figures 1-4*
R5 :
Turn, Dc in the 3rd Ch from the hook, Dc across (22)
R6 :
(Dc 4, dcdec) x3, Dc 4 (19)
R7 :
(Dc 5, dcdec) x2, Dc 5 (17)
R9 :
(Dc 3, dcdec) x3, Dc 2 (14)
R10 :
(Dc 2, dcdec) x3, Dc 2 (11)
R11 :
dcdec, Dc 7, dcdec, (9) Ch 1
R12 :
Sc around the sides of the mushroom, place 2 Sc in the cap corners and 2 Sc in the stem corners
Pineapple (P1) :
*Ch 2 and turn at the end of each row*
Row 1 :
With darker yellow yarn and a 4.5 mm hook: Ch 9, start in the 3rd Ch from the hook, Dc across (7)
R2 :
Dc 3, Inc 1, Dc 3 (8)
R3 :
Dc 4, Inc 1, Dc 3 (9)
R4 :
Dc 4, Inc 1, Dc 4 (10)
R6 :
Dc 5, Inc 1, Dc 4 (11)
R8 :
Dc 5, Inc 1, Dc 5 (12)
R9 :
Dc 6, Inc 1, Dc 5 (13)
R10 :
Dc 6, Inc 1, Dc 6 (14)
R11 :
Dc 7, Inc 1, Dc 6 (15) Ch 1
Info :
Next we will Sc around all 4 sides of the pineapple. Start by placing 2 Sc in the first corner. Place 3 Sc in the 3 remaining corners. When we Sc across the top, Sl St into the last 3 stitches. Finish off and leave a long tail for sewing
— Assembly :
Info :
Needed: sewing needle, pins
Assembly Step 1 :
Time to sew on your toppings! Channel your inner chef and create the pizza of your dreams. Lay your plain cheese pizza blanket on the ground and arrange toppings by eye.
Assembly Step 2 :
Throw the toppings on one by one and sew them down wherever they happen to land on the pizza; toppings are rarely perfectly spaced so overlap and placement variety is fine.
Assembly Step 3 :
For the peppers, make a slight “J” shape to mimic the sliced bell pepper. Pin toppings in place before stitching for accurate layout.
How to sew on the toppings :
Sew in between the stitches of the cheese.
How to sew on the toppings :
You shouldn't be able to see much of your needle from the back side.
How to sew on the toppings :
Repeat this process around the entire topping and weave in your end.
This Pizza Blanket Pattern brings a playful, handcrafted twist to your home decor — perfect as a quirky gift or a cozy conversation piece. Make a full pie or customize toppings to match your favorite flavors; each blanket is a one-of-a-kind creation. Happy crocheting and enjoy serving up handmade comfort! 🍕🧶