๐Ÿงถ Beautiful โœจ Detailed ๐Ÿ’ Adorable

Bobby the Bighorn Sheep Amigurumi Pattern

Bobby the Bighorn Sheep Amigurumi Pattern
4.2โ˜… Rating
5-7 Hours Time Needed
4.0K Made This
โœ‚๏ธ

Intermediate Level

Ideal for those with basic crochet experience, featuring slightly more advanced stitches and techniques to expand your skills.

โฑ๏ธ

Weekend Treat

Takes 5-7 hours, making it an enjoyable project to finish over a couple of days.

๐Ÿฅ

Charming Critter

Delightful animal designs with sweet details that capture the essence of your favorite woodland and farmyard friends.

About This Bobby the Bighorn Sheep Amigurumi Pattern

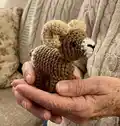
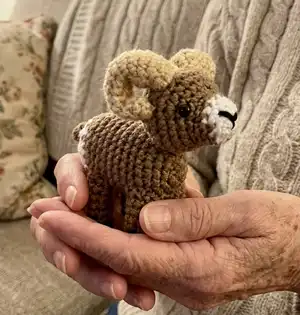
This pattern creates a small, realistic bighorn sheep amigurumi with curled horns and a weighted body for stability. You will work in the round using worsted weight yarn and simple shaping increases and decreases. The pattern includes clear placement notes for eyes, nose stitching, and assembly tips to make sewing parts easy and neat.

Bobby the Bighorn Sheep Amigurumi Pattern crochet pattern - detailed view of completed project

Written in US terms with full round-by-round instructions for each piece. Perfect for making a collectible toy or a charming handmade gift.

Why You'll Love This Bobby the Bighorn Sheep Amigurumi Pattern

I absolutely love this pattern because it captures the personality of a bighorn sheep in a compact, satisfying project. I enjoy the sculpting techniques used for the head and the way the horns are crocheted separately then shaped for a dramatic effect. The weighted body trick gives the finished piece a pleasing, sturdy stance that I find irresistible. Making multiple legs and sewing them in place is a simple assembly that always results in a charming, balanced toy.

Bobby the Bighorn Sheep Amigurumi Pattern step 1 - construction progress Bobby the Bighorn Sheep Amigurumi Pattern step 2 - assembly progress Bobby the Bighorn Sheep Amigurumi Pattern step 3 - details and accessories Bobby the Bighorn Sheep Amigurumi Pattern step 4 - final assembly and finishing

Switch Things Up

I love changing up yarn colors to create different breeds; try a darker brown body with cream horns for a distinct look.

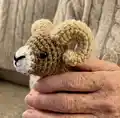
I sometimes substitute sport weight yarn and a smaller hook to make a tiny keychain version that fits in the palm of my hand.

I recommend experimenting with hook size and yarn weight to adjust the final scale โ€” larger yarn and hooks make a chunkier, more display-sized sheep.

I have added embroidered eyebrows or stitches to create character variations; a tiny stitched patch over one eye gives a playful personality.

I often try faux fur or boucle yarn for the body while keeping smooth yarn for the head to create a fluffier appearance.

I will occasionally add a collar or a tiny bell to make the sheep a decorative ornament or gift tag accessory.

I sometimes use felt pieces for different nose shapes or to add reinforced hooves if the toy will be handled a lot.

I like to swap the penny weight trick for a small washers pack if I need more weight to help larger versions stand sturdier.

I recommend trying different horn placements and rolling techniques to get the most natural curl โ€” test before sewing permanently.

I also suggest creating multiple sets of legs and trying alternate spacing to adjust gait and stance; small changes make the pose more dynamic.

Common Mistakes & How to Fix Them

โœ— Skipping the color change at the exact stitch will leave an uneven nose transition; change color on the last stitch as instructed to get a clean nose edge. โœ— Placing safety eyes too high or low changes the expression drastically; follow the placement note between rows 5 and 6 and space eyes 8 stitches apart for the intended look. โœ— Understuffing or overstuffing the body causes imbalance or distortion; stuff gradually and add a penny for weight as instructed to help the sheep stand properly. โœ— Not counting stitches after increases or decreases will lead to incorrect shaping; count your stitches at the end of each round to ensure accuracy and adjust before proceeding.

Bobby the Bighorn Sheep Amigurumi Pattern

Make a tiny, detailed bighorn sheep you can cherish or gift. This pattern walks you through the head, body, legs, tail and signature curled horns with clear step-by-step rounds. You will learn simple shaping techniques and placement tips to create a sturdy, standing amigurumi that holds its shape. Perfect for a weekend project or a thoughtful handmade present.

Intermediate 5-7 Hours

Materials Needed for Bobby the Bighorn Sheep Amigurumi Pattern

โ€” Main Fabric

  • 01
    Worsted weight yarn (#4) - Brown - small amount (main body)
  • 02
    Worsted weight yarn (#4) - Beige - small amount (horns)
  • 03
    Worsted weight yarn (#4) - White - small amount (nose and tail details)
  • 04
    Worsted weight yarn (#4) - Black - small amount (mouth stitching and hooves)

โ€” Tools Required

  • 01
    Crochet hook size 3.0mm (3 mm) - for horns only
  • 02
    Crochet hook size 3.5mm (3.5 mm) - main hook
  • 03
    6 mm black safety eyes (2 pcs)
  • 04
    Fiber fill / polyester stuffing
  • 05
    Scissors
  • 06
    Stitch markers or stitch counter (optional)
  • 07
    Sewing needle / yarn needle for sewing pieces and embroidering mouth
  • 08
    Penny or small coin to weigh the body (optional but recommended)

Progress Tracker

0% Complete

โ€” Supplies Needed :

Infos :

3 mm crochet hook (for horns only). 3.5 mm crochet hook. 6 mm black safety eyes. Worsted weight yarn in beige, brown, white and black(for stitching on mouth). Fiber fill. Scissors. Stitch markers or stitch counter (if needed). Sewing needle.

โ€” Notes :

Infos :

This pattern is made using US terms. The bighorn sheep can be made smaller by reducing the ply yarn you are using and the hook size. Crochet using a tight stitch and stuff generously so it keeps it shape.

โ€” Crochet Abbreviations used in this pattern :

Infos :

DEC- decrease. FO- Finish off. INC-increase. MC- Magic Circle. SC- single crochet. SL- Slip stitch.

โ€” Head :

Info :

*Start using white yarn

Round 1 :

6 SC in MC (6)

Round 2 :

INC X 6 (12)

Info :

*on the last stitch change color to brown, the remainder of the head will be made using brown yarn.

Round 3 - 4 :

SC around (12)

Round 5 :

6 SC, 6 INC (18)

Round 6 :

SC around (18)

Round 7 :

(2SC, INC) X 6 (24)

Round 8 :

(3SC, INC) X 6 (30)

Info :

*Stop and put eyes in and using your needle stitch in the nose.

Round 9 :

SC around (30)

Round 10 :

(3SC, DEC) x 6 (24)

Round 11 :

(2SC, DEC) x 6 (18)

Info :

*stop and lightly stuff head

Round 12 :

(SC, DEC) x 6 (12)

Info :

*continue stuffing so head will stay nice and firm

Round 13 :

SC around (6)

Info :

*SL, close up hole and leave long tail of yarn for sewing onto body

Infos :

**Eyes should be placed in between rows 5 & 6 and be 8 stiches apart. The top of the nose should start between rows 2 and 3 and the bottom should be in the middle of the original magic circle.

โ€” Body :

Info :

*Use brown yarn

Round 1 :

6 SC in MC (6)

Round 2 :

INC X 6 (12)

Round 3 :

(SC, INC) X 6 (18)

Round 4 :

(2SC, INC) x 6 (24)

Round 5- 14 :

24 around (24)

Info :

*On last stitch change to white yarn. At this point you lightly stuff and add a penny inside to weigh it down.

Round 15 :

(2SC, DEC) x 6 (18)

Round 16 :

(SC, DEC) x 6 (12)

Info :

*stop and stuff generously so it will stay nice and firm

Round 17 :

DEC x 6 (6), SL and close up hole.

โ€” Legs (Make 4) :

Info :

*Start off using black yarn

Round 1 :

5SC in MC (5)

Round 2 :

SC around in BLO (change to brown yarn in 5th stitch)

Round 3 :

INC, 4SC (6)

Round 4 :

SC around (6)

Round 5 :

(2 SC, INC) X 2 (8)

Round 6-7 :

SC around (8)

Info :

*SL, stuff with fiber fill and leave long tail for sewing onto body

โ€” Tail :

Info :

*Use brown yarn

Round 1 :

Chain 4

Round 2 :

SC in 2nd chain from hook and next two stitches, SL in last stitch. Leave tail for sewing onto body.

โ€” Horns (Make 2) :

Info :

*Use Beige Yarn & 3mm hook

Round 1 :

4SC in MC (4)

Round 2 :

3SC, INC (5)

Round 3 :

4SC, INC (6)

Round 4 :

6 around (6)

Round 5 :

(2 SC, INC) X 2 (8)

Round 6-7 :

SC around (8)

Round 8 :

(3SC, INC) X 2 (10)

Round 9 :

SC around (10)

Round 10 :

4SC, INC X 2 (12)

Round 11 :

12 around (12)

Round 12 :

(2 SC, DEC) X 3 (9)

Round 13 :

SC around (9)

Info :

*Finish off and leave a long tail for sewing onto head. Lightly stuff your horns.

Assembly Instructions

  • Attach head to body between rows 4 and 5, aligning the base of the head with the opening on top of the body and sew securely with a whipstitch.
  • Sew tail onto the back two rows up from the base of the body so it sits centered on the rear of the sheep.
  • Attach horns between rows 8 & 9 of the head, roll the horns backward to create the curled shape and sew them in place so they sit symmetrically.
  • Place and attach safety eyes between rows 5 and 6, spacing them 8 stitches apart, then stitch the nose and mouth using black yarn as shown in the photos.
  • Sew front legs between rows 4-6 and back legs between rows 11-13, spacing legs evenly and securing firmly so the sheep can stand on its own.

Important Notes

  • ๐Ÿ’กUse stitch markers to keep track of rounds and the start of each round to prevent unwanted increases or decreases.
  • ๐Ÿ’กStuff the head and body gradually and evenly; overstuffing can distort shaping while under-stuffing will make features floppy.
  • ๐Ÿ’กPin parts in place and check symmetry before sewing to achieve the cleanest assembly and correct placement of horns, legs, and tail.
  • ๐Ÿ’กWeigh the body with a penny as suggested to help the finished sheep stand steadily and keep balance.

Create your own little Bobby the Bighorn to display or gift โ€” a tiny tribute to wild mountains and handmade charm. This detailed pattern guides you from the first magic circle to the final sewn horn with friendly photos and notes. Enjoy the shaping, the curled horns, and the proud stance of your finished sheep. ๐Ÿ‘๐Ÿงถ

You ask,

we answer.

FAQs

What size will the finished piece be?

The finished amigurumi measures approximately 9-12 cm tall when using worsted weight yarn and the recommended hook sizes; exact size will vary with yarn and tension.

Can I use different yarn weights for this pattern?

Yes, you can use different yarn weights but your finished sheep will change size; use an appropriate hook and expect stitch and horn adjustments when using lighter or heavier yarn.

Do I need prior crochet experience for this pattern?

This pattern is rated intermediate and assumes you are comfortable working in the round, using increases and decreases, and sewing pieces together.

How long does this project typically take to complete?

Most crocheters complete this project in 5-7 hours, though time may vary based on experience level, assembly care, and how detailed you make the horns and facial stitching.