🧶 Beautiful ✨ Detailed 💝 Adorable

Pino Amigurumi Pattern

Pino Amigurumi Pattern
4.4★ Rating
5-7 Hours Time Needed
3.4K Made This
✂️

Intermediate Level

Ideal for those with basic crochet experience, featuring slightly more advanced stitches and techniques to expand your skills.

⏱️

Weekend Treat

Takes 5-7 hours, making it an enjoyable project to finish over a couple of days.

🧸

Cute Companion

An adorable friend to cherish, handcrafted with love to bring comfort and joy for years to come.

About This Pino Amigurumi Pattern

This pattern teaches you how to crochet Pino, a sweet little rhino amigurumi worked in continuous rounds. You will create legs, arms, body, head, ears, horn and tiny nails with clear round-by-round instructions. The pattern uses single crochet increases and decreases, basic embroidery, and simple assembly techniques for a polished finish.
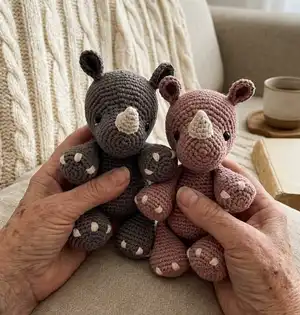
Pino Amigurumi Pattern crochet pattern - detailed view of completed project

Includes a complete materials list, abbreviations, and helpful tips for stuffing and placement. Photos throughout the pattern make attachment and finishing easy to follow.

Why You'll Love This Pino Amigurumi Pattern

I absolutely love this pattern because it combines simple shaping with charming details that make Pino feel full of personality. I enjoyed designing the little horn and the embroidered nails — they really bring the character to life. The pattern is satisfying to work on and fits into a weekend, which I always appreciate. It is perfect for gifting or keeping as a sweet, handmade companion.

Pino Amigurumi Pattern step 1 - construction progress Pino Amigurumi Pattern step 2 - assembly progress Pino Amigurumi Pattern step 3 - details and accessories Pino Amigurumi Pattern step 4 - final assembly and finishing

Switch Things Up

I love how easy it is to personalize Pino by changing colors — try soft pastels for a nursery friend or bold tones for a playful twist.

I sometimes switch yarn weight and a larger hook to make a cuddly oversized rhino; it makes a very different, huggable toy.

I like to embroider different facial expressions, moving the eyebrows or mouth slightly to change Pino's mood.

Try using safety eyes of different sizes or embroidered eyes for a baby-safe version if giving to small children.

I often add tiny accessories like a crocheted scarf, bow or little flag to make each rhino unique and gift-ready.

If you want a poser, add thin wire inside the limbs before stuffing to create posable arms and legs.

Experiment with textured stitches for the body to give Pino a cozy, tactile finish — small bobbles or surface slip stitches work well.

I recommend practicing the horn and nails on scrap yarn to find the scale you love before sewing them to the finished toy.

For travel-sized versions, use fingering weight yarn with a very small hook and reduce rounds slightly to create a tiny keychain rhino.

I often embroider little initials or a tiny heart on the belly as a special personal touch when gifting my amigurumi.

Common Mistakes & How to Fix Them

✗ Skipping a stitch marker when working in continuous rounds causes you to lose track of the start of each round; place and move a marker at the start of every round to stay aligned. ✗ Stuffing too tightly in small parts makes them look lumpy and stiff; stuff gradually and lightly while shaping to keep a smooth, soft silhouette. ✗ Not counting stitches after increases or decreases leads to uneven shaping and mismatched parts; count after every shaping round to ensure correct stitch totals. ✗ Sewing parts without pinning first can result in asymmetrical placement and an unbalanced toy; pin or use removable markers to check placement before stitching. ✗ Using a different yarn weight without adjusting hook and stitch counts changes finished size unexpectedly; always make a gauge test and pick an appropriate hook for your chosen yarn.
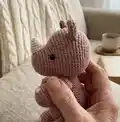
Pino Amigurumi Pattern

Create your own adorable Pino the rhino with this detailed crochet amigurumi pattern. You will work simple shaping, sewing and embroidery to bring this sweet toy to life. The pattern uses single crochet in continuous rounds and includes step-by-step instructions with photos to help you along. Perfect for gifting or keeping as a cozy handmade companion.

Intermediate 5-7 Hours

Materials Needed for Pino Amigurumi Pattern

— Main Fabric

  • 01
    Eco Cotton by Gründl (recommended) - using a 2.5 mm crochet hook will yield an approx. 16 cm / 6.3 inches rhino
  • 02
    1 skein = 50 g, yardage = 105 m (worsted/Aran) - used yarn weight reference
  • 03
    Body: Nr. 08 "Pastell Schlamm" (dark brown) OR Nr. 03 "Mocca" (light brown) - approx. 56 g
  • 04
    Horn and nails: Nr. 01 "Natur Weiß" (off white) - approx. 6 g
  • 05
    Remnant of white cotton yarn (e.g., Schachenmayr Catania) for eye details: approx. 30 cm / 12 inch

— Tools Required

  • 01
    Crochet hook 2.5 mm (size B) or according to the yarn you use
  • 02
    Pair of safety eyes (diameter: 8 mm, black)
  • 03
    Black thread to embroider the eyebrows
  • 04
    Darning needle (blunt tip)
  • 05
    Sewing needle
  • 06
    Embroidery needle (pointed, big eyelet)
  • 07
    Stitch marker
  • 08
    Fiberfill (polyester stuffing)
  • 09
    Scissors
  • 10
    Pins for attaching, securing and checking placement

Progress Tracker

0% Complete

— Legs :

Round 1 :

6 sc into MR = 6 st

Round 2 :

inc x 6 = 12 st

Round 3 :

(1 sc, inc) x 6 = 18 st

Round 4 :

(2 sc, inc) x 6 = 24 st

Round 5 :

(3 sc, inc) x 6 = 30 st

Round 6 :

BLO 30 sc = 30 st

Round 7-9 :

30 sc = 30 st (3 rounds)

Round 10 :

(3 sc, dec) x 6 = 24 st

Round 11 :

24 sc = 24 st (1 round)

Round 12 :

(2sc, dec) x 6 = 18 st

Round 13-14 :

18 sc = 18 st (2 rounds)

Info :

Stuff the leg with fiberfill up to round 11. Do not stuff too tightly, so that the leg will keep its shape.

Round 15 :

(1 sc, dec) x 6 = 12 st

Round 16 :

12 sc = 12 st (1 round)

Round 17 :

dec x 6 = 6 st

Round 18 :

6 sc = 6 st

Round 19 :

2 sc, this round is not crocheted until the end of the round. (When folding the opening the joints of round 5 and 6 should be parallel. Adjust the number of stitches if needed.)

— Arms :

Round 1 :

6 sc into MR = 6 st

Round 2 :

inc x 6 = 12 st

Round 3 :

(1 sc, inc) x 6 = 18 st

Round 4 :

(2 sc, inc) x 6 = 24 st

Round 5 :

BLO 24 sc = 24 st (1 round)

Round 6-9 :

24 sc = 24 st (4 rounds)

Round 10 :

(2 sc, dec) x 6 = 18 st

Round 11 :

18 sc = 18 st (1 round)

Round 12 :

(1 sc, dec) x 6 = 12 st

Round 13-14 :

12 sc = 12 st (2 rounds)

Info :

Stuff the arm with fiberfill up to round 12. Do not stuff too tightly, so that the arm will keep its shape.

Round 15 :

(2 sc, dec) x 3 = 9 st

Round 16-17 :

9 sc = 9 st (2 rounds)

Round 18 :

(1 sc, dec) x 3 = 6 st

Round 19 :

2 sc, the round is not crocheted until the end of the round. (When folding the opening the joints of round 5 and 6 should be parallel. Adjust the number of stitches if needed.)

Info :

Fold the two sides of the arm together and crochet 2 sc across. Cut the yarn and weave in the yarn tail nicely.

— Body :

Round 1 :

6 sc into MR= 6 st

Round 2 :

inc x 6 = 12 st

Round 3 :

(1 sc, inc) x 6 = 18 st

Round 4 :

(2 sc, inc) x 6 = 24 st

Round 5 :

(3 sc, inc) x 6 = 30 st

Round 6 :

(4 sc, inc) x 6 = 36 st

Round 7 :

(5 sc, inc) x 6 = 42 st

Round 8 :

(6 sc, inc) x 6 = 48 st

Round 9-10 :

48 sc = 48 st (2 rounds)

Round 11 :

13 sc, crochet in the 1st leg with 2 sc, 24 sc, Crochet in the 2nd leg with 2 sc, 7 sc = 48 st (At the front the legs have 20 sc in between and at the back there are 24 sc in between. Make sure that the legs are exactly symmetrically at each side of the body. Change the position of the arms when needed.)

Round 12-14 :

48 sc = 48 st (3 rounds)

Round 15 :

(6 sc, dec) x 6 = 42 st

Round 16-17 :

42 sc = 42 st (2 rounds)

Round 18 :

(5 sc, dec) x 6 = 36 st

Round 19 :

(4 sc, dec) x 6 = 30 st

Round 20-21 :

30 sc = 30 st (2 rounds)

Round 22 :

(3 sc, dec) x 6 = 24 st

Info :

Now start stuffing the body with fiberfill.

Round 23 :

(2 sc, dec) x = 18 st

Round 24 :

7 sc, crochet in the 1st arm with 2 sc, 7 sc, crochet in the 2nd arm with 2 sc = 18 st (The arms have 7 sc in between - at the front and as well at the back. Make sure that the arms are exactly symmetrically at each side of the body. Change the position of the arms when needed.)

Round 25 :

(1 sc, dec) x 6 = 12 st

Info :

Fold the two sides of the opening together and crochet 5 sc across. Cut the yarn and weave in the yarn tail nicely.

— Tail :

Info :

Mark the position of tail centered at the back in round 9 with pins. Thread in a piece of yarn - about 20cm / 8 inches in length - and make a knot. Cut it leaving approx. 1 cm/0,4 inches.

— Head :

Round 1 :

6 sc into MR= 6 st

Round 2 :

inc x 6 = 12 st

Round 3 :

(1 sc, inc) x 6 = 18 st

Round 4 :

(2 sc, inc) x 6 = 24 st

Round 5 :

(3 sc, inc) x 6 = 30 st

Round 6-9 :

30 sc = 30 st (4 rounds)

Round 10 :

4 sc, (inc, 1 sc) x 6, 14 sc = 36 st

Info :

You can already mark the position of the security eyes with two yarn remnants in round 11.

Round 11 :

5 sc, place first marker, (inc, 2 sc) x 5, inc, place second marker, 15 sc = 42 st

Round 12 :

6 sc, (inc, 3 sc) x 6, 12 sc = 48 st

Round 13-14 :

48 sc = 48 st (2 rounds)

Info :

Now insert the safety eyes (diameter: 8 mm) at the position you marked before.

Round 15 :

48 sc = 48 st (1 round)

Round 16 :

42 sc, crochet in the body with 5 sc, 1 sc = 48 st (Make sure that the head is attached upright.)

Round 17-19 :

48 sc = 48 st (3 rounds)

Round 20 :

(6 sc, dec) x 6 = 42 st

Round 21 :

42 sc = 42 st (1 round)

Round 22 :

(5 sc, dec) x 6 = 36 st

Round 23 :

(4 sc, dec) x 6 = 30 st

Round 24 :

(3 sc, dec) x 6 = 24 st

Round 25 :

(2 sc, dec) x 6 = 18 st

Info :

Stuff the head with fiberfill.

Round 26 :

(1 sc, dec) x 6 = 12 st

Round 27 :

dec x 6 = 6 st

Info :

Cut the yarn and weave in the yarn tail nicely.

— Ears :

Round 1 :

6 sc into MR = 6 st

Round 2 :

inc x 6 = 12 st

Round 3 :

1 ch, 5 hdc, (2 dc in 1 st) x 2, 5 hdc = 14 st

Info :

Finish off with a sl st in the next st. Cut the yarn leaving a long tail for sewing. The working thread is weaved in nicely and then cut it. Fold the ear together and sew the two stitches at the bottom together. Insert the needle from above and withdraw it at the bottom.

Item Name (Attach the ears) :

The ears are sewn to the head centered at round 17 with 12 visible sc in between.

— Horn ("Natur Weiß" - off white) :

Round 1 :

6 sc into MR = 6 st

Round 2 :

6 sc = 6 st (1 round)

Round 3 :

(1 sc, inc) x 3 = 9 st

Round 4 :

inc x 3, 6 sc = 12 st

Round 5 :

12 sc = 12 st

Info :

Join the round with a sl st. Cut the yarn leaving a long tail for sewing.

— Facial features :

Info :

The eyebrows are embroidered slanted over round 13 with 2 sc in length - using black embroidery thread.

Info :

For the eye lid use "Pastell Schlamm" (dark brown) or "Mocca" (light brown) and make a stitch twice from the upper to the lower part of the eye. One third of the lower part of the eye is embroidered with white cotton yarn.

Info :

Stuff the horn slightly with fiberfill and attach it centered to the rounds 3 - 9. Make sure that the 3 increases of the horn are above.

— Nails ("Natur Weiß" - off white) :

Info :

Mark the nail position with pins. Your reference point is the joint of the rounds from the arms and legs. The joint of the round is now on the bottom (marked with an X in the picture). Between each nail there are 4 visible sc (marked with an O). Embroider each nail with 4 stiches.

Info :

Now your Pino is finished. Have a lot of fun with your own little rhino!

Assembly Instructions

  • Attach the head to the body by crocheting in the body at round 16 so the head is secured upright and seamless; make sure the head is centered and the joints of rounds align.
  • Position legs so that there are 20 sc between them at the front and 24 sc at the back, then crochet the body around the legs at round 11 to secure them in place.
  • Sew the arms to the body in the places indicated by the pattern (7 sc in between at front and back) and ensure symmetry by checking both sides before stitching.
  • Sew the ears centered at round 17 with 12 visible sc in between; fold and sew the bottom two stitches of each ear before attaching and hide the tails neatly.
  • Place the horn centered over rounds 3-9 and sew the horn with the three increases positioned above; stuff the horn lightly before attaching for best shape.

Important Notes

  • 💡The body is worked in continuous rounds so use a stitch marker to mark the start of each round and move it as you go.
  • 💡Adjust the number of stitches for arms and legs if needed to make parts sit symmetrically depending on your tension.
  • 💡Stuff little parts gently and progressively; do not overstuff as this distorts shaping and stitching.
  • 💡Pin parts into position before sewing to ensure correct placement and symmetry across the toy.

This Pino rhino pattern is a sweet and satisfying amigurumi project that makes a lovely handmade gift. The design balances simple construction with delightful details like the horn and embroidered nails. Enjoy every stitch as you bring this little companion to life. 🧶✨

You ask,

we answer.

FAQs

What size will the finished piece be?

The finished amigurumi measures approximately 16 cm (6.3 inches) tall when using Eco Cotton with a 2.5 mm hook as recommended.

Can I use different yarn weights for this pattern?

Yes, you can use different yarn weights, but this will affect the final size; choose a suitable hook for your yarn and expect changes in stitch count and proportions.

Do I need prior crochet experience for this pattern?

This pattern is rated intermediate, so basic knowledge of single crochet, increases, decreases, and working in the round is recommended.

How long does this project typically take to complete?

Most crocheters complete this project in 5-7 hours, though time will vary depending on experience and how much time you spend on finishing and embroidery.