๐Ÿงถ Beautiful โœจ Detailed ๐Ÿ’ Adorable

Pillow-panda Amigurumi Pattern

Pillow-panda Amigurumi Pattern
4.0โ˜… Rating
5-7 Hours Time Needed
2.1K Made This
โœ‚๏ธ

Intermediate Level

Ideal for those with basic crochet experience, featuring slightly more advanced stitches and techniques to expand your skills.

โฑ๏ธ

Weekend Treat

Takes 5-7 hours, making it an enjoyable project to finish over a couple of days.

๐Ÿงธ

Cute Companion

An adorable friend to cherish, handcrafted with love to bring comfort and joy for years to come.

About This Pillow-panda Amigurumi Pattern

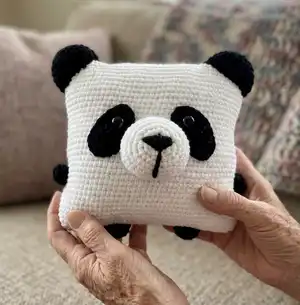
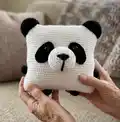
This pattern shows you how to crochet a square panda pillow using plush yarn for a soft, huggable finish. The design includes the pillow body plus separate pieces for ears, legs, arms, spots and a 3D nose that you sew on. Clear round-by-round instructions and assembly photos guide you through shaping and finishing.

Pillow-panda Amigurumi Pattern crochet pattern - detailed view of completed project

You will make all pieces in plush yarn and sew them into place, then embroider the nose for personality. The finished pillow measures about 29 x 29 cm depending on yarn and hook.

Why You'll Love This Pillow-panda Amigurumi Pattern

I absolutely love this pattern because it turns simple crochet rounds into a charming, tactile panda pillow that both kids and adults adore. I enjoy how the plush yarn creates a soft, cozy surface that feels luxurious to the touch. Sewing the separate ears, legs and nose onto the pillow lets me personalize placement and expression every time. The pattern is satisfying to complete โ€” you can finish a pillow in a weekend and gift it right away.

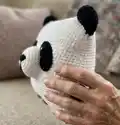
Pillow-panda Amigurumi Pattern step 1 - construction progress Pillow-panda Amigurumi Pattern step 2 - assembly progress Pillow-panda Amigurumi Pattern step 3 - details and accessories Pillow-panda Amigurumi Pattern step 4 - final assembly and finishing

Switch Things Up

I love how easy it is to customize this pillow โ€” change the colors to make a different animal or a modern geometric pillow.

I often swap plush white for pastel shades to make a softer nursery version that is equally snuggly.

If you want a larger version, I increase the chain and number of rows for the square and use a bulkier plush yarn with a larger hook.

To make a mini keychain version I use thinner yarn and a smaller hook and reduce rounds proportionally, then skip stuffing as much.

I like to replace bead eyes with embroidered eyes for a baby-safe version and to give the pillow a softer face.

Try adding a zipper to one edge if you prefer a removable cover you can wash more easily โ€” work the square as two panels and join with a zipper.

I sometimes add tiny crocheted accessories like bows or a scarf to give personality and seasonal flair to the pillow.

Embroider different mouth shapes to change the panda's expression from happy to sleepy or surprised โ€” placement matters a lot for expression.

You can experiment with placement of ears and legs to get a sitting or more whimsical pose; pin parts before sewing to check looks.

Use safety stuffing like washable polyester fill and consider adding a small pillow insert inside for extra structure and easy washing of the cover.

Common Mistakes & How to Fix Them

โœ— Skipping the instruction to secure the beginning of each round with a pin or thread can make your rounds shift; always fix the first loop before continuing. โœ— Stuffing the pillow too loosely causes a floppy shape while overstuffing distorts the stitch texture; fill tightly and evenly, paying special attention to the corners and angles. โœ— Forgetting to leave long threads for sewing details makes assembly difficult; leave and keep long tails so you can position and sew ears, nose and limbs cleanly. โœ— Changing yarn or hook without checking gauge can result in a very different finished size; use recommended yarn weight and a 3.5 mm hook (or adjust and check your size first).

Pillow-panda Amigurumi Pattern

Make a soft, cuddly panda pillow with this step-by-step crochet pattern. You will create a plush square pillow with cute ears, legs, spots and a 3D nose โ€” perfect as a gift or nursery accent. The pattern uses plush yarn for a squishy, tactile finish and includes full assembly and embroidery instructions. Follow the rounds exactly to achieve the best shape and proportions.

Intermediate 5-7 Hours

Materials Needed for Pillow-panda Amigurumi Pattern

โ€” Main Fabric

  • 01
    YarnArt Dolce plush yarn (120 m / 100 g) - White (2 skeins)
  • 02
    YarnArt Dolce plush yarn (120 m / 100 g) - Black (1 skein)
  • 03
    Alternative plush yarns: Himalaya Dolphin Baby or other plush yarns (similar weight)
  • 04
    Filler - hollofayber (polyester stuffing), quantity to fill a 29x29 cm pillow
  • 05
    Black beads or buttons for eyes - 22 mm (2 pieces)

โ€” Tools Required

  • 01
    Crochet hook size 3.5 mm (recommended; yarn package may suggest 3.5-5 mm)
  • 02
    Scissors
  • 03
    Tapestry/yarn needle for sewing and embroidery
  • 04
    Stitch markers or pins (to mark beginning of rounds)
  • 05
    Polyester stuffing (hollofayber)
  • 06
    Black beads or buttons for eyes (22 mm)
  • 07
    Sewing needle for assembly

Progress Tracker

0% Complete

โ€” Materials :

Info :

I used YarnArt Dolce yarn. (120 m /100 g.). Colors: white (2 clew) and black (1 clew). (You can crochet any other plush yarn - Himalaya Dolphin Baby or YarnArt Dolce) Filler (I used hollofayber) Hook โ„– 3.5-5 mm (The size of the hook is specified on the package of yarn.). I used โ„–3,5 black beads (or buttons) for eyes (22 mm) Needle Do not forget to fix the beginning of each new circle with a pin or thread.

โ€” Symbols :

Infos :

sc - single crochet: inc - increase: dec - decrease dc - double crochet hdc - half double crochet sl st - slip stitch: ch - chain

โ€” Pillow :

Info :

Use white plush yarn

Round 1 :

90 ch, connect with the first loop

Round 2 - 37 :

90 sc

Info :

Leave a long thread and sew the top of the pillow. We fasten the thread and hide inside the pillow.

Info :

Fill tightly and evenly. Fill the angle of the pillow well. Sew and fasten the thread and hide inside the pillow.

โ€” Ear (2 details) :

Info :

Use black plush yarn

Round 1 :

6 sc in magic Ring {6}

Round 2 :

(inc) โ€“ repeat 6 times {12}

Round 3 :

(1 sc, inc) โ€“ repeat 6 times {18}

Round 4 :

(2 sc, inc) โ€“ repeat 6 times {24}

Round 5 :

(3 sc, inc) โ€“ repeat 6 times {30}

Round 6 :

(4 sc, inc) โ€“ repeat 6 times {36}

Round 7 :

(5 sc, inc) โ€“ repeat 6 times {42}

Round 8 :

42 sc

Round 9 :

(19 sc, dec) โ€“ repeat 2 times {40}

Info :

Leave a long thread for sewing

โ€” Nose :

Info :

Use white plush yarn

Round 1 :

6 sc in magic Ring {6}

Round 2 :

(inc) โ€“ repeat 6 times {12}

Round 3 :

(1 sc, inc) โ€“ repeat 6 times {18}

Round 4 :

(2 sc, inc) โ€“ repeat 6 times {24}

Round 5 :

(3 sc, inc) โ€“ repeat 6 times {30}

Round 6 :

(4 sc, inc) โ€“ repeat 6 times {36}

Round 7 :

(5 sc, inc) โ€“ repeat 6 times {42}

Round 8 - 9 :

42 sc

Info :

Leave a long thread for sewing

โ€” Leg (2 details) :

Info :

Use black plush yarn

Round 1 :

6 sc in magic Ring {6}

Round 2 :

(inc) โ€“ repeat 6 times {12}

Round 3 :

(1 sc, inc) โ€“ repeat 6 times {18}

Round 4 :

18 sc

Info :

Leave a long thread for sewing

โ€” Arm (2 details) :

Info :

Use black plush yarn

Round 1 :

6 sc in magic Ring {6}

Round 2 :

(inc) โ€“ repeat 6 times {12}

Round 3 :

12 sc

Info :

Leave a long thread for sewing

โ€” Spot (2 details) :

Info :

Use black plush yarn

Round 1 :

12 ch

Round 2 :

we begin to work from the second loop from the hook: 10 sc, 3 sc in 1 loop

Info :

On the other side of the chain: 10 sc, sl st

Round 3 :

1 ch, we begin to work from the second loop from the hook: inc, 9 sc, inc, 1 sc, inc, 11 sc, sl st

Round 4 :

1 ch, we begin to work from the second loop from the hook: 1 sc, inc, 4 sc, hdc, 5 dc, hdc, 1 sc, sl st

Info :

We fasten the thread and leave a long thread for sewing

โ€” Assembly :

Info :

Sew ears: we put ears on the angles of the pillow. Sew and fill. Fasten the thread and hide inside the pillow.

Info :

Sew nose between 13 and 21 rounds. Do not sew up to the end. Fill and leave a small hole. We will embroider the nose.

Info :

Use black plush yarn and needle. Embroider the nose. We start from the center. We fasten the thread and hide inside the nose, fill and sew a hole.

Info :

Sew spots and fasten the thread and hide inside the pillow.

Info :

Sew eyes on spots and sew arms and legs. Fasten the thread and hide inside the pillow.

Assembly Instructions

  • Sew ears to the pillow corners (angles) and fill each ear before closing; fasten thread and hide ends inside the pillow.
  • Sew the nose between rounds 13 and 21 of the pillow. Do not sew it completely closed before stuffing; stuff, close the hole and fasten the thread inside the nose.
  • Position and sew the black eye spots onto the face, then attach black beads or buttons for the eyes on top of the spots and secure stitching inside the pillow.
  • Sew arms and legs to the sides and bottom of the pillow respectively, spacing them evenly; fasten and hide all thread tails inside the pillow.
  • Embroider the nose and mouth with black plush yarn and a needle, starting from the center and securing thread ends inside the nose after finishing.

Important Notes

  • ๐Ÿ’กDo not forget to fix the beginning of each new circle with a pin or thread to avoid shifting your rounds.
  • ๐Ÿ’กStuff the pillow tightly and evenly, paying special attention to the corners and angles so the pillow keeps its square shape.
  • ๐Ÿ’กLeave long threads/tails on finished pieces so you can sew them into place easily and pull thread inside when fastening.
  • ๐Ÿ’กUse the recommended plush yarn to achieve the soft texture; substituting yarn weight will change the final size and texture.

This cute Panda Pillow is made to cuddle and decorate bedrooms or nurseries. ๐Ÿงถ It combines plush yarn with simple amigurumi pieces for a charming result you can finish in a weekend. ๐ŸŽ Sew the details carefully and enjoy a personalized, handmade gift that brings smiles. ๐Ÿงต

You ask,

we answer.

FAQs

What size will the finished piece be?

The finished pillow measures approximately 29 x 29 centimeters when using the recommended YarnArt Dolce plush yarn and a 3.5 mm hook, though size may vary slightly with tension.

Can I use different yarn weights for this pattern?

Yes, you can use different yarn weights, but the final size and texture will change; choose an appropriate hook and make a small gauge swatch to check expected dimensions.

Do I need prior crochet experience for this pattern?

This pattern is rated intermediate โ€” basic knowledge of single crochet, increases and decreases, and working in the round is recommended to follow the rounds and assembly.

How long does this project typically take to complete?

Most crocheters complete this project in about 5-7 hours, depending on experience, speed, and how much time you spend on assembly and embroidery.