🧢 Beautiful ✨ Detailed πŸ’ Adorable

Pillow-Fox Amigurumi Pattern

Pillow-Fox Amigurumi Pattern
4.0β˜… Rating
5-7 Hours Time Needed
2.3K Made This
βœ‚οΈ

Intermediate Level

Ideal for those with basic crochet experience, featuring slightly more advanced stitches and techniques to expand your skills.

⏱️

Weekend Treat

Takes 5-7 hours, making it an enjoyable project to finish over a couple of days.

🧸

Cute Companion

An adorable friend to cherish, handcrafted with love to bring comfort and joy for years to come.

About This Pillow-Fox Amigurumi Pattern

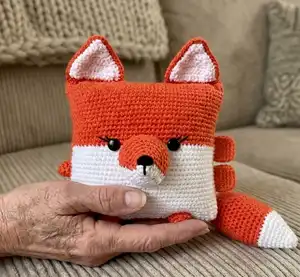
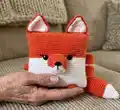
This pattern creates a plush fox-shaped pillow worked in rounds with a contrasting white lower face and removable tail detail. It uses soft plush yarn for a squishy finish and includes instructions for nose, ears, legs, arms and tail. The pattern is photo-supported and includes stitch counts for every round so you can follow along with confidence.

Pillow-Fox Amigurumi Pattern crochet pattern - detailed view of completed project

You will learn simple increases and decreases, basic shaping, and assembly tips to get a neat finish. The finished pillow measures around 28x33 cm depending on yarn and hook.

Why You'll Love This Pillow-Fox Amigurumi Pattern

I absolutely love this pattern because it transforms simple stitches into a lovable, tactile friend that both kids and adults adore. I enjoy the plush fabric feel and how quickly the pillow takes shape, making it satisfying to finish. The contrasting face and cute protruding nose add so much character with minimal effort. Sewing the ears, tail and facial details is where the piece really comes alive, and I get excited seeing unique variations emerge when crocheters change colors or yarns.

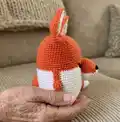
Pillow-Fox Amigurumi Pattern step 1 - construction progress Pillow-Fox Amigurumi Pattern step 2 - assembly progress Pillow-Fox Amigurumi Pattern step 3 - details and accessories Pillow-Fox Amigurumi Pattern step 4 - final assembly and finishing

Switch Things Up

I love how easy it is to customize this pillow by changing yarn colors or sizes; try pastel shades for a nursery-friendly version.

I often switch to bulky plush yarn with a larger hook to make a super-squishy jumbo pillow that is great for floor seating.

I sometimes make a mini version using finer yarn and a smaller hook to create a keyring or small giftable plush companion.

I like adding embroidered freckles or blush with a thin yarn to change the fox's facial expression and give it personality.

I recommend experimenting with safety eyes or embroidered eyes for different looks; embroidered eyes are safer for small children.

I sometimes crochet little accessories like a tiny scarf, hat or bow and sew them on to personalize each pillow as a gift.

I also adjust the tail color striping by adding an extra white round or changing the orange/white ratio for a bolder contrast.

I add wire to the tail inner core if I want a posable tail that can be shaped for display photos.

I find adding small felt or crocheted patches on the back makes the pillow unique and helps hide seams or joins.

I encourage trying different eye distances or nose placements to create different personalities β€” a wider eye distance gives a surprised look, while closer eyes make it cuter.

Common Mistakes & How to Fix Them

βœ— Skipping the stitch marker at the start of each round causes lost counts and uneven shaping; place a marker at the start of every round and move it as you crochet. βœ— Not securing the beginning of joined chains can unravel your work during assembly; fix the beginning of each new circle with a pin or thread as recommended. βœ— Understuffing or overstuffing the pillow creates uneven corners or a flat look; fill tightly and evenly, stuffing the angles well and adding fiber gradually until the shape is balanced. βœ— Cutting tails too short makes sewing parts difficult; leave long threads for sewing the nose, legs, arms and ears and fasten off securely after sewing. βœ— Crocheting too tightly with plush yarn can hide stitches and reduce flexibility; maintain consistent, slightly loose tension to keep stitches visible and the piece soft.

Pillow-Fox Amigurumi Pattern

Make a soft, cuddly Pillow-Fox using plush yarn and simple amigurumi techniques. This pattern guides you step-by-step through crocheting the pillow body, nose, ears, legs, arms and tail, with clear round counts and assembly notes. Perfect as a handmade gift or cozy accent for a nursery or living room. You will love the plush texture and charming fox face details.

Intermediate 5-7 Hours

Materials Needed for Pillow-Fox Amigurumi Pattern

β€” Main Fabric

  • 01
    YarnArt Dolce plush yarn (120 m / 100 g) - Orange: 2 skeins (approx.)
  • 02
    YarnArt Dolce plush yarn (120 m / 100 g) - White: 1 skein (approx.)
  • 03
    Black acrylic or cotton yarn for embroidered nose and eyelashes (small amount)
  • 04
    Optional plush yarn in yellow or accent color for small details (as used for legs/arms in photos)
  • 05
    Polyester stuffing / hollofayber for filling

β€” Tools Required

  • 01
    Crochet hook size 3.5 mm (I used 3.5 mm; package recommends 3.5-4 mm)
  • 02
    Black beads or buttons for eyes (18-22 mm) or safety eyes
  • 03
    Scissors
  • 04
    Yarn needle for sewing
  • 05
    Stitch markers
  • 06
    Pins to fix beginnings of rounds
  • 07
    Polyester stuffing (hollofayber)
  • 08
    Needle for embroidery (for eyelashes and nose)

Progress Tracker

0% Complete

β€” Pillow :

Round 1 :

93 ch, connect with the first loop

Round 2 :

White yarn: 45 sc; Orange yarn: 48 sc {93}

Round 3 - 19 :

White yarn: 45 sc; Orange yarn: 48 sc {93}

Round 20 - 38 :

Orange yarn: 93 sc

Info :

Leave a long thread and sew the top of the pillow. We fasten the thread and hide inside the pillow.

Info :

Fill tightly and evenly. Fill the angle of the pillow well. Sew and fasten the thread and hide inside the pillow.

β€” Nose :

Info :

Use white plush yarn

Round 1 :

6 sc in magic Ring {6}

Round 2 :

orange yarn: inc, inc, inc; white yarn: inc, inc, inc {12}

Round 3 :

orange yarn: 7 sc; white yarn: 5 sc {12}

Round 4 :

orange yarn: 3 sc, inc, 1 sc, inc, 1 sc; white yarn: 5 sc {14}

Round 5 :

orange yarn: 2 sc, inc, 2 sc, inc, 3 sc; white yarn: inc, 2 sc, inc, 1 sc {18}

Round 6 :

orange yarn: 2 sc, inc, 3 sc, inc, 3 sc, inc; white yarn: 3 sc, inc, 3 sc {22}

Round 7 :

orange yarn: 3 sc, inc, 4 sc, inc, 5 sc; white yarn: inc, 4 sc, inc, 2 sc {26}

Round 8 :

orange yarn: 3 sc, inc, 2 sc, inc, 2 sc, inc, inc, 2 sc, inc, 2 sc; white yarn: inc, 2 sc, inc, 2 sc, inc, 3 sc {34}

Round 9 :

orange yarn: inc, 20 sc; white yarn: 13 sc {35}

Round 10 :

orange yarn: 22 sc; white yarn: 13 sc {35}

Round 11 :

orange yarn: 22 sc; white yarn: 13 sc {35}

Info :

Leave a long thread for sewing (white and orange).

Info :

Fill the nose. Use black acryl or cotton yarn and make nose

β€” Leg (2 details) :

Info :

Use yellow plush yarn

Round 1 :

6 sc in magic Ring {6}

Round 2 :

(inc) – repeat 6 times {12}

Round 3 :

(1 sc, inc) – repeat 6 times {18}

Round 4 :

18 sc

Info :

Leave a long thread for sewing

β€” Arm (2 details) :

Info :

Use yellow plush yarn

Round 1 :

6 sc in magic Ring {6}

Round 2 :

(inc) – repeat 6 times {12}

Round 3 :

12 sc

Info :

Leave a long thread for sewing

β€” Tail :

Info :

Use white yarn

Round 1 :

6 sc in Magic ring

Round 2 :

(2 sc, inc) – repeat 2 times {8}

Round 3 :

(3 sc, inc) – repeat 2 times {10}

Round 4 :

(2 sc, inc) – repeat 3 times, 1 sc {13}

Round 5 :

(3 sc, inc) – repeat 3 times, 1 sc {16}

Round 6 :

(4 sc, inc) – repeat 3 times, 1 sc {19}

Round 7 :

(5 sc, inc) – repeat 3 times, 1 sc {22}

Round 8 :

(4 sc, inc) – repeat 4 times, 2 sc {26}

Round 9 :

(4 sc, inc) – repeat 5 times, 1 sc {31}

Info :

Use orange yarn

Round 10 - 19 :

31 sc

Round 20 :

(4 sc, dec) – repeat 5 times, 1 sc {26}

Round 21 :

26 sc

Round 22 :

(3 sc, dec) – repeat 5 times, 1 sc {21}

Round 23 :

21 sc

Round 24 :

(2 sc, dec) – repeat 5 times, 1 sc {16}

Round 25 :

16 sc

Info :

Fill. Leave a long thread for sewing.

β€” Ears :

Info :

Use orange yarn and make 2 details. Then use white yarn and make 2 details

Row 1 :

Make 15 ch

Row 2 :

We begin to work from the second loop from the hook: 14 sc, 1 ch, turn

Row 3 - 4 :

We begin to work from the second loop from the hook: 14 sc, 1 ch, turn

Row 5 :

We begin to work from the second loop from the hook: dec, 10 sc, dec, 1 ch, turn

Row 6 :

We begin to work from the second loop from the hook: dec, 8 sc, dec, 1 ch, turn

Row 7 :

We begin to work from the second loop from the hook: dec, 6 sc, dec, 1 ch, turn

Row 8 :

We begin to work from the second loop from the hook: dec, 4 sc, dec, 1 ch, turn

Row 9 :

We begin to work from the second loop from the hook: dec, 2 sc, dec, 1 ch, turn

Row 10 :

We begin to work from the second loop from the hook: dec, dec, 1 ch, turn

Row 11 :

We begin to work from the second loop from the hook: dec

Info :

Tighten the thread and cut it off.

Info :

Use orange yarn and crochet around the ear. Start from the bottom right corner. Make 12 sc, 3 sc in the 1 top loop, 12 sc. See photos

Info :

Leave a long thread for sewing ears together.

Info :

Similarly, make two white details. Tighten thread and cut it off.

Info :

We put together white and orange details and crochet ears together sc (use orange yarn).

β€” Assembly :

Info :

Leave a long thread for sewing. Sew ears to the orange part of the pillow. Sew nose between 12 and 21 rounds, use white and orange yarn.

Info :

Sew eyes (distance between eyes 11 sc). And make eyelashes.

Info :

Fill and sew legs. Fill and sew arms. Sew tail to bottom corner of the pillow.

Assembly Instructions

  • Sew the ears to the orange top of the pillow using the long threads left from ear assembly; position so the base sits on the top edge and stitch securely.
  • Sew the nose between rounds 12 and 21 on the front of the pillow, using both white and orange threads to secure and hide ends.
  • Attach eyes so the distance between the eyes is 11 sc across the face; sew on black beads or buttons and embroider eyelashes with black yarn.
  • Fill the pillow firmly and evenly, paying special attention to the corners; sew the opening closed and hide the thread inside the pillow.
  • Fill legs and arms, then sew two legs to the bottom edge spaced evenly and sew the two arms to the side seams of the pillow.
  • Sew the tail to the bottom corner of the pillow using the long thread left when finishing the tail and secure tightly.

Important Notes

  • πŸ’‘Do not forget to fix the beginning of each new circle with a pin or thread to keep rounds aligned.
  • πŸ’‘Use stitch markers to mark the start of each round and especially when changing colors for accurate counts.
  • πŸ’‘Stuff firmly but not too tightly; overstuffing can distort the shape while under-stuffing will leave gaps and a floppy finish.
  • πŸ’‘Leave long threads after finishing small parts (nose, ears, legs, arms, tail) to make sewing into the pillow easier and neater.

This adorable Pillow-Fox is a delightful handmade gift and a cozy addition to any room. The plush yarn gives it a friendly, squishy feel that's perfect for cuddling and display. Make one in classic orange-and-white or customize colors for a unique twist. 🧢🦊

You ask,

we answer.

FAQs

What size will the finished piece be?

The finished pillow measures approximately 28 x 33 centimeters when made with YarnArt Dolce and a 3.5 mm hook, though size may vary with different yarns and hooks.

Can I use different yarn weights for this pattern?

Yes, you can substitute yarn weights, but the final size and texture will change; adjust hook size accordingly and expect different stitch counts to affect proportions.

Do I need prior crochet experience for this pattern?

This pattern is rated intermediate; basic knowledge of single crochet, increases, decreases, working in rounds and simple sewing is recommended.

How long does this project typically take to complete?

Most crocheters finish this Pillow-Fox in about 5-7 hours, depending on experience, yarn choice and how much time is spent on assembly and finishing.

What should I use for eyes and nose?

The pattern suggests black beads or buttons 18-22 mm for eyes and black acrylic or cotton yarn for embroidered nose and eyelashes if you prefer not to use beads.