🧢 Beautiful ✨ Detailed πŸ’ Adorable

Pillow- Dino Amigurumi Pattern

Pillow- Dino Amigurumi Pattern
4.9β˜… Rating
5-7 Hours Time Needed
2.0K Made This
βœ‚οΈ

Intermediate Level

Ideal for those with basic crochet experience, featuring slightly more advanced stitches and techniques to expand your skills.

⏱️

Weekend Treat

Takes 5-7 hours, making it an enjoyable project to finish over a couple of days.

🧸

Cute Companion

An adorable friend to cherish, handcrafted with love to bring comfort and joy for years to come.

About This Pillow- Dino Amigurumi Pattern

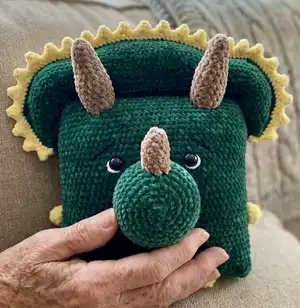
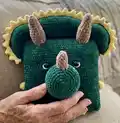
This pattern creates a plush Dino pillow worked in plush yarn with separate details for nose, horns, legs, arms and a frilled crest. The design uses simple amigurumi shaping combined with a flat pillow panel to form a cuddly square pillow. Youll work in rounds for the details and rows for the crest, then assemble all pieces for a charming finished toy.

Pillow- Dino Amigurumi Pattern crochet pattern - detailed view of completed project

Perfect as a gift for children or a whimsical accent for your home, the pattern uses YarnArt Dolce or similar plush yarns. Full step-by-step instructions and clear placement guidance are included for easy assembly.

Why You'll Love This Pillow- Dino Amigurumi Pattern

I absolutely love this pattern because it turns a simple pillow into a playful character with personality. I enjoy the mix of flat crocheting for the pillow body and small amigurumi rounds for the nose and horns β€” it keeps the project interesting from start to finish. The plush yarn gives the Dino a soft, tactile finish that kids always want to hug. Sewing the pieces together and adding the frilled crest is the part I find most rewarding because it makes the Dino come alive. I hope you enjoy making it as much as I did designing and testing the finished pillow.

Pillow- Dino Amigurumi Pattern step 1 - construction progress Pillow- Dino Amigurumi Pattern step 2 - assembly progress Pillow- Dino Amigurumi Pattern step 3 - details and accessories Pillow- Dino Amigurumi Pattern step 4 - final assembly and finishing

Switch Things Up

I love how versatile this Pillow Dino pattern is for customization; try mixing yarn colors for a unique look.

I often change the crest color to a gradient by switching yarn every few rows for a playful stripe effect.

If you want a smaller version, use a lighter weight yarn and a smaller hook to create mini pillow keychains or ornaments.

For an extra plush feel, choose a thicker plush yarn and a slightly larger hook β€” youll get a chunkier, squishier pillow.

I sometimes add tiny felt accessories like a bow or a pocket for a personalized finish that makes great gifts.

Try embroidering expressive eyebrows or a mouth with different yarn colors to change the Dino's personality.

You can replace the bead eyes with safety eyes or embroider the eyes for a fully soft, child-safe toy.

I recommend stuffing the nose and horns firmly but not too tight, and using a small hook to hide the knot inside for a neat finish.

Make a set of matching Dino pillows in coordinating colors for a nursery or playroom, each with a slightly different crest style.

If you enjoy assembly, experiment with different placements of the nose and eyes to vary facial expressions β€” small shifts make a big difference.

Common Mistakes & How to Fix Them

βœ— Not fixing the beginning of each round can cause misaligned edges; secure the beginning of each new circle with a pin or thread to maintain even joins. βœ— Overstuffing the pillow will distort its shape and make seams bulky; stuff tightly but evenly and shape the corners carefully while filling. βœ— Skipping stitch counts during increases and decreases leads to misshapen details; count stitches after each round and use markers if needed for accuracy. βœ— Rushing assembly without pinning parts first results in asymmetry; pin all parts in place and check placement before sewing to ensure correct alignment.

Pillow- Dino Amigurumi Pattern

Create a soft, squishy Dino pillow that doubles as a playful amigurumi companion. This pattern guides you through crocheting a plush square pillow with a cute snout, horns, legs and a frilled crest. Youll love the tactile plush yarn and the charming details that make this a unique handmade gift. Follow the step-by-step rounds and assembly notes to finish a delightful pillow perfect for kids and adults.

Intermediate 5-7 Hours

Materials Needed for Pillow- Dino Amigurumi Pattern

β€” Main Fabric

  • 01
    YarnArt Dolce plush yarn (120 m / 100 g) - Green (approx. 3 skeins)
  • 02
    YarnArt Dolce plush yarn (120 m / 100 g) - Yellow (approx. 1 skein)
  • 03
    YarnArt Dolce plush yarn (120 m / 100 g) - Beige (approx. 1 skein)
  • 04
    Small amount white yarn for eye details
  • 05
    Black acrylic or cotton yarn for eyebrows
  • 06
    Alternative plush yarn options: Himalaya Dolphin Baby or similar plush yarn

β€” Tools Required

  • 01
    Crochet hook size 3.5 mm (pattern suggests 3.5; hook size on yarn label may vary 3.5-5 mm)
  • 02
    Filler - hollofayber or polyester stuffing
  • 03
    Black beads or buttons for eyes (22 mm)
  • 04
    Needle for sewing and weaving ends
  • 05
    Pins to fix the beginning of rounds and for assembly
  • 06
    Scissors
  • 07
    Small crochet hook or hook for hiding thread inside nose

Progress Tracker

0% Complete

β€” Pillow :

Round 1 :

90 ch, connect with the first loop

Round 2 – 37 :

90 sc

Info :

Leave a long thread and sew the top of the pillow. We fasten the thread and hide inside the pillow.

Info :

Fill tightly and evenly. Fill the angle of the pillow well. Sew and fasten the thread and hide inside the pillow.

β€” Nose :

Round 1 :

6 sc in magic Ring {6}

Round 2 :

(inc) – repeat 6 times {12}

Round 3 :

(1 sc, inc) – repeat 6 times {18}

Round 4 :

(2 sc, inc) – repeat 6 times {24}

Round 5 :

(3 sc, inc) – repeat 6 times {30}

Round 6 :

(4 sc, inc) – repeat 6 times {36}

Round 7 :

(5 sc, inc) – repeat 6 times {42}

Round 8 – 14 (7 rounds) :

42 sc

Info :

Leave a long thread for sewing

β€” Leg (2 details) :

Round 1 :

6 sc in magic Ring {6}

Round 2 :

( inc) – repeat 6 times {12}

Round 3 :

(1 sc, inc) – repeat 6 times {18}

Round 4 :

18 sc

Info :

Leave a long thread for sewing

β€” Arm (2 details) :

Round 1 :

6 sc in magic Ring {6}

Round 2 :

(inc) – repeat 6 times {12}

Round 3 :

12 sc

Info :

Leave a long thread for sewing

β€” Brow horn (2 details) :

Round 1 :

6 sc in Magic ring

Round 2 :

5 sc, inc {7}

Round 3 :

6 sc, inc {8}

Round 4 :

(3 sc, inc) – repeat 2 times {10}

Round 5 :

(4 sc, inc) – repeat 2 times {12}

Round 6 :

(5 sc, inc) – repeat 2 times {14}

Round 7 – 12 (6 rounds) :

14 sc

Info :

Fill. Leave a long thread for sewing.

β€” Nose horn :

Round 1 :

6 sc in Magic ring

Round 2 :

5 sc, inc {7}

Round 3 :

6 sc, inc {8}

Round 4 :

7 sc, inc {9}

Round 5 :

8 sc, inc {10}

Info :

Fill. Leave a long thread for sewing.

β€” Frilled crest (2 details) :

Row 1 :

Make 69 ch

Row 2 :

we begin to work from the second loop from the hook: dec, 10 sc, inc, 42 sc, inc, 10 sc, dec, 1 ch

Row 3 :

we begin to work from the second loop from the hook: dec, 9 sc, inc, 44 sc, inc, 9 sc, dec, 1 ch

Row 4 :

we begin to work from the second loop from the hook: dec, 9 sc, inc, 44 sc, inc, 9 sc, dec, 1 ch

Row 5 :

we begin to work from the second loop from the hook: dec, 9 sc, inc, 44 sc, inc, 9 sc, dec, 1 ch

Row 6 :

we begin to work from the second loop from the hook: dec, 9 sc, inc, 13 sc, hdc, 16 dc, hdc, 13 sc, inc, 9 sc, dec, 1 ch

Row 7 :

we begin to work from the second loop from the hook: dec, 9 sc, inc, 13 sc, hdc, 16 dc, hdc, 13 sc, inc, 9 sc, dec, 1 ch

Row 8 :

we begin to work from the second loop from the hook: dec, 9 sc, inc, 12 sc, hdc, 18 sc, hdc, 12 sc, inc, 9 sc, dec, 1 ch

Row 9 :

we begin to work from the second loop from the hook: dec, 9 sc, inc, 11 sc, hdc, 20 sc, hdc, 11 sc, inc, 9 sc, dec, 1 ch

Row 10 :

we begin to work from the second loop from the hook: dec, 9 sc, inc, 12 sc, hdc, 18 sc, hdc, 12 sc, inc, 9 sc, dec

Info :

Add two parts. Use green yarn and sew two parts with sc

Info :

Fill tightly and sew bottom of filled crest with sc. Leave a long thread for sewing.

Info :

Use yellow yarn and crochet top part

Info :

The Β«scallopΒ»: make 4 ch

Info :

we begin to work from the second loop from the hook: sc, hdc, dc

Info :

We skip one loop of the previous row and make 1 sc

Info :

Then we do 2 sc

Info :

And again: 4 ch, we begin to work from the second loop from the hook: sc, hdc, dc

Info :

We skip one loop of the previous row and make 1 sc, 2 sc

Info :

Repeat this way to the end of the top of the frilled crest

β€” Assembly :

Info :

Sew frilled crest

Info :

Fill and sew nose (between 12 and 22 rounds). Sew eyes between 22 and 23 rounds (distance between eyes 12 sc)

Info :

Use white yarn and make eyes. Insert the needle through the bottom of the nose. Leave the thread for the node. Do not pull the thread around the eye.

Info :

Make a knot and hide the thread inside the nose with a hook.

Info :

Sew nose horn and brow horn

Info :

Fill arms and legs and sew. Use black yarn and make eyebrows

Assembly Instructions

  • Sew the frilled crest to the top back of the pillow using single crochet seam or whipstitch, matching the two crest parts and filling before closing.
  • Fill and sew the nose between rounds 12 and 22 of the nose shaping, then attach the nose to the pillow front centered between row 12 and row 22.
  • Sew eyes between rounds 22 and 23 on the pillow front with a distance of 12 sc between eye centers; use black beads/buttons and secure from the inside.
  • Insert the needle through the bottom of the nose to secure white yarn eye details; leave thread for a knot and hide the knot inside the nose with a small hook.
  • Sew nose horn and brow horns into position on the crest and forehead, stuffing lightly before closing each horn and hiding threads inside the pieces.
  • Fill arms and legs firmly, arrange them at the pillow sides and bottom, then sew securely. Use black yarn to embroider eyebrows above the eyes.

Important Notes

  • πŸ’‘Do not forget to fix the beginning of each new circle with a pin or thread to prevent a twisted join and keep rounds even.
  • πŸ’‘Stuff pieces tightly and evenly but avoid overstuffing, especially in corners and the crest to preserve the shape of the pillow.
  • πŸ’‘Leave a long thread for sewing on small pieces so you can securely attach them and weave the ends inside the piece.
  • πŸ’‘Pin parts in place and check symmetry before sewing to ensure balanced placement of eyes, nose and crest.

This adorable Pillow Dino is a cozy, cuddly project that doubles as a decorative accent and a playful toy. It mixes plush yarn textures with charming amigurumi details for a piece full of personality. Perfect as a handmade gift or a cheerful addition to a nursery or living room. πŸ§ΆπŸ¦–

You ask,

we answer.

FAQs

What size will the finished piece be?

The finished pillow measures approximately 30x40 centimeters as made by the designer, but the size may vary depending on yarn and hook size.

Can I use different yarn weights for this pattern?

You can use other plush yarns, but changing yarn weight will alter the final size; adapt your hook size and expect a different finished dimension.

Do I need prior crochet experience for this pattern?

This pattern is rated intermediate because it includes working in rounds, shaping with increases and decreases, and sewing multiple parts together.

How long does this project typically take to complete?

Most crafters finish this project in about 5-7 hours, though time will vary with experience and the level of detail in assembly.