🧢 Beautiful ✨ Detailed πŸ’ Adorable

Pillow- Cat Amigurumi Pattern

Pillow- Cat Amigurumi Pattern
4.6β˜… Rating
5-7 Hours Time Needed
3.7K Made This
βœ‚οΈ

Intermediate Level

Ideal for those with basic crochet experience, featuring slightly more advanced stitches and techniques to expand your skills.

⏱️

Weekend Treat

Takes 5-7 hours, making it an enjoyable project to finish over a couple of days.

🧸

Cute Companion

An adorable friend to cherish, handcrafted with love to bring comfort and joy for years to come.

About This Pillow- Cat Amigurumi Pattern

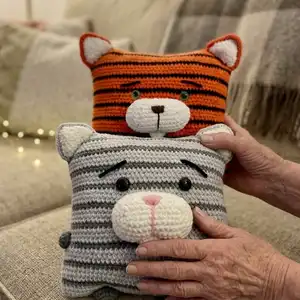
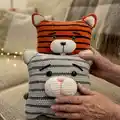
This pattern creates a cuddly striped cat pillow worked in rounds and small crochet pieces for ears, nose, lip, legs and arms. It uses plush yarn for a soft touch and alternating stripes to create the cat motif. Youll follow exact round counts and simple shaping to assemble a 30x33 cm pillow (size may vary by yarn and hook).

Pillow- Cat Amigurumi Pattern crochet pattern - detailed view of completed project

Includes step-by-step instructions for each piece and clear placement notes for sewing everything together. Great as a handmade gift or a cozy decoration for a childs room or nursery.

Why You'll Love This Pillow- Cat Amigurumi Pattern

I absolutely love this pattern because it turns simple stitches into a lovable striped cat pillow that feels wonderful to touch. I enjoy using plush yarn to create that soft, huggable texture that children adore. The design is playful but structured, so I can practice shaping small parts like ears and the nose while still finishing a satisfying project. Sewing the elements together and seeing the face come to life is always the most rewarding moment for me.

Pillow- Cat Amigurumi Pattern step 1 - construction progress Pillow- Cat Amigurumi Pattern step 2 - assembly progress Pillow- Cat Amigurumi Pattern step 3 - details and accessories Pillow- Cat Amigurumi Pattern step 4 - final assembly and finishing

Switch Things Up

I love how easy it is to customize this pillow by changing colors; try pastel shades for a nursery-friendly version or bold brights for a playful kiddo gift.

You can change the size by swapping yarn weight and hook size β€” bulky yarn with a larger hook makes a chunky pillow while thinner yarn makes a mini keychain version.

I often swap the striped pattern for solid or ombre colors to match my home decor β€” you can alternate color every 1 or 2 rounds for different effects.

To create a set, crochet a few pillows in complementary colors and sizes and display them together for a charming collection.

I sometimes replace bead eyes with embroidered eyes for a safer toy for small children or use smaller buttons for a subtler look.

For more personality, add tiny crocheted accessories like a bow, collar or a little heart and sew them to the chest or ear.

If you want a posable version, consider adding a small length of wire inside each arm before closing to make them adjustable.

Try using different yarn textures such as velvet or faux fur for a super-soft finish β€” just test gauge so the face pieces still match proportionally.

I recommend experimenting with nose and eyebrow styles; an embroidered smile or angled eyebrows change the expression dramatically.

For gifting, add a hidden zipper to the bottom seam so the pillow cover can be removed and washed β€” I sometimes leave an opening and insert a washable inner cushion.

Common Mistakes & How to Fix Them

βœ— Skipping stitch markers during rounds and color changes leads to misalignment; place a marker at the start of each round and when switching colors to keep your stripes even. βœ— Not stuffing evenly results in a lumpy or misshapen pillow; stuff gradually, focusing on corners and angles, and check shape frequently while filling. βœ— Cutting yarn tails too short makes sewing pieces difficult and visible; leave long threads for sewing and hide the ends inside the pillow when fastening off. βœ— Ignoring stitch counts on shaping rounds causes incorrect piece size; count after each round, especially after increases and decreases, and compare to the pattern counts.

Pillow- Cat Amigurumi Pattern

This adorable striped Pillow-Cat is a soft, plush amigurumi pillow you can crochet for kids or as a cozy home accent. The pattern uses plush yarn for a cuddly texture and includes full instructions for the pillow body, ears, nose, lip, legs and arms. Youll get clear round-by-round guidance and assembly placement so you can finish a charming, gift-ready cat pillow.

Intermediate 5-7 Hours

Materials Needed for Pillow- Cat Amigurumi Pattern

β€” Main Fabric

  • 01
    Himalaya Dolphin Baby plush yarn (120 m /100 g). Colors used: Light gray (2 skeins), Gray (1 skein), White (1 skein).
  • 02
    Pink yarn (small amount) for nose embroidery/details.
  • 03
    Black yarn (small amount) for eyebrows or facial detailing.
  • 04
    Alternative plush yarn option: YarnArt Dolce (use equivalent amounts).
  • 05
    Filler: Polyester stuffing (hollofayber) – quantity to fill a 30x33 cm pillow (approx 150-250 g depending on desired firmness).

β€” Tools Required

  • 01
    Crochet hook No 3.5 - 4.5 mm (pattern specifies hook size on yarn package); author used No 3.5 mm
  • 02
    Black beads or buttons for eyes (22 mm)
  • 03
    Tapestry/yarn needle for sewing pieces
  • 04
    Scissors
  • 05
    Stitch markers or pins to mark the beginning of rounds
  • 06
    Polyester stuffing (hollofayber)
  • 07
    Pins for positioning pieces while sewing
  • 08
    Optional: embroidery needle for nose and eyebrow details

Progress Tracker

0% Complete

β€” Pillow :

Info :

Use light gray plush yarn

Round 1 :

90 ch, connect with the first loop

Round 2 - 3 :

90 sc

Info :

We will change colors

Round 4 :

gray: 90 sc {90}

Round 5 - 7 :

light gray: 90 sc {90}

Round 8 :

gray: 90 sc {90}

Round 9 - 11 :

light gray: 90 sc {90}

Round 12 :

gray: 90 sc {90}

Round 13 - 15 :

light gray: 90 sc {90}

Round 16 :

gray: 90 sc {90}

Round 17 - 19 :

light gray: 90 sc {90}

Round 20 :

gray: 90 sc {90}

Round 21 - 23 :

light gray: 90 sc {90}

Round 24 :

gray: 90 sc {90}

Round 25 - 27 :

light gray: 90 sc {90}

Round 28 :

gray: 90 sc {90}

Round 29 - 31 :

light gray: 90 sc {90}

Round 32 :

gray: 90 sc {90}

Round 33 - 35 :

light gray: 90 sc {90}

Round 36 :

gray: 90 sc {90}

Round 37 - 39 :

light gray: 90 sc {90}

Info :

Leave a long thread and sew the top of the pillow. We fasten the thread and hide inside the pillow. Fill tightly and evenly. Fill the angle of the pillow well. Sew the bottom of the pillow and fasten the thread and hide inside the pillow.

β€” Ear (2 details) :

Info :

Use white plush yarn

Row 1 :

Make 11 ch

Row 2 :

we begin to work from the second loop from the hook: 10 sc, 1 ch, turn

Row 3 :

we begin to work from the second loop from the hook: dec, 6 sc, dec, 1 ch, turn

Row 4 :

we begin to work from the second loop from the hook: dec, 4 sc, dec, 1 ch, turn

Row 5 :

we begin to work from the second loop from the hook: dec, 2 sc, dec, 1 ch, turn

Row 6 :

we begin to work from the second loop from the hook: dec, dec, 1 ch, turn

Row 7 :

we begin to work from the second loop from the hook: dec

Info :

We crochet around the ear.

Info :

Make 7 sc, make inc in the left bottom angle, then make 8 sc, inc in the right bottom angle, 8 sc, sl st.

Info :

We fasten the thread and cut it off.

Info :

Use light gray yarn to crochet the outer row and assemble white and light gray details together (use light gray yarn).

Info :

We start from the bottom right corner and make: 10 sc, inc (in the upper corner), inc, 10 sc (hide all the ends inside ears). Leave a long thread for sewing.

Info :

We put ears on the angles of the pillow and sew (the angle of the pillow should be inside the ear). Fasten the thread and hide it inside the pillow.

β€” Nose :

Info :

Use white plush yarn

Round 1 :

Make 14 ch

Round 2 :

we begin to work from the second loop from the hook: 12 sc, 3 sc in 1 loop, 12 sc {27}

Round 3 :

3 in 1 loop, 12 sc, inc, inc, inc, 12 sc {33}

Round 4 :

inc, inc, inc, 13 sc, inc, sc, inc, sc, inc, 12 sc {39}

Round 5 :

sc, inc, sc, inc, sc, inc, 13 sc, inc, 2 sc, inc, 2 sc, inc, 13 sc {45}

Round 6 :

8 sc, hdc, (dc) – repeat 5 times, hdc, sc, hdc, (dc) – repeat 5 times, hdc, 22 sc {45}

Round 7 :

10 sc, inc, 10 sc, inc, 23 sc {45}

β€” Lip :

Info :

Use white plush yarn

Round 1 :

6 sc in magic Ring {6}

Round 2 :

(inc) – repeat 6 times {12}

Info :

Sew 2 halves with 6 sc. Leave a long thread for sewing.

β€” Leg (2 details) :

Info :

Use brown plush yarn

Round 1 :

6 sc in magic Ring {6}

Round 2 :

(inc) – repeat 6 times {12}

Round 3 :

(1 sc, inc) – repeat 6 times {18}

Round 4 :

18 sc

Info :

Leave a long thread for sewing.

β€” Arm (2 details) :

Info :

Use brown plush yarn

Round 1 :

6 sc in magic Ring {6}

Round 2 :

(inc) – repeat 6 times {12}

Round 3 :

12 sc

Info :

Leave a long thread for sewing.

β€” Assembly :

Info :

Sew nose between 12 and 22 rounds and fill. Use pink yarn and make pink nose.

Info :

Sew lip, fasten the thread and hide it inside the pillow.

Info :

Fill arms and sew (between 11 and 15 rounds). Sew legs and fasten the thread and hide inside the pillow.

Info :

Sew eyes between 24 and 25 rounds. Distance between eyes 11 sc. Use black yarn and make eyebrows.

Info :

Fasten all threads and hide ends inside the pillow for a clean finish.

Assembly Instructions

  • Sew the nose to the pillow between rounds 12 and 22; stuff the nose firmly before closing and use pink yarn to embroider the nose detail.
  • Position and sew the lip beneath the nose with the long thread left from the lip piece; fasten the thread and hide the ends inside the pillow.
  • Position arms between rounds 11 and 15 on each side of the pillow, stuff lightly and sew securely so they sit slightly forward for a natural pose.
  • Attach legs to the bottom edge of the pillow, spacing evenly; fasten threads and hide the ends inside the pillow for a tidy finish.
  • Sew ears to the top corners of the pillow so the pillow corner sits inside the ear; fasten threads and hide the ends inside the pillow.
  • Sew eyes between rounds 24 and 25; leave 11 sc between the centers of the eyes and embroider eyebrows with black yarn above the eyes.

Important Notes

  • πŸ’‘Do not forget to fix the beginning of each new circle with a pin or thread to avoid rotation when working in joined rounds.
  • πŸ’‘Work with consistent tension and use stitch markers to mark the first stitch of each round for even stripes.
  • πŸ’‘Stuff the pillow gradually and evenly, paying special attention to the corners so they keep their shape rather than bulging.
  • πŸ’‘Leave long tails for sewing each small part and hide these tails inside the pillow when finishing to prevent loose ends from showing.
  • πŸ’‘When changing colors, weave in ends or hide them into the first few stitches of the new round to keep edges neat.

This soft striped Pillow-Cat makes a sweet handmade gift and a cozy addition to any room. It uses plush yarn for a cuddle-friendly finish and clear round-by-round instructions for easy following. Whether made for a child or as a decorative accent, youll love the cute face and squishy texture. 🧢😺

You ask,

we answer.

FAQs

What size will the finished piece be?

The finished pillow measures approximately 30 x 33 centimeters when using the recommended plush yarn and a 3.5 mm hook; exact size depends on yarn and hook tension.

Can I use different yarn weights for this pattern?

Yes, you can use different yarn weights, but this will change the final size and texture; choose an appropriate hook for your yarn and expect adjustments to stuffing and placement of features.

Do I need prior crochet experience for this pattern?

This pattern is rated Intermediate; basic experience with single crochet, increases, decreases, working in the round and simple shaping is recommended for best results.

How long does this project typically take to complete?

Most crocheters finish this project in about 5-7 hours depending on experience, assembly time and whether you are making extra details or color changes.