🧶 Beautiful ✨ Detailed 💝 Adorable

Pillow-bull Amigurumi Pattern

Pillow-bull Amigurumi Pattern
4.1★ Rating
5-7 Hours Time Needed
1.1K Made This
✂️

Intermediate Level

Ideal for those with basic crochet experience, featuring slightly more advanced stitches and techniques to expand your skills.

⏱️

Weekend Treat

Takes 5-7 hours, making it an enjoyable project to finish over a couple of days.

🧸

Cute Companion

An adorable friend to cherish, handcrafted with love to bring comfort and joy for years to come.

About This Pillow-bull Amigurumi Pattern

This pattern creates a soft, square bull pillow made with plush yarn for a squishy finish. You will crochet the pillow body, ears, horns, nose, legs, arms and hair, then assemble them into a cute character. The pattern includes full round-by-round instructions and clear assembly guidance to help you finish with confidence.

Pillow-bull Amigurumi Pattern crochet pattern - detailed view of completed project

Perfect as a handmade gift for children or adults, the pillow measures about 28x28 cm depending on yarn and hook. The instructions use simple stitches but involve shaping and finishing steps for a charming result.

Why You'll Love This Pillow-bull Amigurumi Pattern

I absolutely love this pattern because it turns plush yarn into an irresistibly soft and characterful pillow that people of all ages will love. I enjoy how the simple square body becomes a personality-packed friend after a few small details like the horn, nose and hair. Sewing and shaping the nose adds a delightful sculpted look that makes each pillow unique. Working with plush yarn is soothing and fast, and the finished piece is both decorative and functional.

Pillow-bull Amigurumi Pattern step 1 - construction progress Pillow-bull Amigurumi Pattern step 2 - assembly progress Pillow-bull Amigurumi Pattern step 3 - details and accessories Pillow-bull Amigurumi Pattern step 4 - final assembly and finishing

Switch Things Up

I love to customize this pillow by changing the color palette; I often swap the beige for cream or mint for a fresh look.

If I want a bigger pillow I use bulkier plush yarn and a larger hook; conversely I use a smaller hook and thinner plush yarn for mini keychain versions.

I sometimes replace the button eyes with embroidered eyes or safety eyes for different ages and safety needs.

For a whimsical touch I change the horn shape or color, or add a little pompom on top to create personality variations.

I add clothing accessories like a tiny scarf or bow by crocheting small strips and sewing them on after assembly.

I experiment with eyebrow placement and embroidery to give different facial expressions from surprised to sleepy.

To make the pillow posable I occasionally add thin wire to limbs before stuffing, which gives fun movement to arms and legs.

For gift sets I make matching mini animals or a flat applique using the same plush yarn colors to coordinate with the pillow.

I also try different materials for eyes—wooden buttons or felt circles—to alter the overall look and safety for children.

When I want more dramatic hair I increase the number of hair rings or make longer chains before connecting to create a fuller fringe effect.

Common Mistakes & How to Fix Them

✗ Skipping the note to fix the beginning of each new round will make your rounds spiral; fix the first stitch with a pin or extra thread to keep rounds aligned. ✗ Not leaving long tails for sewing makes assembly fiddly and increases finishing time; always leave a long thread and use it to stitch parts securely. ✗ Understuffing the pillow causes flat corners and poor shape; fill tightly and evenly and pay attention to stuffing the corners well. ✗ Placing eyes without measuring causes uneven facial placement; measure and mark the eye distance (10-11 sc) before attaching buttons or beads. ✗ Pulling yarn too tightly when working plush yarn can compress the stitches excessively; maintain an even, gentle tension for a soft finish.

Pillow-bull Amigurumi Pattern

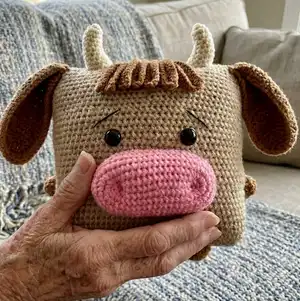
Create an adorable plush pillow bull that’s perfect for gifts, nursery decor, or a cozy accent. This pattern uses plush yarn for a soft, huggable finish and includes step-by-step rounds and assembly photos. You’ll make ears, horns, a cute snout and tiny limbs, then assemble them into a charming square bull pillow. A warm, satisfying project that blends simple stitches with thoughtful shaping.

Intermediate 5-7 Hours

Materials Needed for Pillow-bull Amigurumi Pattern

— Main Fabric

  • 01
    Himalaya Dolphin Baby plush yarn (120 m /100 g) - beige (2 rolls)
  • 02
    Himalaya Dolphin Baby plush yarn - pink (for nose) - 1 roll (approx)
  • 03
    Himalaya Dolphin Baby plush yarn - brown (for ears, legs, hair) - 1 roll (approx)
  • 04
    Himalaya Dolphin Baby plush yarn - white (for horns) - small amount
  • 05
    Acrylic yarn - black (for eyebrows)
  • 06
    Polyester filler (hollofayber) for stuffing

— Tools Required

  • 01
    Crochet hook size 3.5-5 mm (use size recommended on yarn label)
  • 02
    Black beads or buttons for eyes (22 mm)
  • 03
    Tapestry/yarn needle for sewing parts
  • 04
    Filler/hollofayber (polyester stuffing)
  • 05
    Needle for tightening and finishing
  • 06
    Pins to fix beginning rounds or position parts
  • 07
    Scissors
  • 08
    Stitch marker (optional)

Progress Tracker

0% Complete

— Pillow :

Round 1 :

90 ch, connect with the first loop

Round 2 - 37 :

90 sc

Infos :

Leave a long thread and sew the top of the pillow. We fasten the thread and hide inside the pillow. Fill tightly and evenly. Fill the corners of the pillow well. Sew and fasten the thread and hide inside the pillow.

— Ear (2 details) :

Round 1 :

21 ch

Round 2 :

We begin to crochet from the second loop from the hook: 1 hdc, 17 dc, 6 dc in 1 loop. On the back of the chain: 18 dc, 1 hdc, 1 sc, sl st, 1 ch

Round 3 :

We begin to crochet from the second loop from the hook: 1 sc, 1 hdc, 1 dc, inc, 17 dc, inc, inc, inc, 18 dc, inc, 1 dc, 1 hdc, 1 sc, sl st, 1 ch

Round 4 :

We begin to crochet from the second loop from the hook: 1 sc, 1 hdc, 19 dc, inc, 1 dc, inc, inc, inc, inc, inc, 1 dc, inc, 18 dc, inc, 1 dc, 1 hdc, 1 sc, sl st

Info :

Leave a long thread for sewing

— Leg (2 details) :

Round 1 :

6 sc in magic Ring {6}

Round 2 :

(inc) – repeat 6 times {12}

Round 3 :

(1 sc, inc) – repeat 6 times {18}

Round 4 :

18 sc

Info :

Leave a long thread for sewing

— Arm (2 details) :

Round 1 :

6 sc in magic Ring {6}

Round 2 :

(inc) – repeat 6 times {12}

Round 3 :

12 sc

Info :

Leave a long thread for sewing

— Nose :

Round 1 :

20 ch

Round 2 :

We begin to work from the second loop from the hook: 18 sc, 3 sc in 1 loop. On the back of the chain: 18 sc {39}

Round 3 :

3 sc in 1 loop, 18 sc, inc, 1 sc, inc, 17 sc, inc {45}

Round 4 :

1 sc, inc, 19 sc, inc, 2 sc, inc, 19 sc, inc {49}

Round 5 :

3 sc, inc, 20 sc, inc, 2 sc, inc, 20 sc, inc {53}

Round 6 :

4 sc, inc, 20 sc, inc, 4 sc, inc, 21 sc, inc {57}

Round 7 - 9 :

57 sc

Info :

Leave a long thread for sewing

— Horn (2 details) :

Round 1 :

6 sc in Magic ring

Round 2 :

(2 sc, inc) - repeat 2 times {8}

Round 3 :

(3 sc, inc) - repeat 2 times {10}

Round 4 :

inc, 4 sc, dec, 3 sc {10}

Round 5 :

inc, inc, 2 sc, dec, dec, 2 sc {10}

Round 6 :

inc, inc, inc, 7 sc {13}

Round 7 :

1 sc, inc, inc, inc, inc, 8 sc {17}

Round 8 :

2 sc, inc, inc, inc, inc, inc, 5 sc, dec, dec, 1 sc {20}

Round 9 :

4 sc, inc, 4 sc, inc, 6 sc, dec, dec {20}

Info :

Fill. Leave a long thread for sewing.

— Hair :

Step 1 :

We make 30 ch and connect with the first loop: sl st

Step 2 :

Make 30 ch and connect with the first loop in new chain: sl st

Step 3 :

Make 30 ch and connect with the first loop in new chain: sl st

Steps 4 - 7 :

Make 30 ch and connect with the first loop in new chain: sl st. I made 7 rings. If you want more hair, you can do more rings. Leave a long thread for sewing.

— Assembly :

Info :

Sew nose (between 9 and 17 rounds). Fill, do not sew up to the end.

Info :

Make a tightening: take a new thread, insert it into the needle, tie a knot. Insert the needle through the unstitched nose hole. We take out the needle in the middle of the lower part of the nose. We make a little seam and bring the needle in the place where the nostrils will be (distance between nostrils 14 sc).

Info :

Make a seam nearby, pull out the needle at the bottom of the nose (in the middle) and tighten a little. Make a knot here.

Info :

We make the second tightening on the other side. Fasten the thread at the bottom of the nose (inside). Cut off. Sew and fill the nose to the end. Fasten the thread and hide inside the pillow.

Info :

Sew the ears in the corners of the pillow. The ear should be sewn on the front of the pillow. Fasten the thread and hide inside the pillow.

Info :

Sew the horns on the top of the pillow. Fasten the thread and hide inside the pillow.

Info :

Use button for eyes and sew. Distance between eyes 10-11 sc.

Info :

Sew hair and fasten the thread and hide inside the pillow.

Info :

Fill and sew legs and hands. Fasten the thread and hide it inside the pillow.

Info :

Use black yarn and make eyebrows.

Assembly Instructions

  • Sew the nose between rounds 9 and 17; partially fill before finishing, then complete stuffing and sew closed, fastening the thread and hiding the tail inside the pillow.
  • Position and sew ears on the front corners of the pillow; fasten the thread securely and hide the ends inside the pillow for a neat finish.
  • Attach horns on the top center of the pillow; sew through the base and secure with a knot, hiding threads inside the pillow.
  • Sew the nose to the pillow then make two small tightening seams to form the nostrils (distance between nostrils about 14 sc); finish by hiding threads inside.
  • Sew hair rings across the top of the head where indicated, fasten threads and hide ends inside the pillow.
  • Attach legs and arms to the bottom and sides of the pillow respectively, fill as needed, sew securely and hide all thread tails inside the pillow.

Important Notes

  • 💡Do not forget to fix the beginning of each new round with a pin or thread to avoid spiraling rounds.
  • 💡Use pins to mark eye placement and the nose center before sewing to ensure even placement and symmetry.
  • 💡Stuff the pillow firmly but evenly and pay special attention to stuffing the corners for a neat square shape.
  • 💡Leave long tails for sewing on each small part to make assembly easier and more secure.
  • 💡Work with consistent tension when using plush yarn; too tight tension will make the pillow stiff and too loose will create gaps.

This adorable Pillow-bull is a cozy and huggable handmade friend that adds charm to any room. 🧶 It combines plush yarn and simple shaping to create a lovable, squishy square bull perfect for gifting. 🐮 Enjoy making each detail and watching your pillow come to life with personality! ✨

You ask,

we answer.

FAQs

What size will the finished piece be?

The finished pillow measures approximately 28x28 centimeters when using the recommended plush yarn and hook size, though final size depends on your yarn and tension.

Can I use different yarn weights for this pattern?

Yes, you can use different yarn weights, but the final size and texture will change; choose an appropriate hook for your yarn and expect changes in finished dimensions.

Do I need prior crochet experience for this pattern?

This pattern is rated intermediate; basic knowledge of single crochet, increases, decreases and working in rounds is recommended for best results.

How long does this project typically take to complete?

Most crocheters finish this pillow in 5-7 hours, depending on experience level, pieces made and assembly time.