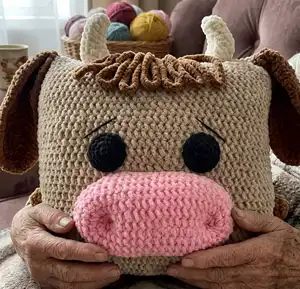
🧢 Beautiful ✨ Detailed πŸ’ Adorable

Pillow-bull Amigurumi Pattern

Pillow-bull Amigurumi Pattern
4.0β˜… Rating
5-7 Hours Time Needed
2.9K Made This
βœ‚οΈ

Intermediate Level

Ideal for those with basic crochet experience, featuring slightly more advanced stitches and techniques to expand your skills.

⏱️

Weekend Treat

Takes 5-7 hours, making it an enjoyable project to finish over a couple of days.

🧸

Cute Companion

An adorable friend to cherish, handcrafted with love to bring comfort and joy for years to come.

About This Pillow-bull Amigurumi Pattern

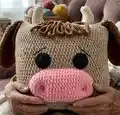
This pattern creates a plush, square bull pillow with removable features and lots of character. You will crochet a flattened pillow body and small amigurumi detailsβ€”ears, nose, horns, legs and hairβ€”to attach securely. The pattern uses plush yarn (Himalaya Dolphin Baby recommended) and gives full round-by-round instructions for each piece. It is a delightful home accessory or a handmade gift for kids and adults alike.

Pillow-bull Amigurumi Pattern crochet pattern - detailed view of completed project

Detailed photos and explicit assembly steps are included to help placement and finishing. You can easily adapt sizes by changing yarn weight or hook size for a larger or smaller pillow.

Why You'll Love This Pillow-bull Amigurumi Pattern

I absolutely love this pattern because it transforms simple stitches into a playful, huggable character with personality. I enjoy how the plush yarn creates a soft, tactile finish that is perfect for a pillow. Sewing the separate details on is very satisfying β€” each step makes the bull come to life. I also appreciate that the pattern is flexible: you can personalize colors, eye types, or add accessories to make each pillow unique.

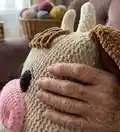
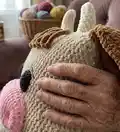
Pillow-bull Amigurumi Pattern step 1 - construction progress Pillow-bull Amigurumi Pattern step 2 - assembly progress Pillow-bull Amigurumi Pattern step 3 - details and accessories Pillow-bull Amigurumi Pattern step 4 - final assembly and finishing

Switch Things Up

I love how easy it is to customize this Pillow-Bull: try different color schemes for an instant personality change β€” pastel for nursery, bold for a playful look.

If you want a larger pillow, use a bulkier plush yarn and a larger hook; reduce yarn weight and hook size for a mini keychain-friendly version.

I often swap the button eyes for safety eyes or embroider eyes for a child-safe toy β€” each choice gives a different expression.

Experiment with eye spacing and eyebrow placement to give the bull a surprised, sleepy, or mischievous face; try moving eyes 1-2 stitches for variation.

Add accessories such as a tiny crochet bow, a scarf, or a bell to create seasonal or gift-ready variations of this pattern.

I sometimes make the nose in a contrasting textured yarn or add embroidery for extra detail and depth.

For a more realistic look, try shaping the horns with wire inside before sewing (wrap wire and hide inside stuffed horn) for posability.

Want more hair? Add more loops or make them longer by increasing the chain length for each hair ring.

Make a set of several bulls with coordinated colors to decorate a nursery or create a fun gift bundle.

If you plan to sell finished pieces, consider offering personalization by using initials or small embroidered motifs on the back of the pillow.

Common Mistakes & How to Fix Them

βœ— Skipping stitch markers while working long rounds can cause lost beginning-of-round points; place a marker at the start of every round and move it as you work. βœ— Understuffing corners and details results in floppy shapes; stuff firmly and evenly, adding small amounts of filler and shaping corners as you go. βœ— Forgetting to leave long tails for sewing leads to difficult assembly; leave long threads on parts to be attached and hide ends inside after sewing. βœ— Crocheting too tightly with plush yarn makes stitches hard to work; use a slightly larger hook or relax your tension for even stitches and easy assembly.

Pillow-bull Amigurumi Pattern

Make a soft, cuddly Pillow-Bull using plush yarn and simple amigurumi techniques. This pattern guides you through crocheting a square pillow body, ears, legs, nose, horns, hair and assembly with clear round-by-round instructions. Perfect as a handmade gift for children or a fun home accessory. You will learn shaping, sewing, and finishing tips to create a charming bull pillow.

Intermediate 5-7 Hours

Materials Needed for Pillow-bull Amigurumi Pattern

β€” Main Fabric

  • 01
    Himalaya Dolphin Baby plush yarn (120 m / 100 g) - Colors: beige (2 rolls) for the body
  • 02
    Himalaya Dolphin Baby plush yarn - pink (for nose) approx one ball
  • 03
    Himalaya Dolphin Baby plush yarn - brown (for ears, legs, arms, hair)
  • 04
    Himalaya Dolphin Baby plush yarn - white (for horns)
  • 05
    Acrylic yarn black - small amount for embroidered eyebrows
  • 06
    Filler: hollofayber (polyester stuffing) sufficient to fill pillow and details

β€” Tools Required

  • 01
    Crochet hook size 3.5-5.0 mm (use size recommended on plush yarn label)
  • 02
    Black beads or buttons for eyes 22 mm (2 pieces)
  • 03
    Yarn needle for sewing and finishing
  • 04
    Scissors
  • 05
    Stitch markers (to mark round starts)
  • 06
    Polyester stuffing (hollofayber)
  • 07
    Sewing needle (for tightening and decorative embroidery of eyebrows)

Progress Tracker

0% Complete

β€” Pillow :

Info :

Use beige plush yarn

Round 1 :

90 ch, connect with the first loop

Round 2 - 37 :

90 sc

Info :

Leave a long thread and sew the top of the pillow. We fasten the thread and hide inside the pillow.

Info :

Fill tightly and evenly. Fill the corners of the pillow well. Sew and fasten the thread and hide inside the pillow.

β€” Ear (2 details) :

Info :

Use brown plush yarn

Round 1 :

21 ch

Round 2 :

We begin to crochet from the second loop from the hook: 1 hdc, 17 dc, 6 dc in 1 loop. On the back of the chain: 18 dc, 1 hdc, 1 sc, sl st, 1 ch

Round 3 :

We begin to crochet from the second loop from the hook: 1 sc, 1 hdc, 1 dc, inc, 17 dc, inc, inc, inc, 18 dc, inc, 1 dc, 1 hdc, 1 sc, sl st, 1 ch

Round 4 :

We begin to crochet from the second loop from the hook: 1 sc, 1 hdc, 19 dc, inc, 1 dc, inc, inc, inc, inc, inc, 1 dc, inc, 18 dc, inc, 1 dc, 1 hdc, 1 sc, sl st

Info :

Leave a long thread for sewing

β€” Leg (2 details) :

Info :

Use brown plush yarn

Round 1 :

6 sc in magic Ring {6}

Round 2 :

(inc) – repeat 6 times {12}

Round 3 :

(1 sc, inc) – repeat 6 times {18}

Round 4 :

18 sc

Info :

Leave a long thread for sewing

β€” Arm (2 details) :

Info :

Use brown plush yarn

Round 1 :

6 sc in magic Ring {6}

Round 2 :

(inc) – repeat 6 times {12}

Round 3 :

12 sc

Info :

Leave a long thread for sewing

β€” Nose :

Info :

Use brown plush yarn for small nostril details but main nose is pink plush yarn (use pink plush yarn)

Round 1 :

20 ch

Round 2 :

We begin to work from the second loop from the hook: 18 sc, 3 sc in 1 loop. On the back of the chain: 18 sc {39}

Round 3 :

3 sc in 1 loop, 18 sc, inc, 1 sc, inc, 17 sc, inc {45}

Round 4 :

1 sc, inc, 19 sc, inc, 2 sc, inc, 19 sc, inc {49}

Round 5 :

3 sc, inc, 20 sc, inc, 2 sc, inc, 20 sc, inc {53}

Round 6 :

4 sc, inc, 20 sc, inc, 4 sc, inc, 21 sc, inc {57}

Round 7 - 9 :

57 sc (3 rounds)

Info :

Leave a long thread for sewing

β€” Horn (2 details) :

Info :

Use white yarn

Round 1 :

6 sc in Magic ring

Round 2 :

(2 sc, inc) - repeat 2 times {8}

Round 3 :

(3 sc, inc) - repeat 2 times {10}

Round 4 :

inc, 4 sc, dec, 3 sc {10}

Round 5 :

inc, inc, 2 sc, dec, dec, 2 sc {10}

Round 6 :

inc, inc, inc, 7 sc {13}

Round 7 :

1 sc, inc, inc, inc, inc, 8 sc {17}

Round 8 :

2 sc, inc, inc, inc, inc, inc, 5 sc, dec, dec, 1 sc {20}

Round 9 :

4 sc, inc, 4 sc, inc, 6 sc, dec, dec {20}

Info :

Fill. Leave a long thread for sewing.

β€” Hair :

Info :

Use brown yarn

Step 1 :

We make 30 ch and connect with the first loop: sl st

Step 2 :

Make 30 ch and connect with the first loop in new chain: sl st

Step 3 :

Make 30 ch and connect with the first loop in new chain: sl st

Steps 4 - 7 :

Make 30 ch and connect with the first loop in new chain: sl st. I made 7 rings. If you want more hair, you can do more rings. Leave a long thread for sewing.

β€” Assembly :

Step 1 :

Sew nose (between 9 and 17 rounds). Fill, do not sew up to the end.

Step 2 :

Make a tightening: take a new thread, insert it into the needle, tie a knot. Insert the needle through the unstitched nose hole and bring the needle out in the middle of the lower part of the nose to form nostrils (distance between nostrils 14 sc).

Step 3 :

Make a little seam nearby, pull out the needle at the bottom of the nose (in the middle) and tighten a little. Make a knot here and hide the thread.

Step 4 :

Make the second tightening on the other side. Fasten the thread at the bottom of the nose (inside) and cut off. Sew and fill the nose to the end. Fasten the thread and hide inside the pillow.

Step 5 :

Sew the ears in the corners of the pillow. The ear should be sewn on the front of the pillow. Fasten the thread and hide inside the pillow.

Step 6 :

Sew the horns on the top of the pillow. Fasten the thread and hide inside the pillow.

Step 7 :

Use button or bead for eyes and sew. Distance between eyes 10-11 sc. Fasten the thread and hide inside the pillow.

Step 8 :

Sew hair and fasten the thread and hide inside the pillow.

Step 9 :

Fill and sew legs and hands. Fasten the thread and hide it inside the pillow.

Assembly Instructions

  • Sew the nose between rounds 9 and 17; stuff the nose, perform the nostril tightenings and then finish sewing and hide the thread inside the pillow.
  • Position and sew the ears in the front corners of the pillow, securing them firmly and hiding thread ends inside the pillow.
  • Sew the horns on the top of the pillow, stuffing lightly and securing with hidden knots to keep them upright.
  • Attach the eyes (22 mm beads or buttons) on round 19 area with 10-11 sc distance between centers; secure well for safety.
  • Sew the hair rings along the top front of the pillow; fasten threads and hide inside the pillow for a tidy finish.
  • Sew legs and arms to the bottom and sides of the pillow, fill each piece before closing and hide thread ends inside the pillow.

Important Notes

  • πŸ’‘Do not forget to fix the beginning of each new circle with a pin or thread so your rounds stay aligned.
  • πŸ’‘Use stitch markers to keep track of your rounds and the start of each row, especially when assembling facial features and color changes.
  • πŸ’‘Stuff firmly but not overly tight; overstuffing can distort corners and make sewing pieces together difficult.
  • πŸ’‘Leave long threads on each detail for sewing and hide the tail inside the pillow after fastening to create a neat finish.

This adorable Pillow-Bull is a cozy and playful handmade gift that brightens any room. It combines plush yarn texture with simple amigurumi shaping for a satisfying project. Perfect for kids or as a cute decorative accentβ€”handmade with love! 🧢🧡

You ask,

we answer.

FAQs

What size will the finished piece be?

The finished pillow measures approximately 28 x 28 centimeters using the recommended plush yarn and hook size, but size may vary with yarn and hook choice.

Can I use different yarn weights for this pattern?

Yes β€” you can use different yarn weights, but the final size and look will change; use a hook appropriate for your yarn and adjust stuffing accordingly.

Do I need prior crochet experience for this pattern?

This pattern is rated intermediate; familiarity with basic stitches (sc, inc, dec, hdc, dc) and working in rounds is recommended for best results.

How long does this project typically take to complete?

Most crocheters finish this project in about 5-7 hours, though time may vary depending on experience, yarn choice, and assembly detail.