🧶 Beautiful ✨ Detailed 💝 Adorable

Field of Daisies Crochet Blanket Pattern

Field of Daisies Crochet Blanket Pattern
4.8★ Rating
12-15 Hours Time Needed
2.1K Made This
✂️

Beginner Friendly Level

Perfect for those just starting their crochet journey, with clear instructions and simple techniques

⏱️

Multi-Day Project

A rewarding 12+ hour journey—perfect for dedicated crafters who love detailed work.

🤗

Soft Hug

Gentle, plush, and full of warmth, creating a sense of comfort and coziness wherever they find a home.

About This Field of Daisies Crochet Blanket Pattern

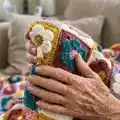
This Field of Daisies blanket pattern creates a colorful patchwork of daisy motifs joined into a cozy throw. The pattern uses medium weight yarn with easy crochet stitches and clear motif instructions. It finishes with a neat hdc edging and playful flower pompoms at each corner for a charming look.

Field of Daisies Crochet Blanket Pattern crochet pattern - detailed view of completed project

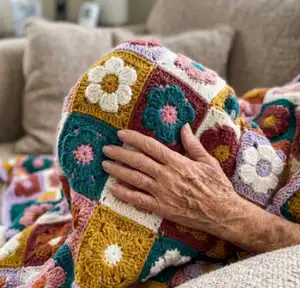
The layout uses six color combinations repeated across 120 motifs to give a balanced, vibrant blanket. Detailed assembly directions and an assembly diagram are included to make joining simple.

Why You'll Love This Field of Daisies Crochet Blanket Pattern

I absolutely love this pattern because the repeating daisy motifs are endlessly satisfying to crochet and arrange. I enjoy the color play—mixing six contrast colors produces a lively quilt-like effect that brightens any room. The construction is simple and modular, so I can make motifs during short crafting sessions and assemble them later. The little flower pompoms at the corners add a whimsical touch that always makes me smile when the blanket is finished.

Field of Daisies Crochet Blanket Pattern step 1 - construction progress Field of Daisies Crochet Blanket Pattern step 2 - assembly progress Field of Daisies Crochet Blanket Pattern step 3 - details and accessories Field of Daisies Crochet Blanket Pattern step 4 - final assembly and finishing

Switch Things Up

I love customizing this blanket by swapping the contrast colors to create different moods—try pastels for a nursery version or jewel tones for a cozy living room throw.

I sometimes change yarn weight and hook size to create a larger or smaller blanket; using bulky yarn and a larger hook produces a quick, chunky throw.

For a more delicate look I use sport or DK weight yarn with a smaller hook to make a baby-sized blanket of the same motif design.

I also enjoy changing the border: replace the hdc edging with a scalloped shell border or a picot edge for a decorative finish.

You can vary the motif layout to create diagonal stripes, checkerboard effects, or randomized color placements for a modern look.

Try embroidering a small detail on the center of some flowers or adding a contrasting French knot to change the daisy centers.

If you want more texture, add a surface crochet row between motif joins or use a slightly fuzzy yarn for the flower petals.

Make cushion covers by using fewer motifs and joining them with a backing panel or zipper closure for home decor coordination.

Replace the flower pompoms with tassels or crocheted bobbles if you prefer a different corner finish that still adds charm.

I often create a set of matching accessories—like a pillow or a small bag—using the same motifs to make coordinated handmade gifts.

Common Mistakes & How to Fix Them

✗ Skipping the gauge check before starting causes the finished blanket to be the wrong size; make a 4" gauge swatch of 12 sc and 15 rows and adjust hook size if needed. ✗ Not keeping color strands tidy will lead to tangled yarn while working multiple motifs; wind small balls for each color and work with one color change at a time. ✗ Joining motifs through both loops instead of back loops only makes the join bulky and misaligned; sew motifs together through back loops only as instructed for a flat seam. ✗ Overstuffing the flower pompoms makes them lumpy and hard to close; stuff lightly and gradually while completing the last petal to maintain a soft shape. ✗ Forgetting to break and fasten off colors where indicated can create messy tails; follow each motif round and fasten off where the pattern directs, weaving in ends neatly.

Field of Daisies Crochet Blanket Pattern

Bright, floral and modular, this Field of Daisies crochet blanket is made from colorful daisy motifs joined together for a cheerful, handmade throw. You will enjoy making each square and watching the blanket come to life as you assemble the rows. Perfect for gifting or brightening a room, the pattern includes full motif instructions, edging, and flower pompom corner details to finish.

Beginner Friendly 12-15 Hours

Materials Needed for Field of Daisies Crochet Blanket Pattern

— Main Fabric

  • 01
    Red Heart Super Saver (7 oz/198 g; 364 yds/333 m) main yarn
  • 02
    Contrast A: Carrot (0256) - 2 balls or 545 yds/498.5 m
  • 03
    Contrast B: Gold (0321) - 2 balls or 545 yds/498.5 m
  • 04
    Contrast C: Paddy Green (0368) - 2 balls or 545 yds/498.5 m
  • 05
    Contrast D: Pale Plum (0579) - 2 balls or 665 yds/608 m
  • 06
    Contrast E: Soft White (0316) - 2 balls or 620 yds/567 m
  • 07
    Contrast F: Light Raspberry (0774) - 2 balls or 545 yds/498.5 m
  • 08
    Fiberfill stuffing for corner Flower Pompoms

— Tools Required

  • 01
    Crochet hook size U.S. H/8 (5 mm) Susan Bates Silvalume or size needed to obtain gauge
  • 02
    Susan Bates yarn needle
  • 03
    Scissors
  • 04
    Stitch markers
  • 05
    Tapestry/yarn needle for sewing motifs
  • 06
    Pins for assembly (optional)
  • 07
    Fiberfill stuffing for pompoms

Progress Tracker

0% Complete

— Measurements & Gauge :

Infos :

Approx 57" x 68" [145 x 173 cm]. Gauge: 12 sc and 15 rows = 4" [10 cm]. Motif = 5 1/2" [14 cm] square.

— Motifs :

Motif 1 :

With A as Color 1, F as Color 2, and E as Color 3 - make 20 Motifs.

Motif 2 :

With B as Color 1, E as Color 2, and C as Color 3 - make 20 Motifs.

Motif 3 :

With C as Color 1, D as Color 2, and B as Color 3 - make 20 Motifs.

Motif 4 :

With D as Color 1, C as Color 2, and F as Color 3 - make 20 Motifs.

Motif 5 :

With E as Color 1, B as Color 2, and A as Color 3 - make 20 Motifs.

Motif 6 :

With F as Color 1, A as Color 2, and D as Color 3 - make 20 Motifs.

— Flower Motif :

Info :

See Diagram. With Color 1, ch 4. Join with sl st to first ch to form ring.

Round 1 :

Ch 3. 9 dc in ring. Join Color 2 with sl st to top of beg ch 3. Break Color 1. 10 dc.

Round 2 :

With Color 2, ch 3. 1 dc in first dc. *2 dc in next dc. Rep from * around. Join with sl st to beg of ch 3. 20 dc.

Round 3 :

Skip first dc. *(1 dc, 1 tr) in next dc. 3 tr in next dc. (1 tr, 1 dc) in next dc. Sl st in next dc. Rep from * around, ending by joining with sl st to top of ch-3. Fasten off.

Round 4 :

Join Color 3 with sl st to any centre tr of 3-tr group. Ch 1. 1 sc in same sp as sl st. *1 hdc in next tr. 1 dc in each of next 2 sts. 1 tr in same st as sl st from previous (3rd) rnd. 1 dc in each of next 2 sts. 1 hdc next tr. 1 sc in next tr. Rep from * around, omitting last sc and joining with sl st to first sc.

Round 5 :

Ch 1. 1 sc in same sp as sl st. *1 hdc in next tr. 1 dc in next st. 2 dc in next st. (1 tr, ch 1, 1 tr) in next st (corner made). 2 dc in next st. 1 dc in next st. 1 hdc in next tr. 1 sc in each of next 3 sts. Rep from * around, ending with 1 sc in each of last 2 sts. Join with sl st to first sc. Fasten off.

— Flower "Pompoms" :

Info :

Make 4 Flower Pompoms. Flowers (make 2 for each Pompom).

Flower 1st rnd :

With B, ch 4. Join with sl st to first ch to form ring. Ch 3. 9 dc in ring. Join E with sl st to top of beg ch 3. Break B. 10 dc.

Flower 2nd rnd :

With Color 2, ch 3. 1 dc in first dc. *2 dc in next dc. Rep from * around. Join with sl st to beg of ch 3. 20 dc.

Flower 3rd rnd :

Skip first dc. *(1 dc, 1 tr) in next dc. 3 tr in next dc. (1 tr, 1 dc) in next dc. Sl st in next dc. Rep from * around, ending by joining with sl st to top of ch-3. Fasten off.

Flower 4th rnd :

Join Color 3 with sl st to any centre tr of 3-tr group. Ch 1. 1 sc in same sp as sl st. *1 hdc in next tr. 1 dc in each of next 2 sts. 1 tr in same st as sl st from previous rnd. 1 dc in each of next 2 sts. 1 hdc next tr. 1 sc in next tr. Rep from * around, omitting last sc and joining with sl st to first sc. Fasten off.

— Flower Pompom Assembly :

Info :

With 2 Flowers held WS tog, join with sl st anywhere around edge.

Round 1 :

Working through both thicknesses and back loops only, sl st around Flowers, stuffing lightly before completing 5th petal. Fasten off.

Info :

Sew one Flower Pompom to each corner of Blanket.

— Assembly :

Info :

Sew Motifs tog through back loops only as shown in Assembly diagram on page 3.

— Edging :

1st rnd :

(RS). Join D with sl st to any corner. Ch 2. Work 1 rnd of hdc evenly around all sides, working 3 hdc in each corner. Join with sl st to first hdc.

2nd rnd :

Ch 2. 1 hdc in each hdc around, working 3 hdc in each corner hdc. Join with sl st to first hdc. Fasten off.

— Notes :

Infos :

Ch 2 at beg of rnd does not count as st. Ch 3 at beg of rnd counts as dc.

Assembly Instructions

  • Sew motifs together through back loops only as shown in the assembly diagram on page 3, aligning center petals for a consistent grid.
  • Join the edging by joining Color D with a slip stitch to any corner, ch 2 and work 1 rnd of hdc evenly around all sides, placing 3 hdc in each corner.
  • Work the 2nd rnd of edging: ch 2, 1 hdc in each hdc around, working 3 hdc in each corner hdc, join and fasten off.
  • Make 4 Flower Pompoms by joining two flower pieces WS together with slip stitches through back loops only, stuffing lightly before completing the last petal.
  • Sew one Flower Pompom to each corner of the blanket securely, stitching through the center of the pompom to anchor it to the blanket.

Important Notes

  • 💡Use stitch markers to help align and count motifs when assembling to keep the grid straight and consistent.
  • 💡Work motif joins through back loops only for a flatter seam that lets motifs sit flush against one another.
  • 💡Stuff flower pompoms lightly and gradually before completing the final petal so they remain soft and even in shape.
  • 💡Weave in yarn ends as you go to keep the back of the blanket neat and reduce finishing time.

This Field of Daisies blanket is a joyful, colorful project that brightens any space and warms your heart. The modular motifs are perfect for making in batches, and the sweet pompoms give a playful finishing touch. Enjoy the process of mixing colors and assembling a handmade treasure to cherish. 🧶🌸

You ask,

we answer.

FAQs

What size will the finished piece be?

The finished blanket measures approximately 57" x 68" [145 x 173 cm] when using the recommended yarn and hook size.

Can I use different yarn weights for this pattern?

Yes, you can use different yarn weights, but this will affect the final size and drape; adjust your hook size and make a gauge swatch to obtain the correct motif size.

Do I need prior crochet experience for this pattern?

This pattern is rated beginner friendly (Easy), so basic knowledge of stitches like ch, sc, dc and hdc is recommended for best results.

How long does this project typically take to complete?

Most crocheters complete this project in 12-15 hours, though time may vary based on experience and how quickly you make and join motifs.