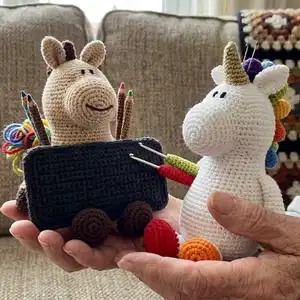
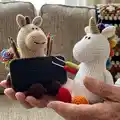
Make a charming horse or unicorn phone stand with this friendly crochet pattern. You will create a sturdy, weighted body with removable tail parts, cute arms and feet, and optional pockets for storage. The pattern uses DK or sport yarn and a 3.0 mm hook and includes step-by-step rounds and assembly notes to guide you through every stitch. Ideal for gifting or adding a playful handmade touch to your desk.
Progress Tracker
0% Complete
— ARM (FRONT LEG) :
Info :
For the unicorn I made each hoof in a different color.
Round 1 :
magic ring of 8 sc - 8
Round 2 :
*2sc in next st* around - 16
Round 3 :
*2sc in next st, sc in next st* around - 24
Round 4 :
in back loops: *sc in next st* around - 24
Round 5 :
sc in next 6 st, *inv_dec, sc in next st* x4, sc in next 6 st - 20
Round 6 :
*sc in next st* around - 20
Round 7 :
*sc in next st* around - 20. change to BODY-COLOR with last st. fasten off HOOF-COLOR and secure both yarn-ends with several knots on the hoof's inside
Round 8 :
in back loops: *sc in next st* around - 20
Info :
stuff the hoof a little bit but keep the underside flat
Round 9 :
*inv_dec, sc in next 3 st* around - 16
Round 10 :
*sc in next st* around - 16
Round 11 :
*sc in next st* around - 16
Round 12 :
*sc in next st* around - 16
Info :
stuff the arm a little bit. the following part of the arm can remain empty.
Round 13 :
*inv_dec, sc in next 6 st* x2 - 14
Round 14 :
*sc in next st* around - 14
Round 15 :
*inv_dec, sc in next 5 st* x2 - 12
Round 16 :
*sc in next st* around - 12
Round 17 :
*inv_dec, sc in next 4 st* x2 - 10
Round 18 :
*sc in next st* around - 10
Round 19 :
sc in next 4 st, now flatten the opening so that the stitch you made last sits on the side; both side-stitches remain unworked; crochet the opening closed with: sc in next 4 stitch-pairs
Info :
see page 28 for details on crocheting openings closed. Fasten off & weave in yarn-end (see page 29 for details)
— FOOT (HIND LEG) :
Round 1 :
magic ring of 8 sc - 8
Round 2 :
*2sc in next st* around - 16
Round 3 :
*2sc in next st, sc in next st* around - 24
Round 4 :
in back loops: *sc in next st* around - 24
Round 5 :
sc in next 6 st, *inv_dec, sc in next st* x4, sc in next 6 st - 20
Round 6 :
*sc in next st* around - 20
Round 7 :
sc in next 7 st, *inv_dec, sc in next 2 st* x2, sc in next 5 st - 18. change to BODY-COLOR with last st
Round 8 :
in back loops: sc in next 5 st, *dec* x4, sc in next 5 st - 14
Info :
stuff the hoof a bit, leave the rest of the leg empty
Round 9 :
sc in next 5 st, *inv_dec* x2, sc in next 5 st - 12
Round 10 :
*sc in next st* around - 12
Round 11 :
sc in next 4 st, now flatten the opening so that the stitch you made last sits on the side; both side-stitches remain unworked; crochet the opening closed with: sc in next 5 stitch-pairs
Info :
fasten off & weave in yarn-end
— TAIL-PART 1 (smallest) :
Round 1 :
magic ring of 8 sc - 8
Round 2 :
*2sc in next st, sc in next st* around - 12
Round 3 :
*sc in next st* around - 12
Round 4 :
*sc in next st* around - 12
Round 5 :
*inv_dec, sc in next 4 st* around - 10
Round 6 :
sc in next 2 st, now flatten the opening so that the stitch you made last sits on the side; both side-stitches remain unworked; crochet the opening closed with: sc in next 4 stitch-pairs
Round 7 :
ch 1 + turn, begin in 2nd st from hook: *sc in next st* across - 4
Info :
fasten off & weave in yarn-end
— TAIL-PART 2 :
Round 1 :
magic ring of 8 sc - 8
Round 2 :
*2sc in next st, sc in next st* around - 12
Round 3 :
*sc in next st* around - 12
Round 4 :
*sc in next st* around - 12
Round 5 :
*sc in next st* around - 12
Round 6 :
*sc in next st* around - 12
Round 7 :
*inv_dec, sc in next 4 st* around - 10
Round 8 :
sc in next 2 st, now flatten the opening so that the stitch you made last sits on the side; both side-stitches remain unworked; crochet the opening closed with: sc in next 4 stitch-pairs
Round 9 :
ch 1 + turn, begin in 2nd st from hook: *sc in next st* across - 4
Info :
fasten off & weave in yarn-end
— TAIL-PART 3 :
Round 1 :
magic ring of 8 sc - 8
Round 2 :
*2sc in next st, sc in next st* around - 12
Round 3 :
*sc in next st* around - 12
Round 4 :
*sc in next st* around - 12
Round 5 :
*sc in next st* around - 12
Round 6 :
*sc in next st* around - 12
Round 7 :
*sc in next st* around - 12
Round 8 :
*sc in next st* around - 12
Round 9 :
*inv_dec, sc in next 4 st* around - 10
Round 10 :
sc in next 2 st, now flatten the opening so that the stitch you made last sits on the side; both side-stitches remain unworked; crochet the opening closed with: sc in next 4 stitch-pairs
Round 11 :
ch 1 + turn, begin in 2nd st from hook: *sc in next st* across - 4
Info :
fasten off & weave in yarn-end
— TAIL-PART 4 :
Round 1 :
magic ring of 8 sc - 8
Round 2 :
*2sc in next st, sc in next st* around - 12
Round 3 :
*sc in next st* around - 12
Round 4 :
*sc in next st* around - 12
Round 5 :
*sc in next st* around - 12
Round 6 :
*sc in next st* around - 12
Round 7 :
*sc in next st* around - 12
Round 8 :
*sc in next st* around - 12
Round 9 :
*sc in next st* around - 12
Round 10 :
*sc in next st* around - 12
Round 11 :
*inv_dec, sc in next 4 st* around - 10
Round 12 :
sc in next 2 st, now flatten the opening so that the stitch you made last sits on the side; both side-stitches remain unworked; crochet the opening closed with: sc in next 4 stitch-pairs
Round 13 :
ch 1 + turn, begin in 2nd st from hook: *sc in next st* across - 4. fasten off & weave in yarn-end
— OPTIONAL: POCKET (make 2) :
Info :
After a couple of rounds guide the yarn-end from the beginning to the outside through the center of the magic ring.
Round 1 :
magic ring of 7 sc - 7
Round 2 :
*2sc in next st* around - 14
Round 3 :
*sc in next st* around - 14
Round 4 :
*sc in next st* around - 14
Round 5 :
*sc in next st* around - 14
Round 6 :
*sc in next st* around - 14
Round 7 :
*sc in next st* around - 14
Round 8 :
*sc in next st* around - 14
Round 9 :
*sc in next st* around (sl in last st) - 14. fasten off & weave in yarn-end on the outside
— JAW :
Info :
There are no regular increases here.
Round 1 :
magic ring of 6 sc - 6
Round 2 :
sc in next st, 3sc in next st, sc in next st, sc in next st, 2sc in next st, sc in next st, 3sc in next st - 11
Round 3 :
sc in next 2 st, 3sc in next st, sc in next st, sc in next st, 2sc in next st, sc in next 2 st, 2sc in next st, sc in next st, 3sc in next st, sc in next st - 17
Round 4 :
in this round two stitches are marked with additional markers; sc in next 3 st, 3sc in next st (mark the 1st of the 3-increase stitches), sc in next 2 st, 2sc in next st, sc in next 4 st, 2sc in next st, sc in next 2 st, 3sc in next st (mark the 3rd of the 3-increase stitches), sc in next 2 st - 23
Round 5 :
sl in first st. fasten off & weave in yarn-end on the back side
— MANE-PARTS :
Info :
There are 3 sizes for the mane-parts. Make two of each to get a total of six. They are numbered 1 to 6 beginning with smallest. They sit on the head in this order: 1,2,3,3,2,1. Mane-parts are not stuffed in the pattern.
MANE-PART 1 & 6 Round 1 :
magic ring of 8 sc - 8
MANE-PART 1 & 6 Round 2 :
*2sc in next st, sc in next st* around - 12
MANE-PART 1 & 6 Round 3 :
*sc in next st* around - 12
MANE-PART 1 & 6 Round 4 :
*sc in next st* around - 12
MANE-PART 1 & 6 Round 5 :
*inv_dec, sc in next 4 st* around - 10
MANE-PART 1 & 6 Round 6 :
*inv_dec, sc in next 3 st* around - 8
MANE-PART 1 & 6 Round 7 :
sc in next st, now flatten the opening so that the stitch you made last sits on the side; crochet the opening closed with: sc in next 3 stitch-pairs. fasten off & weave in yarn-end
MANE-PART 2 & 5 Rounds :
same as parts 1 & 6 with rounds to close the opening; fasten off & weave in yarn-end
MANE-PART 3 & 4 Rounds :
same structure as above for the medium-sized parts; close opening with sc in next 3 stitch-pairs; fasten off & weave in yarn-end
— EAR :
Round 1 :
magic ring of 6 sc - 6
Round 2 :
*2sc in next st, sc in next 2 st* around - 8
Round 3 :
*2sc in next st, sc in next 3 st* around - 10
Round 4 :
*2sc in next st, sc in next 4 st* around - 12
Round 5 :
*sc in next st* around - 12
Round 6 :
*sc in next st* around - 12
Round 7 :
now flatten the opening so that the stitch you made last sits on the side; crochet the opening closed with: sc in next 5 stitch-pairs. fasten off & weave in yarn-end
— HORSE/UNICORN (BODY) :
Round 1 :
magic ring of 6 sc - 6
Round 2 :
*2sc in next st* around - 12
Round 3 :
*2sc in next st, sc in next st* around - 18
Round 4 :
*2sc in next st, sc in next 2 st* around - 24
Info :
change of sequence: from here on there are 8 increases per round instead of 6
Round 5 :
*2sc in next st, sc in next 2 st* around - 32
Round 6 :
*2sc in next st, sc in next 3 st* around - 40
Round 7 :
sc in next 3 st, *2sc in next st, sc in next 4 st* x7, 2sc in next st, sc in next st - 48
Round 8 :
sc in next 3 st, *2sc in next st, sc in next 5 st* x7, 2sc in next st, sc in next 2 st - 56
Round 9 :
*2sc in next st, sc in next 6 st* around - 64
Round 10 :
in this round the arms, feet & tail-part 1 are crocheted to the body. sc in next 2 st, place first arm on top and crochet it on with sc in next 4 stitch-pairs, continue on body with: sc in next 16 st, crochet first foot on with sc in next 5 stitch-pairs, continue on body: sc in next 2 st, crochet second foot on with sc in next 5 stitch-pairs, continue on body: sc in next 15 st, crochet second arm on with sc in next 4 stitch-pairs, continue on body: sc in next 5 st, crochet tail-part 1 on with sc in next 4 stitch-pairs, continue on body with sc in next 2 st - 64
Info :
during the following rounds the remaining tail-parts are attached to the body; they need to be secured later. place body so inside faces up; guide a longish piece of yarn ~30 cm through two stitches of the first tail part between rounds 4 & 5; pull yarn halfway through and let it hang for now; during following rounds guide yarn-ends through each newly attached tail-part
Round 11 :
in this round tail-part 2 is crocheted to the body. sc in next 16 st, inv_dec, sc in next 9 st, inv_dec, sc in next 9 st, inv_dec, sc in next 18 st. crochet tail-part 2 on with: sc in next 4 stitch-pairs, continue on body with: sc in next 2 st - 61
Round 12 :
in this round tail-part 3 is crocheted to the body. sc in next 55 st, crochet tail-part 3 on with: sc in next 4 stitch-pairs, continue on body with: sc in next 2 st - 61
Round 13 :
in this round tail-part 4 is crocheted to the body. sc in next 55 st, crochet tail-part 4 on with: sc in next 4 stitch-pairs, continue on body with: sc in next 2 st - 61
Info :
guide the tail parts' yarn ends through stitches between rounds 3 & 4 so they come out between rounds 8 & 9; let yarn-ends hang for now; tie one knot if you like but it must be opened again later
Round 14 :
sc in next 16 st, inv_dec, sc in next 8 st, inv_dec, sc in next 8 st, inv_dec, sc in next 23 st - 58
Round 15 :
*sc in next st* around - 58
Round 16 :
*sc in next st* around - 58
Round 17 :
sc in next 16 st, inv_dec, sc in next 7 st, inv_dec, sc in next 7 st, inv_dec, sc in next 22 st - 55
Info :
during the next two rounds the pockets are crocheted to the body; it's similar to crocheting body-parts to the body but place the pockets inside the body instead of placing them in front of it; ignore prompts for pockets if you don't want any; keep crocheting with single crochets until the round is complete
Round 18 :
in this round the first half of each of the two pockets is crocheted to the body (see page 33). sc in next 10 st, place first pocket inside the body and guide your hook through the next stitch of the body and from there through one of the stitches of the pocket; partially crochet the first pocket on with: sc in next 7 stitch-pairs, continue on body with: sc in next 16 st, partially crochet the second pocket on with: sc in next 7 stitch-pairs, continue on body with: sc in next 15 st - 55
Round 19 :
in this round the second half of the pockets is crocheted to the body. sc in next 10 st, continue on pocket with: sc in next 7 st, continue on body with: sc in next 16 st, continue on second pocket with: sc in next 7 st, continue on body with: sc in next 15 st - 55
Round 20 :
sc in next 16 st, inv_dec, sc in next 6 st, inv_dec, sc in next 6 st, inv_dec, sc in next 21 st - 52
Round 21 :
*sc in next st* around - 52
Round 22 :
*sc in next st* around - 52
Round 23 :
sc in next 16 st, inv_dec, sc in next 5 st, inv_dec, sc in next 5 st, inv_dec, sc in next 20 st - 49
Round 24 :
*sc in next st* around - 49
Round 25 :
*sc in next st* around - 49
Round 26 :
sc in next 16 st, inv_dec, sc in next 4 st, inv_dec, sc in next 4 st, inv_dec, sc in next 19 st - 46
Round 27 :
in this round the end of the first arm is crocheted to the body. sc in next 36 st, crochet the arm on with: sc in next 4 stitch-pairs, continue on body with: sc in next 6 st - 46
Round 28 :
in this round the second arm is crocheted to the body. sc in next 5 st, crochet the arm on with: sc in next 4 stitch-pairs, continue on body with: sc in next 37 st - 46. secure the tail-parts to the body (see page 34). untie knot and guide prepared yarn-ends from tail-parts through two stitches of the body using stitches between rounds 6 & 7; make sure tail-parts sit upright and centered between the arms; pull yarn-ends tight on the body's inside and knot securely
Round 29 :
sc in next 16 st, inv_dec, sc in next 3 st, inv_dec, sc in next 3 st, inv_dec, sc in next 18 st - 43
Round 30 :
in this round the jaw is crocheted to the body. sc in next 18 st, place the jaw in front so that the back side is facing you and the straight side with the two marked stitches is lined up with the stitches of the body; begin crocheting in the first of the marked stitches; crochet the jaw partially on with: sc in next 7 stitch-pairs, continue on body with: sc in next 5 st, *2sc in next st, sc in next 2 st* x3, sc in next 4 st - 46
Round 31 :
sc in next 6 st, *2sc in next st, sc in next 2 st* x3, sc in next 3 st, now continue along the jaw with sequences of increases and sc as described in pattern; continue on body with: sc in next 6 st, sequences to reach 67. Stuff the body. Put a handful of heavy filling into a small freezer bag; close bag and place inside horse's body towards the front; fill the rest with soft stuffing ensuring no dents are left especially where tail-parts are attached
Round 32 :
sc in next 6 st, *2sc in next st, sc in next 3 st* x3, sc in next 49 st - 70
Round 33 :
*sc in next st* around - 70
Round 34 :
*sc in next st* around - 70
Round 35 :
at the end of this round the stitch-marker is set back by one stitch; leave the last stitch unworked because of that; sc in next 23 st, *inv_dec* x2, sc in next 16 st, *inv_dec* x2, sc in next 5 st, *inv_dec, sc in next 3 st* x3, sc in next 2 st - 63. remove the stitch-marker
Round 36 :
during this round two stitches are marked with additional markers; these positions are later needed for the nostrils; first put the round's stitch-marker in the first of the following stitches: sc in next 5 st, *inv_dec, sc in next 3 st* x3, sc in next 29 st (mark stitches #10 & 20 with additional markers), *inv_dec, sc in next 2 st* x2, sc in next 6 st - 58
Round 37 :
in this round the first mane-part is crocheted to the body; also two more stitches for the nostrils are marked. crochet mane-part 1 on with: sc in next 3 stitch-pairs, continue on body with: sc in next 5 st, *inv_dec, sc in next 2 st* x2, sc in next 9 st, inv_dec, sc in next 9 st (mark stitches #2 & 9), inv_dec, sc in next 20 st - 54
Round 38 :
in this round the second mane-part is crocheted to the body. crochet mane-part 2 on with: sc in next 3 stitch-pairs, continue on body with: sc in next 20 st, inv_dec, sc in next 7 st, inv_dec, sc in next 20 st - 52
This lovable phone stand horse/unicorn is both functional and adorable, perfect for desks and gift-giving. It combines thoughtful shaping, removable tail parts, and optional pockets to make a playful and practical amigurumi. Enjoy customizing colors and mane styles to create your own unique character. 🧶🧵