About This By Your Side Basket Bag Pattern
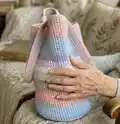
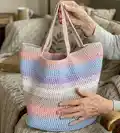
This pattern makes the By Your Side Basket Bag — a spacious, striped tote crocheted in Paintbox Yarns Recycled Crafty Pots. It is worked in the round from a flat oval base and includes built-in handles and a consistent single (double) crochet texture. The pattern is perfect for customizing color changes and making a durable everyday bag.
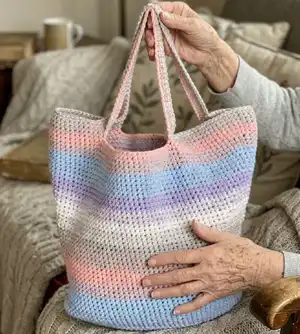
Worked in single (double) crochet throughout, the bag uses simple increases to shape the base and then turns into straight rounds for the sides. Instructions use US terminology with UK equivalents in brackets.
Why You'll Love This By Your Side Basket Bag Pattern
I absolutely love this pattern because it turns recycled yarn into a stylish, usable bag perfect for everyday wear. I enjoy how the shaping is logical and satisfying — you can see the base grow into a balanced oval before the sides rise. The stripe placement is flexible, so I often experiment with colour placement to match outfits or moods. I also love that the finished bag is durable and washable, which makes it practical as well as beautiful.
Switch Things Up
I love changing the stripes to make each bag unique; try swapping the Neapolitan palette for bold brights or autumnal tones to suit the season.
I often make the bag larger by using a bulkier yarn and a larger hook for a chunkier, squishier tote that works as a beach bag.
I sometimes make mini versions using a finer yarn and smaller hook to create a purse-sized or kid-friendly version you can hang from a backpack.
I recommend adding a fabric lining for extra strength and to prevent small items from slipping through the stitches; sew the lining in before attaching handles permanently.
I like to add internal pockets by crocheting small rectangles and sewing them to the inside wall before lining; it keeps keys and phone organized.
I occasionally reinforce the base with a plastic or cardboard insert covered in fabric for a stiffer bottom that helps the bag stand upright.
I will sometimes lengthen the handle by adding extra chains when creating the opening, or shorten it for a hand-held tote — the handle length is easy to customise.
I enjoy surface crochet or embroidery across the finished sides to add initials or simple motifs for a personalized touch.
I sometimes incorporate a drawstring closure worked across the top edge before the final rounds for extra security when carrying items.
I recommend trying different stitch textures for the top rounds, like a round of reverse single crochet or crab stitch, to give the bag a polished edge.
Common Mistakes & How to Fix Them
✗ Skipping stitch markers when working the increases can cause the marker placement to shift; place and check markers at each increase round to keep shaping even.
✗ Not counting your stitches after rounds with multiple increases will create an uneven base; count at the end of each round and correct immediately if the count is wrong.
✗ Pulling your yarn too tightly for the foundation chain can make the base ripple; keep a relaxed tension on the foundation chain and even tension when working back along it.
✗ Forgetting to move markers up the sides leads to misplaced increases and awkward shaping; remember to move markers up each round as instructed to maintain the base alignment.
✗ Skipping the front loop only (flo) round where specified will change the texture of the bag opening; follow the flo instruction exactly to get the same neat top edge.