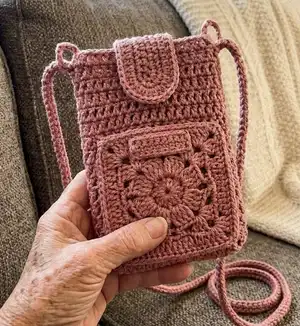
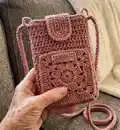
🧢 Beautiful ✨ Detailed πŸ’ Adorable

Phone Bag with pocket Crochet Pattern

Phone Bag with pocket Crochet Pattern
4.8β˜… Rating
5-7 Hours Time Needed
2.6K Made This
βœ‚οΈ

Intermediate Level

Ideal for those with basic crochet experience, featuring slightly more advanced stitches and techniques to expand your skills.

⏱️

Weekend Treat

Takes 5-7 hours, making it an enjoyable project to finish over a couple of days.

✨

Stylish Touch

An elegant detail to elevate any look, combining traditional techniques with contemporary design sensibilities.

About This Phone Bag with pocket Crochet Pattern

This pattern teaches you how to crochet a compact phone bag with a decorative popcorn pocket and flap closure. It uses lightweight polyester or cotton yarn and a 3.5mm hook to create a sturdy textured bag with a magnetic button and optional hook buckle. The instructions include special stitch explanations, an invisible join technique, Romanian cord strap tutorial, and step-by-step photos to guide you.

Phone Bag with pocket Crochet Pattern crochet pattern - detailed view of completed project

You will make the pocket motif, a rectangular bag body, a strap closure, and a Romanian cord shoulder strap, then assemble all pieces together. The project is written with clear rounds and photo references for each important step.

Why You'll Love This Phone Bag with pocket Crochet Pattern

I absolutely love this pattern because it combines a pretty textured popcorn motif with a practical, everyday design that you can use right away. I enjoy how the Romanian cord strap adds a handmade artisanal touch and how the invisible join technique creates a neat professional finish. I also love that the pocket detail gives the bag personality while remaining functional. Making several in different colors is a quick and satisfying way to build up handmade gifts.

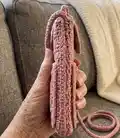
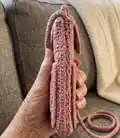
Phone Bag with pocket Crochet Pattern step 1 - construction progress Phone Bag with pocket Crochet Pattern step 2 - assembly progress Phone Bag with pocket Crochet Pattern step 3 - details and accessories Phone Bag with pocket Crochet Pattern step 4 - final assembly and finishing

Switch Things Up

I love how easy it is to customize this pattern with different yarn colors and textures, and I often mix cotton and linen blends for a more rustic look.

I sometimes use a sport weight yarn with a 3.0mm hook to make a slightly smaller, more delicate bag for evening use.

I also try bulky cotton with a 4.5mm hook to make a chunkier version that becomes a cozy little pouch for cold-weather outfits.

I like to change the pocket motif by swapping the popcorn for a cluster or shell stitch to create different surface textures and visual interest.

For a fun twist, I embroider initials or small motifs onto the flap before attaching the magnetic button to personalize the bag.

I often replace the magnetic button with a decorative wooden button and a looped closure for a handmade vintage feel.

I sometimes line the bag with fabric for extra structure and a polished interior finish; this also helps protect delicate phone surfaces.

If I want a crossbody style, I make the Romanian cord longer, or for a wristlet I shorten it and attach a wrist loop to one side.

I like to swap the hook buckle for lobster clasps so the strap becomes removable, making the bag convertible and easier to wash.

I recommend experimenting with small decorative trims like tassels, leather tags, or metal studs to match your personal style and make each bag unique.

Common Mistakes & How to Fix Them

βœ— Skipping stitch markers during the pocket rounds can cause misalignment of the popcorn petals; place a marker at the start of each round and after key repeats to stay on track. βœ— Working popcorn stitches too tightly will make the motif stiff and small; relax your tension and practice the popcorn on a swatch to get a consistent look. βœ— Forgetting to leave a long yarn tail when fastening off will make sewing the pocket and strap difficult; always leave a 15-20 cm (6-8 in) tail for sewing and finishing. βœ— Not using the invisible join technique correctly can create a visible seam on the bag edge; follow the invisible join steps carefully and pull the loop tight enough to match surrounding stitches. βœ— Sewing pieces without pinning first often leads to uneven placement; pin or clip the pocket, strap closure, and handles before stitching them down permanently. βœ— Using a much larger or smaller hook than recommended will change the finished size and fit; check gauge and adjust hook or yarn to match measurements.

Phone Bag with pocket Crochet Pattern

Make a stylish, compact phone bag with a decorative popcorn-pocket using lightweight yarn and simple crochet techniques. This pattern guides you step-by-step with clear photos and special stitch explanations so you can crochet a beautiful, practical accessory. Perfect for gifting or everyday use, the finished bag features a magnetic button closure and a Romanian cord strap.

Intermediate 5-7 Hours

Materials Needed for Phone Bag with pocket Crochet Pattern

β€” Main Fabric

  • 01
    Polyester yarn 2mm thickness or lightweight yarn or cotton yarn, approximately +/- 100 meters
  • 02
    Main color: Brown sample shown - approx 100g (adjust depending on yarn brand)
  • 03
    Alternative color: Pink sample shown - approx 100g (optional for variation)

β€” Tools Required

  • 01
    Crochet hook size 3.5mm
  • 02
    Tapestry needle
  • 03
    Bag hook buckle – 33mm long (optional)
  • 04
    Magnetic Button – 14mm
  • 05
    Stitch marker
  • 06
    Scissors
  • 07
    Measuring tape

Progress Tracker

0% Complete

β€” Special Stitches :

Info :

POPCORN: Work 5 double crochet (DC) stitches into the same stitch. Drop the loop from your hook. Insert your hook from front to back under the top 2 loops of the first double crochet of the group. Grab the dropped loop with your hook and pull it through the stitch. You have completed the POPCORN stitch.

Info :

DOUBLE CROCHET 2 TOGETHER (DC2TOG): (Yarn over, insert hook in next stitch, yarn over and pull up loop, yarn over, draw through 2 loops) x 2 times, so now you have 3 loops on hook, yarn over, draw through all loops on hook. You have completed the DC2TOG stitch.

Info :

DOUBLE CROCHET 3 TOGETHER (DC3TOG): (Yarn over, insert hook in next stitch, yarn over and pull up loop, yarn over, draw through 2 loops) x 3 times, so now you have 4 loops on hook, yarn over, draw through all loops on hook. You have completed the DC3TOG stitch.

β€” Pocket :

Round 1 :

Start with MR CH2, [DC2TOG, CH 1] X 8 times. SLST on top of CH 2. Photo 1

Round 2 :

Working only in each of the CH 1-SP. SLST into next CH 1 SP, CH 2 [POPCORN into the CH 1-SP, CH3] x 8 times. Photo 2. SLST on top of the 1st POPCORN. Photo 3

Round 3 :

SLST into next CH 3-SP Photo 4, CH 2, DC3TOG into CH 3-SP Photo 5 & 6, [CH 2, *SC, CH 2, SC* into next CH 3-SP Photo 7, CH 2, *DC3TOG, CH 3, DC3TOG* into next CH 3-SP] x 3 times, Photo 8. CH 2, *SC, CH 2, SC* into next CH 3-SP, CH 2, DC3TOG into the same CH 3-SP of the 1st DC3TOG, Photo 9 CH 3, SLST into top of the 1st DC3TOG. Photo 10, 11

Round 4 :

SLST into next CH 2-SP, CH 2 count as 1st DC, 2 DC in to the same CH 2-SP Photo 12, 3 DC in next 2 CH 2-SP, Photo 13, *3 DC, CH 3, 3 DC* into CH 3-SP. Photo 14. [3 DC in to each of the next 3 CH 2-SP, *3 DC, CH 3, 3 DC* into CH 3-SP] x 3 times, SLST into top of CH 2 from the beginning. Photo 15

Round 5 :

CH 1, 11 SC, 3 SC into CH 3-SP, [15 SC, 3 SC into CH 3-SP] x 3 times. 4 SC, SLST into the top of CH 1. Photo 16

Round 6 :

CH 1, SLST on the both loops along the edge until the end. Photo 17. Use invisible join technique to join the round. Fasten off, cut the yarn and leave long yarn for sewing.

β€” Invisible join technique :

Infos :

Once you've finished your last slip stitch Photo 18, cut the yarn and draw it out through the loop, leaving about 10 cm (4"). Photo 19. Thread the end onto a tapestry needle and insert the needle from the front underneath both loops of the 1st slip stitch. Photo 20. Now bring the needle up and insert it from the top into the middle of the last slip stitch of the round. Photo 21. Pull it tight enough that the loop you've made looks like the others. Photo 22

β€” Bag body :

Round 1 :

CH 22, DC into 3rd chain from hook, 18 DC, 3 DC into last CH. Working on the opposite side of the chain, 18 DC, 2 DC into last CH, SLST into 1st DC from the beginning. (42)

Round 2-16 :

CH 2, DC into the base of CH 2, 41 DC, SLST into top of CH 2 from the beginning. (42)

Round 17 :

CH 1, SLST along the edge of the bag. Photo 23 Use invisible join technique to join the round. Fasten off, cut the yarn and hide the yarn end inside the bag

β€” Bag strap closure :

Round 1 :

CH 18, SC into 2nd chain from hook, 15 SC, 3 SC into last CH. Working on the opposite side of the chain, 16 SC. (35) CH 1, turn.

Round 2 :

16 SC, INC x 3 times, 15 SC (37). CH 1, turn.

Round 3 :

16 SC, INC, 2 SC, INC, 17 SC (39). CH 1, turn.

Round 4 :

[SLST into the next ST, CH 1] repeat until the end of the strap. Fasten off, cut the yarn and leave long yarn for sewing. Photo 24

β€” Shoulder Strap (Romanian cord) :

Info :

Top handle – Romanian Cord Leave 20 cm long yarn before beginning the CH as you need to attach the handle to the bag. Start with a slip knot Photo 25. CH 2, 1SC in 2nd CH from hook Photo 26,27,28 turn your work from right to left and you will work in the one loop on the bottom ST Photo 29. 1 SC through the one loop on the bottom of ST, Photo 30,31. Turn your work from right to left again, this time you need to work through 2 loops in the next row Photo 32. 1SC through 2 loops. Photo 33,34,35 Repeat until 90 cm long or your desired length. Fasten off, leave a yarn tail for sewing.

β€” Assembling :

Infos :

Place the strap closure around 3cm inside the bag's center. Sew the strap onto the bag, refer to red dot for sewing line. Photo 36. Place the pocket to the bottom center of the bag Photo 37. Sew it to the bag through the back loops of the pocket. Feel free to stitch through the front to back for a strong seam Photo 38. Sew the magnetic button inside of the strap so they match up to the magnet button on the bag. Photo 39. Sew the leather label to the above center of the pocket. Photo 40. Sew the shoulder strap on to the hook bucket Photo 41,42. Push the ring gate to attach the strap to the bag. Photo 43. If you do not have the hook bucket, sew the strap direct to both side of the bag. Photo 44.

Assembly Instructions

  • Place the strap closure around 3 cm inside the bag's center and sew it onto the bag following the marked sewing line for alignment.
  • Position the pocket at the bottom center of the bag and sew it through the back loops; stitch front-to-back if you want a stronger seam.
  • Sew the magnetic button to the inside of the strap closure so it aligns with the magnet on the bag body for secure closing.
  • Sew the leather label centered above the pocket, then attach the shoulder strap to the hook buckle and push the ring gate to secure it to the bag.
  • If you do not have a hook buckle, sew the strap directly to both sides of the bag, reinforcing the attachment with several secure stitches.

Important Notes

  • πŸ’‘Use stitch markers to mark the beginning of rounds and repeat sections to maintain even shaping throughout the pocket and body.
  • πŸ’‘Leave long yarn tails when fastening off important pieces so you have enough length for sewing and finishing securely.
  • πŸ’‘Practice the POPCORN, DC2TOG and DC3TOG on a small swatch before making the pocket to ensure consistent tension and appearance.
  • πŸ’‘Pin all parts in place before sewing to ensure correct positioning and symmetry for a polished finished bag.

This lovely Phone Bag with Pocket pattern brings a charming, practical accessory to life with a textured popcorn pocket and tidy finishing details. The Romanian cord strap and magnetic closure make it simple to wear and secure for daily use. Enjoy making this stylish bag for yourself or as a thoughtful handmade gift. 🧢✨

You ask,

we answer.

FAQs

What size will the finished piece be?

The finished bag measures approximately Width = 11 cm / 4.33" and Height = 16 cm / 6.30" when using the recommended yarn and 3.5mm hook.

Can I use different yarn weights for this pattern?

Yes, you can use different yarn weights, but this will affect the final size. Use an appropriate hook for your yarn and check gauge; lighter yarn with a smaller hook will make a smaller bag and vice versa.

Do I need prior crochet experience for this pattern?

This pattern is rated intermediate (advance beginner) so basic familiarity with crochet stitches plus experience with special stitches like popcorn and DC2TOG/DC3TOG is recommended.

How long does this project typically take to complete?

Most crocheters complete this project in 5-7 hours, though time may vary depending on experience level and how many details or assembly steps you choose to do carefully.

How do I make the Romanian cord shoulder strap?

The pattern provides step-by-step instructions: start with a slip knot, CH 2, work 1SC in 2nd CH, then work through the bottom loop and alternate rows to create the Romanian cord until you reach about 90 cm or desired length.