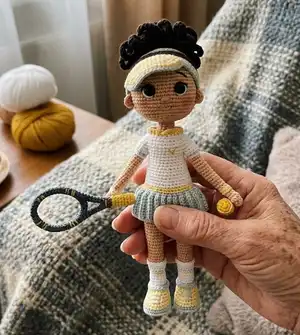
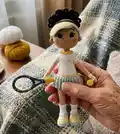
Make a charming tennis player doll you can proudly display or gift. This detailed amigurumi pattern walks you through shaping limbs, creating a wire skeleton, and finishing crisp clothing details. You will enjoy making the skirt, sneakers and tiny tennis racket to complete Penny's sporty look. Perfect for intermediate crocheters who like small, precise work and beautiful handmade toys.
Progress Tracker
0% Complete
— Arms :
Info :
Beige color. 2 pieces. Don't fill with fiber
Round 1 :
1 row: 5sc in MR
Round 2 :
2 row: 5inc (10)
Round 4 :
4 row: 1 3dc bubble -9sc (10)
Round 5 :
5 row: (1dec-3sc)*2 (8) (the 1st dec must be exactly above 3dc bubble)
Info :
Work 3 shifting sc in the left arm. Then work wristbands. I've worked wristbands of different colors for each arm, but you can make them of one color.
Right arm :
Change color into white one, but don't cut beige thread.
Round 7 :
7 row: 8sl st (work loose)
Info :
Change color into yellow one, cut white thread.
Round 8 :
8 row: 8sc (BLO and sc of the 6th row)
Info :
Link to the video to get known how to change thread color. Here and further press YouTube icon to link to the video.
Info :
Change color into grey one, cut yellow thread.
Info :
Change color into beige one, cut grey thread.
Left arm :
Change color into yellow, but don't cut beige thread.
Round 7 :
7 row: 8sl st (work loose)
Round 8 :
8 row: 8sc (BLO and sc of the 6th row)
Info :
Change color into beige one, cut yellow thread.
Round 10 :
10 row: 8sl st (work loose)
Round 11 :
11 row: 8sc (BLO and sc of the 9th row)
Round 12-17 :
12-17 row (6 rows): 8sc
Round 18 :
18 row: (1inc-3sc)*2 (10) Inc must be exactly in both sides of the arm.
Round 19-24 :
19-24 row (6 rows): 10sc
Info :
Work 5 shifting sc in the right arm, and 4 shifting sc for the left one to make color changing exactly in the cetner of inner side of the arm. Change color into white one, cut beige thread.
Round 25 :
25 row: 10sl st (work loose)
Info :
Change color into grey one, but don't cut white thread.
Round 26 :
26 row: 10sc (BLO and sc of the 24th row)
Info :
Change color into white one, cut grey thread.
Info :
Fix and cut thread, hide tail thread.
— Legs :
Info :
Grey color. 2 pieces. Don't fill with fiber. 8ch, turn the work, from the 2nd ch.
Round 1 :
1 row: 6sc-3sc in 1 stitch-5sc-2sc in 1 stitch (16)
Round 2 :
2 row: 1inc-5sc-3inc-5sc-2inc (22)
Round 3 :
3 row: 1sc-1inc-5sc-(1sc-1inc)*3-5sc-(1sc-1inc)*2 (28)
Info :
Link to the video to get known how to make and oval.
Info :
Change color into yellow one, cut grey thread.
Round 5 :
5 row: 28sl st (work loose)
Round 6 :
6 row: 28sc (BLO and sc of the 4th row)
Info :
Insert insole right now. Cut an oval insole from plastic or cardboard of the length of the foot (in my case, it's an oval of 0,98 x 1,38 inches). Insert (or glue) it inside the foot. I recommend to cut the 2nd insole at once to have them of the same size.
Info :
Dec must be exactly in the center from 7 - 9 rows, if it's necessary make shifting sc.
Round 7 :
7 row: 8sc-5dec-10sc (23)
Round 8 :
8 row: 7sc-3dec-10sc (20)
Round 9 :
9 row: 7sc-2dec-9sc (18)
Info :
Insert wire right now. Take a wire of 2 mm thick and 11,02 inches long and twist it in spiral and wrap ends with adhesive plaster. Bend it to make a form of foot.
Info :
Insert wire skeleton with wrapped part down. Fill the foot with fiber tightly with the help of a skewer or sushi stick. Then fill the leg with fiber in the process. Link to the video below to get known how to make a wire skeleton.
Info :
Change color into white one, but don't cut yellow thread.
Round 10 :
10 row: BLO 3sc-1dec-(2sc-1dec)*2-3sc-1dec (14)
Round 11-15 :
11-15 row (5 rows): 14sc
Info :
Work 1 shifting sc to have color change exactly above the heel in the back.
Info :
Change color into yellow one, but don't cut white thread.
Round 16 :
16 row: 14sl st (work loose)
Info :
Change color into white one, cut yellow thread.
Round 17 :
17 row: 14sc (BLO and sc of the 15th row)
Info :
Change color into grey one, don't cut white thread.
Round 18 :
18 row: 14sl st (work loose)
Info :
Change color into white one, cut grey thread.
Round 19 :
19 row: 14sc (BLO and sc of the 17th row)
Info :
Change color into beige one, cut white thread.
Round 21 :
21 row: BLO 14sc
Round 22-25 :
22-25 row (4 rows): 14sc
Round 26 :
26 row: 3sc-1inc-7sc-1inc-2sc (16) Inc must be exactly along both sides of the leg. If it's necessary make required number of shifting sc.
Round 27-29 :
27-29 row (3 rows): 16sc
Round 30 :
30 row: 4sc-1inc-8sc-1inc-2sc (18) Inc must be exactly along both sides of the leg. If it's necessary make required number of shifting sc.
Round 31-35 :
31-35 row (5 rows): 18sc
Info :
Work 3 shifting sc to have color changing exactly in the center of the back. Change color into white one, cut beige thread.
Round 36 :
36 row: 18 sl st (work loose)
Round 37 :
37 row: 18sc (BLO and sc of the 35th row)
Info :
Leave unfinished 4 shifting sc in the left leg; fix and cut thread, hide tail thread. Work 5 shifting sc in the right leg, don't cut thread, we go on on working the body.
Info :
Bind off foot: Attach thread of grey color to FLO of the 3rd row, as it's shown in the photo and work 28sc. Fix and cut thread, hide tail thread.
Info :
Bind off the edge of the sneaker: Attach thread of yellow color to FLO of the 9th row, as it's shown in the photo and work by the scheme. 1 row: 18sc. Change color into grey one, cut yellow thread. 2 row: 18sl st (work loose). 3 row: 18sc (BLO and sc of the 1st row). Fix and cut thread, hide tail thread.
Info :
Bind off stockings: Attach thread of white color to FLO of the 20th row, as it's shown in the photo and work 14sc. Fix and cut thread, hide tail thread. Embroider shoelaces on the sneakers with grey color.
— Body :
Info :
Continue to work. Fill the body with fiber in the process. Place the legs to make them face with toes exactly straight. Legs attachment must be exactly along the center of inner part of hip. 4ch, sl st in the last sc of the 2nd leg. Twist wire of both legs together as it's shown in the photo.
Round 39 :
39 row: 18sc along one leg-4sc along chain-18sc along the 2nd leg -4sc along chain (44)
Info :
Place the marker, which must be exactly in the back.
Round 40-47 :
40-47 row (8 rows): 44sc
Info :
Work several shifting sc to have the marker aside the body (in my case, i've made 9 shifting sc). Change color into grey one, but don't cut white thread.
— Skirt :
Info :
Yarn of grey color, use hook of the same number or a bit bigger one. Work in turning rows. Probably, you have to use hook of bigger number or add/remove 1-2 rows. Check to your work.
Info :
12ch, turn the work, from the 2nd ch.
Round 1 :
1 row: BLO 9sc-BLO 2sl st, 1ch, turn the work (11)
Round 2 :
2 row: BLO 2sl st-BLO9sc, 1ch, turn the work (11)
Info :
Repeat the 1st and the 2nd rows 26 times; there must be 54 rows.
Round 55 :
55 row: BLO 9sc-BLO 2sl st, 1ch, turn the work (11)
Info :
Fold the piece in halves and work 11 sc in both sides. Fix and cut thread, hide tail thread.
Info :
Continue to work the body and attach the skirt. Put the skirt on the body with row in sl st up and work in the following scheme.
Round 49 :
49 row: catch stitches of the skirt and the body - 44sc
Info :
Wrap twisted wire with adhesive plaster to make the skeleton safer. Change color into yellow one, cut grey thread.
Round 50 :
50 row: 44sl st (work loose)
Round 51 :
51 row: 44sc (BLO and sc of the 49th row)
Info :
Change color into white one, cut yellow thread.
Round 52 :
52 row: 44sl st (work loose)
Round 53 :
53 row: BLO and sc of the 51st row: 1dec-2osc-1dec-20sc (42) Dec must be exactly aside the body.
Round 54 :
54 row: (5sc-1dec)*6 (36)
Round 55-57 :
55-57 row (3 rows): 36sc
Round 58 :
58 row: (4sc-1dec)*6 (30)
Round 59-62 :
59-62 row (4 rows): 30sc
Info :
Attach the arms. Attach arms in 1 sc. If it's necessary shift the marker to have it exactly before right arm attaching (I've shifted in 2 sc). Place the arms to the body to make the fingers face straight. Attach left arm, working sc together with the arm (it's the 1st sc of the row) and then work along the arm.
Round 63 :
63 row: 10sc along left arm-14sc along the body-10sc along right arm (attach right arm in the same way as for the left one)-14sc along the body (48)
Info :
Insert wire skeleton inside the arms. Take a piece of wire 1/1,5mm thick and 9,06 inches long, bend it in both ends in about 0,39 inches and wrap with adhesive plaster. Insert wire in both arms behind main skeleton (see the photo). Fill the arms with fiber a bit with the help of a skewer or sushi stick (fill palms with fiber tightly, but the rest of arm a bit).
Round 65 :
65 row: 7sc-1 triple dec-21sc-1 triple dec-18sc (44) dec in 65, 66, 67 rows must be exactly aside in the center of shoulder. Link to the video to get known how to make a triple dec.
Round 66 :
66 row: 2sc-2dec-18sc-2dec-16sc (40)
Round 67 :
67 row: 1sc-2dec-16sc-2dec-15sc (36)
Round 68 :
68 row: (4sc-1dec)*6 (30)
Round 69 :
69 row: (3sc-1dec)*6 (24)
Info :
Work 2 shifting sc to have the marker aside. Change color into beige one, cut white thread.
Round 70 :
70 row: BLO (2sc-1dec)*6 (18)
Round 71 :
71 row: (1sc-1dec)*6 (12)
Round 72-79 :
72-79 row (8 rows): 12sc
Info :
Work required number of shifting sc to have the marker aside. Fix and cut thread, hide tail thread.
Collar :
Attach thread of yellow color to FLO of the 69th row and work by the scheme: 12sc-1hdc-4dc-1sl st-4dc-1hdc-1sc Make sure, sl st must be exactly in the center.
Logo :
Embroider a logo on the T-shirt with yellow and white color.
— Head :
Info :
See the photo next page. Beige color. Fill the head with fiber in the process. 13ch, turn the work, from the 2nd ch
Round 1 :
1 row: 11sc-3sc in 1 stitch-10sc-1sc-1inc (26)
Round 2 :
2 row: 1inc-10sc-3inc-10sc-2inc (32)
Round 3 :
3 row: 1sc-1inc-10sc-(1sc-1inc)*3-10sc-(1sc-1inc)*2 (38)
Round 4 :
4 row: 2sc-1inc-10sc-(2sc-1inc)*3-10sc-(2sc-1inc)*2 (44)
Round 5 :
5 row: 3sc-1inc-10sc-(3sc-1inc)*3-10sc-(3sc-1inc)*2 (50)
Round 6 :
6 row: 4sc-1inc-10sc-(4sc-1inc)*3-10sc-(4sc-1inc)*2 (56)
Round 7 :
7 row: 25sc-1inc-27sc-1inc-2sc (58) Inc must be exactly aside.
Round 9 :
9 row: 26sc-1inc-28sc-1inc-2sc (60) Inc must be exactly aside.
Round 10-17 :
10-17 row (8 rows): 60sc
Round 18 :
18 row: 4sc-1dec-(8sc-1dec)*5-4sc (54)
Round 19 :
19 row: (7sc-1dec)*6 (48)
Info :
If you use eyes on safe fastening, insert them between 11 and 14 rows in the distance of 6 sc.
Round 20 :
20 row: 3sc-1dec-(6sc-1dec)*5-3sc (42)
Round 21 :
21 row: (5sc-1dec)*6 (36)
Round 22 :
22 row: 2sc-1dec-(4sc-1dec)*5-2sc (30)
Round 23 :
23 row: (3sc-1dec)*6 (24)
Round 24 :
24 row: 1sc-1dec-(2sc-1dec)*5-1sc (18)
Round 25 :
25 row: (4sc-1dec)*3 (15)
Round 26 :
26 row: BLO 15sc
Round 27-33 :
27-33 row (7 rows): 15sc
Info :
Fix and cut thread, hide tail thread. Fill the head with fiber.
Info :
Push the lower part of the head inside the head with the help of sushi stick. Make sure, the head is filled with fiber tightly, but it can easily be put on the neck. Attach the head to the body. Firstly decorate the face and then fix it to the body.
This sweet Penny tennis player was crafted to be a tiny sporty companion with lots of little details and personality. The pattern includes a poseable wire skeleton, pleated skirt and tiny sneakers to make your creation come alive. Whether you gift her or keep her on display, she makes a delightful handmade keepsake. 🧶🎾