🧢 Beautiful ✨ Detailed πŸ’ Adorable

Neon the Horse Amigurumi Pattern

Neon the Horse Amigurumi Pattern
4.1β˜… Rating
5-7 Hours Time Needed
1.3K Made This
βœ‚οΈ

Intermediate Level

Ideal for those with basic crochet experience, featuring slightly more advanced stitches and techniques to expand your skills.

⏱️

Weekend Treat

Takes 5-7 hours, making it an enjoyable project to finish over a couple of days.

πŸ₯

Charming Critter

Delightful animal designs with sweet details that capture the essence of your favorite woodland and farmyard friends.

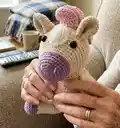
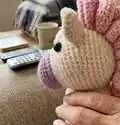
About This Neon the Horse Amigurumi Pattern

This pattern makes a seated amigurumi horse named Neon with a rounded head, patch, curly mane and tail. It uses 4ply/fingering yarn in pastel shades and small safety eyes for a cute finish. Instructions are given in US terminology with round-by-round shaping and color changes. The finished toy is approximately 15cm tall when seated.

Neon the Horse Amigurumi Pattern crochet pattern - detailed view of completed project

Worked in the round with clear stitch counts for each round, this pattern guides you through ears, head, body, arms, legs and finishing touches. Photos are provided for reference and assembly placement to help you achieve a neat finish.

Why You'll Love This Neon the Horse Amigurumi Pattern

I absolutely love this pattern because it combines playful character with simple, repeatable stitches that result in a charming toy. I enjoy how the pastel colour changes and curled mane give Neon personality without complicated techniques. Sewing the pieces together is satisfying and the placement instructions make assembly straightforward. I also appreciate that the pattern is versatile β€” you can make colour changes to personalise your Neon easily.

Neon the Horse Amigurumi Pattern step 1 - construction progress Neon the Horse Amigurumi Pattern step 2 - assembly progress Neon the Horse Amigurumi Pattern step 3 - details and accessories Neon the Horse Amigurumi Pattern step 4 - final assembly and finishing

Switch Things Up

I love how easy it is to change Neon’s personality with just a few colour swaps; try browns and creams for a realistic horse, or rainbow stripes for a whimsical version.

I often make the toy larger by using aran weight yarn and a larger hook to create a cuddlier plushie perfect for toddlers.

I sometimes swap safety eyes for embroidered eyes to make the toy suitable for very young children and to give a softer look to the face.

For a sparkly mane and tail, use a glitter or metallic thread combined with the main yarn to add subtle shimmer and texture.

I like to stitch tiny accessories like a crocheted saddle or scarf to personalise each Neon; these can be made from leftover yarn scraps.

Try placing the eyes slightly closer or further apart to change the expression β€” small shifts give big character changes.

I also experiment with different stuffing levels; lighter stuffing makes Neon floppy, while firmer stuffing preserves a sitting pose better.

To make Neon posable, I have added craft wire inside the limbs in some builds, which allows gentle repositioning of the arms and legs.

If I want a super-mini keychain version, I use 2-ply yarn and a 1.5mm hook and scale down all pieces proportionally.

I always recommend testing a small swatch when changing yarn weight so you can predict the final size and adjust hook size or stitch counts as needed.

Common Mistakes & How to Fix Them

βœ— Working too loosely can cause gaps between stitches and visible stuffing; maintain a firm, consistent tension and use a smaller hook if needed. βœ— Forgetting to change yarn colours at the correct round can misalign features; mark color change rounds with a sticky note or stitch marker and change exactly as written. βœ— Skipping stitch counts during increases or decreases leads to uneven shaping; count stitches at the end of each round and correct immediately if the count is off. βœ— Not stuffing gradually makes shaping difficult and lumps appear; stuff a little at a time, especially when forming the head and body, and check shape frequently.

Neon the Horse Amigurumi Pattern

Create a sweet, pastel Neon the Horse amigurumi with this complete intermediate-level crochet pattern. You will make a seated horse with shaped head, limbs, curly mane and tail using simple amigurumi techniques. The pattern includes full round-by-round instructions, materials list, abbreviations and assembly steps so you can stitch with confidence. Perfect as a handmade gift or a charming keepsake to display.

Intermediate 5-7 Hours

Materials Needed for Neon the Horse Amigurumi Pattern

β€” Main Fabric

  • 01
    4ply yarn / fingering weight, less than 50g in BEIGE (main body)
  • 02
    4ply yarn / fingering weight, less than 50g in APRICOT (head/body contrast)
  • 03
    4ply yarn / fingering weight, less than 50g in PURPLE (muzzle, hooves, details)
  • 04
    4ply yarn / fingering weight, less than 50g in PINK (mane and tail, glitter yarn used for shimmer)
  • 05
    BEIGE = Hobbii Cotton Kings 8/4 colour 02 (used for body)
  • 06
    APRICOT = Hobbii Rainbow Cotton 8/4 colour 89 (used for head contrast)
  • 07
    PURPLE = Hobbii Rainbow Cotton 8/4 colour 39 (used for muzzle and hooves)
  • 08
    PINK = Hobbii Rainbow Glitter Gold colour 044 (used for mane/tail)
  • 09
    Polyester toy stuffing (as needed)
  • 10
    8mm safety eyes (2 pieces)

β€” Tools Required

  • 01
    Crochet hook size 2.0mm (B-1 US)
  • 02
    Scissors
  • 03
    Tapestry needle for sewing and weaving ends
  • 04
    Stitch marker
  • 05
    Polyester stuffing
  • 06
    Safety eyes 8mm (2 pieces)

Progress Tracker

0% Complete

β€” Ears (APRICOT, make 2) :

Round 1 :

6 sc in MR [6]

Round 2 :

inc x 6 [12]

Round 3 :

(sc, inc) x 6 [18]

Round 4-9 :

sc x 18 [18]

Info :

Fasten off, fold ears in half and half again (you should have 4 edges together) and sew across the bottom. Leave a tail for sewing.

β€” Head (PURPLE) :

Round 1 :

6 sc in MR [6]

Round 2 :

inc x 6 [12]

Round 3 :

(sc, inc) x 6 [18]

Round 4 :

(sc x 2, inc) x 6 [24]

Round 5 :

(sc x 3, inc) x 6 [30]

Round 6-9 :

sc x 30 [30]

Info :

Change to APRICOT.

Round 10 :

in BLO: sc x 30 [30]

Round 11 :

sc x 30 [30]

Round 12 :

(sc x 4, inc) x 6 [36]

Round 13 :

(sc x 5, inc) x 6 [42]

Round 14 :

(sc x 6, inc) x 6 [48]

Round 15 :

(sc x 7, inc) x 6 [54]

Round 16-20 :

sc x 54 [54]

Round 21 :

(sc x 7, dec) x 6 [48]

Round 22 :

sc x 48 [48]

Round 23 :

(sc x 6, dec) x 6 [42]

Round 24 :

(sc x 5, dec) x 6 [36]

Round 25 :

(sc x 4, dec) x 6 [30]

Info :

If using safety eyes, insert between rounds 15 and 16, 11 stitches apart.

Round 26 :

(sc x 3, dec) x 6 [24]

Info :

Stuff the head and continue stuffing until fastened off.

Round 27 :

(sc x 2, dec) x 6 [18]

Round 28 :

(sc, dec) x 6 [12]

Round 29 :

dec x 6 [6]

Info :

Fasten off and weave tail through final round, pull to close.

β€” Arms (PURPLE, make 2) :

Round 1 :

6 sc in MR [6]

Round 2 :

inc x 6 [12]

Round 3 :

(sc, inc) x 6 [18]

Round 4 :

sc x 18 [18]

Round 5 :

in BLO: sc x 18 [18]

Round 6 :

(sc x 7, dec) x 2 [16]

Info :

Change to BEIGE.

Round 7 :

(sc x 6, dec) x 2 [14]

Round 8 :

sc x 14 [14]

Info :

Change to APRICOT.

Round 9-18 :

sc x 14 [14]

Info :

Fasten off, stuff rounds 1-8 and sc across top. Leave a tail for sewing.

β€” Legs (PURPLE, make 2) :

Round 1 :

8 sc in MR [8]

Round 2 :

inc x 8 [16]

Round 3 :

(sc, inc) x 8 [24]

Round 4-5 :

sc x 24 [24]

Round 6 :

in BLO: (sc x 6, dec) x 3 [21]

Round 7 :

(sc x 5, dec) x 3 [18]

Info :

Change to BEIGE.

Round 8-9 :

sc x 18 [18]

Info :

Change to APRICOT.

Round 10-18 :

sc x 18 [18]

Info :

Fasten off, stuff and sc across the top to close. Leave a tail for sewing.

β€” Body (APRICOT) :

Round 1 :

6 sc in MR [6]

Round 2 :

inc x 6 [12]

Round 3 :

(sc, inc) x 6 [18]

Round 4 :

(sc x 2, inc) x 6 [24]

Round 5 :

(sc x 3, inc) x 6 [30]

Round 6 :

(sc x 4, inc) x 6 [36]

Round 7 :

(sc x 5, inc) x 6 [42]

Round 8-15 :

sc around [42]

Round 16 :

(sc x 5, dec) x 6 [36]

Round 17-20 :

sc x 36 [36]

Round 21 :

(sc x 4, dec) x 6 [30]

Round 22 :

sc x 30 [30]

Round 23 :

(sc x 3, dec) x 6 [24]

Info :

Stuff and continue stuffing until fastened off.

Round 24 :

(sc x 2, dec) x 6 [18]

Round 25 :

(sc, dec) x 6 [12]

Info :

Fasten off, weave tail through final round and pull to close. Leave a tail for sewing.

β€” Mane (PINK) :

Info :

Leave a long tail at the beginning for sewing. You will work in rows and turn at the end of each row. Chains do not count as a stitch.

Row 1 :

ch16, sc in 2nd ch from hook, sc x 14 [15]

Row 2 :

ch2 and 3dc in same stitch, 3dc x 14 [45]

Row 3 :

ch2 and 3dc in same stitch, 3dc x 44 [135]

Info :

Fasten off and leave a tail for sewing.

β€” Tail (PINK) :

Info :

Leave a long tail at the beginning for sewing. You will work in rows and turn at the end of each row. Chains do not count as a stitch.

Row 1 :

ch9, sc in 2nd ch from hook, sc x 7 [8]

Row 2 :

ch2 and 3dc in same stitch, 3dc x 7 [24]

Row 3 :

ch2 and 3dc in same stitch 3dc x 24 [72]

Info :

Fasten off and leave a tail for sewing.

β€” Patch (BEIGE) :

Row 1 :

ch 6, sc in 2nd chain from hook, sc x 3, 3sc in the final chain, turn and work on the other side: sc x 3, inc [12]

Row 2 :

inc, sc x 3, inc, sc, inc, sc x 3, inc, sc [16]

Row 3 :

sc, inc, sc x 4, inc, sc, inc, sc x 5, inc, sc [20]

Info :

Fasten off and leave a tail for sewing.

β€” Assembly :

Step 1 :

EYES – using APRICOT, sew over a stitch on the inner part of each eye (As shown) and pull a little to create an indent. Tie off yarn tails and hide inside the head.

Step 2 :

PATCH – sew to the centre of the head over rounds 12-19.

Step 3 :

HEAD – sew to the body. Go around twice to make secure.

Step 4 :

EARS – sew to either side of the head over rounds 18-22. Approx. 3 stitches from the patch.

Step 5 :

LEGS – sew to rounds 5-7 of the body pointing outwards, 3 stitches apart.

Step 6 :

ARMS – sew to the body over rounds 17-22 on a diagonal so the arms point slightly forward and rest on the legs.

Step 7 :

MANE – approx. 1 round after the patch, sew down the back of the head.

Step 8 :

TAIL – sew to the back of the body over rounds 6-11.

Step 9 :

NOSTRILS – using APRICOT, making 2 vertical lines over rounds 3-5, approx. 5 stitches apart.

Info :

That’s it! Enjoy your Neon.

Assembly Instructions

  • EYES – Using APRICOT, sew over a stitch on the inner part of each eye and pull slightly to create an indent. Tie off yarn tails and hide inside the head.
  • PATCH – Sew the patch to the centre of the head covering rounds 12-19 to create the facial patch detail.
  • HEAD – Sew the head to the body securely, going around twice to ensure a strong join.
  • EARS – Sew ears to either side of the head over rounds 18-22, approximately 3 stitches from the patch for symmetry.
  • LEGS – Sew legs to the body pointing outwards at rounds 5-7, spacing them 3 stitches apart for stability.

Important Notes

  • πŸ’‘A yarn with no stretch is best for amigurumi; I ordinarily use cotton or a cotton blend for neat stitches and stability.
  • πŸ’‘Amigurumi is stitched in the round unless the pattern specifically says otherwise; keep consistent stitch direction throughout.
  • πŸ’‘Generally, the hook you use for amigurumi will be smaller than for other crochet to keep the stitches tight and prevent stuffing showing.
  • πŸ’‘Stuff firmly but not excessively and add stuffing gradually to shape the head and body evenly.

Neon the Horse is a playful pastel amigurumi that brings soft charm to any shelf or nursery. Customize colours to suit your style and make a delightful handmade gift for friends or little ones. Share your finished Neon on social media and tag the maker to join the community of makers. 🧢✨

You ask,

we answer.

FAQs

What size will the finished piece be?

The finished amigurumi measures approximately 15 cm tall when seated using the recommended 4ply yarn and 2.0mm hook.

Can I use different yarn weights for this pattern?

Yes, you can use different yarn weights but this will change the overall size; adjust your hook accordingly and expect different stitch densities.

Do I need prior crochet experience for this pattern?

This pattern is rated intermediate, so basic knowledge of single crochet, increases, decreases and working in the round is recommended for best results.

How long does this project typically take to complete?

Most crocheters finish this project in 5-7 hours, depending on experience and assembly pace.