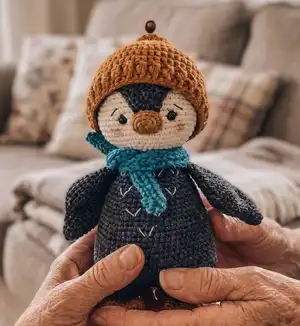
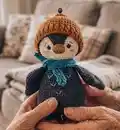
Make a charming handmade penguin with this detailed crochet amigurumi pattern. You will create a removable cap, tiny scarf, embroidered belly ticks, and adorable face details. The pattern includes full round-by-round instructions, materials list, and assembly tips so you can follow along easily. Perfect as a gift or a cozy decor accent you will love to make.
Progress Tracker
0% Complete
— Head :
Round 3 :
(1 sc, inc) x 6 (18)
Round 4 :
(2 sc, inc) x 6 (24)
Round 5 :
(3 sc, inc) x 6 (30)
Round 6 :
(4 sc, inc) x 6 (36)
Round 7 :
(5 sc, inc) x 6 (42)
Round 8 :
(6 sc, inc) x 6 (48)
Round 9 :
(7 sc, inc) x 6 (54)
Round 10 :
(8 sc, inc) x 6 (60)
Round 11-20 :
(60) 10 rounds
Info :
We will now pause to insert the eyes. Insert them between rnds 17/18, 10 sts apart.
Round 21 :
(8 sc, dec) x 6 (54)
Round 22 :
(7 sc, dec) x 6 (48)
Round 23 :
(6 sc, dec) x 6 (42)
Round 24 :
(5 sc, dec) x 6 (36)
Round 25 :
(4 sc, dec) x 6 (30)
Info :
Start to stuff the head.
Round 26 :
(3 sc, dec) x 6 (24)
Round 27 :
24 sc, sl st. (24)
Info :
Stuff the head (I stuff very firmly and evenly). Secure the thread, weave in end inside of the head.
— Sewn cap (in main color) :
Round 3 :
(1 sc, inc) x 6 (18)
Round 4 :
(2 sc, inc) x 6 (24)
Round 5 :
(3 sc, inc) x 6 (30)
Round 6 :
(4 sc, inc) x 6 (36)
Round 7 :
(5 sc, inc) x 6 (42)
Round 8 :
(6 sc, inc) x 6 (48)
Round 9 :
(7 sc, inc) x 6 (54)
Round 10 :
(8 sc, inc) x 6 (60)
Round 11 :
(19 sc, inc) x 3 (63)
Round 12-19 :
(63) 8 rounds
Info :
Don't cut the thread. Then we are going to crochet the black vertical "peak", which should be located on the forehead. Fold the piece in half as it's shown in the pic.
Item Name (P1) :
Attach the thread and crochet in turning rows: R1. Ch1, in the same st 1 sc, then 6 sc, dec (8).
Round 2 :
Ch1, 6 sc, dec (7)
Round 3 :
Ch1, 5 sc, dec (6)
Round 4 :
Ch1, 4 sc, dec (5)
Round 5 :
Ch1, 3 sc, dec (4)
Round 6 :
Ch1, 2 sc, dec (3)
Info :
Cut the thread. Return to the thread of black color and crochet around the whole hat piece. I got 27 sc till the peak, 6 sc across the peak side, 3 sc across the peak top, 6 sc across another side of the peak, and 26 sc till the end of the round. Leave a long tail for sewing.
— Beak (in saffron color, don't stuff) :
Round 1 :
Ch4, from the second ch from the hook: 2 sc, 3 sc into one st, then on the other side of the chain: 1 sc, 3 sc into one st (9)
Round 2 :
3 sc, 3 sc into one st, 4 sc, 3 sc into one st (13)
Info :
The last st is the sl st. Cut the thread, leaving a long tail for sewing.
— Head details :
Info :
Sew the cap to the head, having fixed it with pins. Sew the hat to the head above the 3rd round (count the rounds from the head bottom). The peak end should be located above the 10th round of the head. Sew the beak, fixing it above the edge of the peak.
Info :
Make special needle sculpting for the eyes. Use the thread of the cream color. Using a needle, insert the thread into the hole on the head, bring it out at point 1, insert it at point 2 and bring it out at point 3, insert it at point 4 and bring it out into the hole on the head. Tighten the ends of the threads well and fix them with a knot.
Info :
Embroider the eyebrows above the eyes with sewing thread. Embroider the eye whites and eyelids (see photos). Add blush to the cheeks as desired.
— Legs and body (are crocheted as one piece) :
Foot (make 2, in saffron color, don't stuff) :
Rnd 1. Ch6, from the second ch from the hook: 4 sc, 3 sc into one st, then on the other side of the chain: 3 sc, inc (12)
Round 2 :
5 sc, 3 sc into one st, 5 sc, 3 sc into one st (16)
Round 3 :
6 sc, inc, 7 sc, inc, 1 sc (18)
Round 6 :
(1 sc, dec) x 6 (12)
Info :
Cut the thread, leaving a thread tail. Pull the opening closed pulling a needle through front loops of stitches. Weave in the thread tail.
Legs (make 2, in main color) :
Rnd 1. Put a pin under the foot's third round in the center (count the rounds from the top). Step 2 stitches from the pin to both sides and crochet 12 sc in a round. Make the first sc at the right side from the pin, work clockwise (insert the crochet hook under the stitches of the upper layer only). Weave in thread end inside of the piece.
Round 3 :
(3 sc, inc) x 6 (30)
Round 4 :
30 sc, sl st. (30)
Info :
Cut the thread. Make another leg in the same way. On the second leg don't cut the yarn, work 18 sc additionally to finish at the middle of the other side of the leg, join both legs with sl st. Make sure they are located in parallel.
Round 5 :
30 sc around the first leg, 30 sc around the second leg (60). Place marker to indicate the beginning of rounds (it should be located at the front side of the body).
Round 7 :
(9 sc, inc) x 6 (66)
Round 8-15 :
(66) 8 rounds
Round 16 :
(9 sc, dec) x 6 (60)
Round 17-19 :
(60) 3 rounds
Round 20 :
(8 sc, dec) x 6 (54)
Round 21-23 :
(54) 3 rounds
Info :
Stuff the legs and the body.
Round 24 :
(7 sc, dec) x 6 (48)
Round 25-27 :
(48) 3 rounds
Round 28 :
(6 sc, dec) x 6 (42)
Round 29-30 :
(42) 2 rounds
Round 31 :
(5 sc, dec) x 6 (36)
Round 33 :
(4 sc, dec) x 6 (30)
Round 35 :
(3 sc, dec) x 6 (24)
Info :
Cut the thread, leave a long tail for sewing. Stuff the body.
— Tail (in main color, don't stuff) :
Round 2 :
(1 sc, inc) x 3 (9)
Round 3 :
(2 sc, inc) x 3 (12)
Round 4 :
(3 sc, inc) x 3 (15)
Round 5 :
(4 sc, inc) x 3 (18)
Round 6 :
18 sc, sl st (18)
Info :
Cut the thread, leaving a long tail for sewing.
— Wings (make 2, in main color, don't stuff) :
Round 2 :
(1 sc, inc) x 3 (9)
Round 4 :
2 sc, inc, (1 sc, inc) x 2, 2 sc (12)
Round 5 :
3 sc, inc, (2 sc, inc) x 2, 2 sc (15)
Round 7 :
4 sc, inc, (3 sc, inc) x 2, 2 sc (18)
Round 8 :
dec, 3 sc, inc, (1 sc, inc) x 4, 2 sc, dec (21)
Round 10 :
dec, 3 sc, inc, (2 sc, inc) x 4, 1 sc, dec (24)
Round 11-14 :
(24) 4 rounds
Round 15 :
8 sc, dec, (1 sc, dec) x 2, 8 sc (21)
Round 17 :
7 sc, dec, (1 sc, dec) x 2, 6 sc (18)
Round 19 :
5 sc, dec, (1 sc, dec) x 2, 5 sc (15)
Round 21 :
6 sc, dec, 7 sc (14)
Info :
Fold the wing in half and work 7 sc through two layers. Cut the thread, leaving a long tail for sewing.
— Toy assembly :
Info :
Sew the head to the body, having fixed it with pins. Add stuffing to the space between the body and the head while sewing so the head will be fixed much better.
Info :
Sew the wings to the body under the 3rd round (count from the top). Sew the tail as it's shown in the pic. Add stuffing while sewing.
Info :
Embroider the ticks on the belly with the thread of cream color (divide the thread into 4 strands). Embroider the first tick on the center of the belly. Embroider the next two ticks 2 rounds apart from the first tick, etc. I embroider 10 ticks.
— Crochet cap :
Info :
(Start every new rnd with 3 turning ch (which are counted as one DC st), finish every rnd with a sl st, which joins the beginning and the end of a rnd.)
Round 1 :
Make a ch57, joined it in a circle with sl st (make sure the chain is not twisted).
Round 2 :
3 turning ch, 56 DC, sl st (57)
Round 3 :
3 turning ch, front post DC, back post DC - work in this way, alternating front and back post DC sts till the end of the rnd, sl st (57)
Round 4 :
3 turning ch, 16 DC, dec, (17 DC, dec) x 2, sl st (54)
Round 5 :
3 turning ch, 53 DC, sl st (54)
Round 6 :
3 turning ch, 6 DC, dec, (7 DC, dec) x 5, sl st (48)
Round 7 :
3 turning ch, 5 DC, dec, (6 DC, dec) x 5, sl st (42)
Round 8 :
3 turning ch, 4 DC, dec, (5 DC, dec) x 5, sl st (36)
Round 9 :
3 turning ch, 3 DC, dec, (4 DC, dec) x 5, sl st (30)
Round 10 :
3 turning ch, 2 DC, dec, (3 DC, dec) x 5, sl st (24)
Round 11 :
3 turning ch, DC, dec, (2 DC, dec) x 5, sl st (18)
Round 12 :
3 turning ch, dec, (DC, dec) x 5, sl st (12)
Round 13 :
3 turning ch, 5 dec, DC, sl st (7)
Info :
Cut the thread, leaving a thread tail. Pull the opening closed pulling a needle through front loops of stitches. Sew on the bell. Weave in the thread tail.
— Crochet scarf :
Info :
Work in rows, ch61 starting in the 2nd ch from the hook:
Round 1 :
R 1. BLO 60 sl st, ch 1, turn (60)
Round 2-4 :
R 2-4. BLO 60 sl st, ch 1, turn (60) 3 rows
Round 5 :
R 5. BLO 60 sl st (60)
Info :
Cut the thread and weave in the ends. Congratulations! Your Penguin is now complete!
This adorable Penguin amigurumi pattern includes a removable cap, cozy scarf, and embroidered details to make a truly special handmade gift. 🧶
Every round-by-round instruction and finishing tip is included so you can crochet with confidence and joy. ✨
Make one for yourself or craft a whole flock of little friends to share with loved ones. 🐧