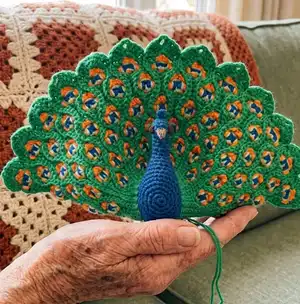
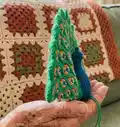
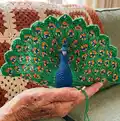
Create a charming crocheted peacock with an open train of feathers using clear, photo-led instructions. This pattern walks you through crocheting the body, head, wings, embroidered feather details and reinforcing the train with craft wire. Youll learn shaping, small-round techniques, and simple embroidery to make the eye-patterns on each feather. Perfect for intermediate makers who enjoy a detailed, rewarding project.
Progress Tracker
0% Complete
— Body :
Rnd 1 :
Sc 6 in magic ring (6)
Rnd 4 :
Sc, [inc, sc 2]*5, inc, sc (24)
Rnd 5 :
[sc 3, inc]*6 (30)
Rnd 6 :
Sc 2, [inc, sc 4]*5, inc, sc 2 (36)
Rnd 7 :
Ch 8 [img 1], sk 8 [img 2], sc 28 (36)
Info :
This creates an opening out of which you will later crochet the neck.
Rnd 8 :
Sc 8 in the back loops of the ch sts, sc 24 (36) [img 3]
Rnd 12 :
Sc 2, [dec, sc 4]*5, dec, sc 2 (30)
Rnd 14 :
[sc 3, dec]*6 (24)
Info :
Start filling with fiberfill and continue stuffing as you go.
Rnd 16 :
Sc, [dec, sc 2]*5, dec, sc (18)
Info :
Fasten off and close the round. (p. 4 of 'Amigurumi Lessons')
— Neck and head :
Info :
Crochet the neck out of the opening.
Rnd 1 :
Sc 18 (18) (Please see the detailed description with images below)
Info :
Join the blue yarn at the gap to the right of the first skipped stitch. [img 1] Sc in next 8 sts. [img 2] Sc in space between rnd 6 and 7 of the body. [img 3] Sc in the other side of the 8 chs. [img 4] Sc in the space you first joined the yarn in. [img 5 and 6]
Rnd 2 :
[sc 7, dec]*2 (16)
Rnd 3 :
[sc 2, dec]*4 (12)
Info :
Fill with fiberfill and continue stuffing as you go.
Info :
Fasten off and close the round.
— Beak :
Item Name (P1) :
Crochet the beak in beige and attach it. Ch 2. Sc in 2nd ch from hook (1). Fasten off.
Info :
Pin the beak centered to the front of the head between the last two rounds. [img 1] Thread the yarn ends on a yarn needle and bring them through to the same space in between stitches on the back, one by one. [img 2] Tie the ends together and cut them short. Then pull them inside the body, using a hook. [img 3]
— Embroider the eyes :
Info :
Cut an approx. 70 cm/28" long piece of white embroidery floss and thread it on a large-eyed sewing needle. Insert the needle next to the beak and stitch through to the top of the head on the same side. Repeat this stitch two more times. [img 1 to 3]
Info :
Insert the needle at the same spot and stitch through to the back of the head on the same side. [img 4]
Info :
Now, make a parallel stitch, leaving a small space in between. This stitch is positioned further towards the back of the head. The needle exits at the same spot as in img 4. Repeat this stitch two more times. [img 5 to 7]
Info :
The stitches almost connect in the front now. Connect the stitches at the back as well with one stitch. [img 8] The needle exits at the other side of the beak from where you can embroider the other side the same way. [img 9]
Info :
Once you have embroidered the other side, hide the ends the same way you did with the beak. [img 10]
Info :
Cut a 30 cm/12" long black piece of embroidery floss and thread it on the large-eyed sewing needle. Make one long stitch between the white stitches. [img 11] Make the same stitch to create a bolder line. This time the needle exits at the center of the black stitch. [img 12]
Info :
Make two short vertical stitches through the center of the horizontal black stitch. [img 13 and 14] Hide the ends the same way you did previously. [img 15] See the result in img 16.
— Make the crest :
Info :
Cut a 10 cm/4" short piece of blue yarn. Thread it on a yarn needle and insert it vertically, centered at the back of the head. Pull the piece of yarn halfway through and remove the yarn needle. [img 1 and 2]
Info :
Make a double knot and cut the ends about 1 cm/0.4" short. [img 3 and 4] Untwist the yarn ends so that the separate fibers form a crest. [img 5]
— Crochet the wings :
Info :
Crochet the orange parts of the wings (make 2).
Rnd 1 :
Sc 6 in magic ring (6)
Rnd 4 :
[ch 7 [img 1], sc 6 (starting in 2nd ch) [img 2], press both sides together, sl st next st and corresponding st on the opposite side together]*6 [img 3 to 8]
Info :
Fasten off, leaving a long yarn tail for sewing.
— Crochet the brown parts of the wings :
Info :
The brown parts of the wings are crocheted in rows.
Info :
Crochet the left side: Ch 3, leaving a long tail for sewing.
R 1 :
Sc 2 (starting in 2nd ch from hook), ch 1, turn (2)
R 2 :
Inc 2, ch 1, turn (4)
R 3 :
Inc 1, sc 2, inc 1, ch 1, turn (6)
R 4 to 7 :
Sc 6, ch 1, turn (6)
R 8 :
Sc 2, [sk 1, sc 1]*2, ch 1, turn (4)
R 9 :
Sk 1, sc 3, ch 1, turn (3)
R 10 :
Sc 1, sk 1, sc 1, ch 1, turn (2)
R 11 :
Sc 2, ch 1, turn (2)
R 12 :
Sk 1, sc 1, ch 1, turn (1)
R 13 and 14 :
Sc 1, ch 1, turn (1)
Info :
Now crochet all around the wing. Sc 14 in the side of the wing in between rows all the way to the top [img 1], sc 2 in the other side of the 2-ch-chain you began with [img 2], sc 14 in the other side of the wing in between rows down to the tip of the wing (30) [img 3 to 4]. Finish with a sl st in the first sc and an invisible finish. Weave in the yarn end.
Info :
Crochet the right side: follow the same rows as the left. Do not fasten off. Now crochet all around the right wing as you did the left, then finish and weave in ends.
— Attach the wings :
Info :
Sew on the prange parts of the wings: Pin the orange parts of the wings on rounds 13 to 16 of the body. The feathers should slightly point upwards. Sew on the feathers along the base and weave in the yarn ends. [img 1 to 3]
Info :
Sew on the brown parts of the wings: Pin the brown parts of the wings on rounds 6 to 16. They should overlap with the orange parts and the brown tip should align with the upper orange feathers. Sew them on along the base of the top side. [img 4 to 6]
— Attach the legs with wire :
Info :
Cut a 50 cm / 20" long piece of craft wire and insert it in between rounds 12 and 13 of the body with 5 stitches space in between. Both wire ends should be equally long. Bend them downwards. [img 1]
Info :
Measure 3 cm / 1.2" from the belly, then bend the wire forward. This will be the leg. [img 2]
Info :
Measure 1 cm / 0.4" from the bend and bend the wire backwards. This will be the outer toe. [img 3]
Info :
Bend the wire forward. [img 4] Bend the wire backwards at 1.5 cm / 0.6", measured from the last bend. This creates the middle toe. [img 5]
Info :
Bend the wire forward [img 6] and backwards again at 1 cm / 0.4". This shapes the inner toe. [img 7]
Info :
Now, bend the wire straight backwards, like an extension of the middle toe. Then bend it back forward at 1 cm / 0.4", measured from the slight bend. This will be the back toe. [img 8]
Info :
Wrap the remaining wire tightly around the leg and cut off any excess. Bend the legs ever so slightly at half-length. [img 9]
Info :
Repeat these steps on the other side. [img 10 and 11]
— Crochet the train in green :
Info :
The train of feathers is crocheted in rows. You will crochet a front and a reverse side, which you will sew together after embroidering the front side. Try not to make the slip stitches too tight. Starting with row 2, you will work in the back loops only.
Info :
Crochet the front side of the train: Ch 38, leaving a long yarn end for sewing.
R 1 :
Tr in 4th ch from hook, tr 4, sc 5, dc 5, sl st 5, hdc 5, sl st 10, ch 1, turn (35)
R 2 :
In BLO: Sl st 10, hdc 5, sl st 5, dc 5, sc 5, tr 5, ch 1, turn (35)
R 3 :
In BLO: [sl st 5, hdc 5]*2, sl st 15, ch 1, turn (35)
R 4 :
In BLO: Sl st 15, [hdc 5, sl st 5]*2, ch 3, turn (35)
R 5 :
In BLO: Tr 5, sc 5, dc 5, sl st 5, hdc 5, sl st 10, ch 1, turn (35)
R 6 :
In BLO: Sl st 10, hdc 5, sl st 5, dc 5, sc 5, tr 5, ch 1, turn (35)
R 7 :
In BLO: Sl st 5, dc 5, [sl st 5, hdc 5]*2, sl st 5, ch 1, turn (35)
R 8 :
In BLO: [sl st 5, hdc 5]*2, sl st 5, dc 5, sl st 5, ch 3, turn (35)
R 9 :
In BLO: Tr 5, sc 5, dc 5, sl st 5, hdc 5, sl st 10, ch 1, turn (35)
R 10 to 49 :
Repeat rows 2 to 9 x 5 times (40 rs)
R 50 :
Sl st 10, hdc 5, sl st 5, dc 5, sc 5, tr 5 (35) [img 1]
— Crochet the reverse side of the train :
Info :
Ch 33, leaving a long end for sewing.
R 1 :
Tr in 4th ch from hook, tr 4, sc 5, dc 5, sl st 5, hdc 5, sl st 5, ch 1, turn (30)
R 2 :
In BLO: Sl st 5, hdc 5, sl st 5, dc 5, sc 5, tr 5, ch 1, turn (30)
R 3 :
In BLO: [sl st 5, hdc 5]*2, sl st 10, ch 1, turn (30)
R 4 :
In BLO: Sl st 10, [hdc 5, sl st 5]*2, ch 3, turn (30)
R 5 :
In BLO: Tr 5, sc 5, dc 5, sl st 5, hdc 5, sl st 5, ch 1, turn (30)
R 6 :
In BLO: Sl st 5, hdc 5, sl st 5, dc 5, sc 5, tr 5, ch 1, turn (30)
R 7 :
In BLO: Sl st 5, dc 5, [sl st 5, hdc 5]*2, ch 1, turn (30)
R 8 :
In BLO: [hdc 5, sl st 5]*2, dc 5, sl st 5, ch 3, turn (30)
R 9 :
In BLO: Tr 5, sc 5, dc 5, sl st 5, hdc 5, sl st 5, ch 1, turn (30)
R 10 to 49 :
Repeat rows 2 to 9 x 5 times (40 rs)
R 50 :
Sl st 5, hdc 5, sl st 5, dc 5, sc 5, tr 5 (30)
Info :
Fasten off, leaving a long yarn end for sewing.
— Embroider the "eyes" on the front side of the train :
Info :
Cut a long piece of ochre yarn. You can join more yarn later. All yarn ends will be hidden by the reverse side of the train. Embroider the feather's eyes on each of the hdc, dc and tr 'feathers'. Begin at the lower edge. Insert the needle between the 1st and 2nd hdc [img 1], then bring it under the 2nd and 3rd hdc on the opposite side of the 'feather'. [img 2]
Info :
Repeat this stitch two more times [img 3 and 4], then insert the needle centered above the 5th hdc and in between the 3rd and 4th hdc on the same side. [img 5] Now, insert it centered above the 5th hdc again, this time exiting centered between the 3rd and 4th hdc. [img 6]
Info :
Insert the needle centered above the 5th hdc again and in between the 3rd and 4th hdc on the other side. [img 7] Repeat this stitch two more times. [img 8 and 9]
Info :
Now, bring the needle under the 2nd and 3rd hdc on this side. [img 10] Insert the needle in between the 1st and 2nd hdc on both sides. [img 11] Insert the needle at the same spot again and bring it through to the center of the 5th hdc of the next 'feather'. [img 12]
Info :
You can begin embroidering this eye from here. [img 13 to 15] Repeat this with all hdc and dc 'feathers'. When you reach the top row of tr 'feathers', make 7 stitches on the 4th and 5th tr instead of 5. [img 16]
Info :
Cut a long piece of blue yarn and within the ochre outline, embroider 2 vertical stitches on the 2nd and 3rd hdc on each side (4 in total). [img 17 to 20] Repeat this with all hdc and dc 'feathers'. When embroidering the top row of tr 'feathers', embroider 3 vertical stitches on the 2nd and 3rd tr on each side (6 in total) instead of 2 (4 in total).
Info :
Cut a turquoise or aquamarine piece of yarn and make a vertical stitch over the 2nd and 3rd hdc in between the ochre and blue stitches. [img 21] Then make a horizontal stitch in between the 1st and 2nd hdc on the left side. The needle exits at the center. [img 22]
Info :
Now, make a short vertical stitch centered over the 2nd hdc stitches on both sides, centered between the blue stitches. [img 23] Make a horizontal stitch in between the 1st and 2nd hdc on the right side. [img 24] Then make a vertical stitch over the 2nd and 3rd hdc in between the ochre and blue stitches on the right side. [img 25]
Info :
Make a horizontal stitch to connect the two vertical turquoise stitches. [img 26] Repeat this with all hdc, dc, and tr 'feathers'. Tie the yarn ends together at the wrong side and cut them short.
— Sew the front and reverse side of the train together :
Info :
Lay the front and reverse sides of the train on top of each other with the wrong sides facing each other. Both sides should align. The top (or the tips of the top row feathers), that you crocheted to the front side later, and the first 5 slip stitches along the bottom side should peek out from under the reverse side. [img 1]
Info :
Pin the corners of the front and reverse sides of the train together with stitch markers. [img 2] Sew the sides together by stitching together the corresponding stitches, using the long yarn ends. [img 3 to 6]
Info :
Leave the bottom sides open. Sew the top sides together by stitching the triple crochet and slip stitches along the edge of the reverse side together with the corresponding triple crochet and slip stitches of the front side. [img 7 to 15] Hide the yarn ends inside.
— Reinforce the train with wire :
Info :
Cut a 60 cm/24" long piece of craft wire. You will use it to reinforce the center part of the train. Weave the wire through the reverse side of the train in between row 17 and 18, 21 and 22, 25 and 26, 29 and 30, and 33 and 34. [img 1]
Info :
Weave any remaining wire along the top and secure it. [img 2 to 5] See result in img 6.
— Sew the train on the body :
Info :
Pin the train on round 6 of the body. You can slightly stretch the 'ribbings' of the front side of the train. There should be around 9 stitches space on the belly between both corners of the train. [img 1]
Info :
Pin the reverse side of the train in place. [img 2] Sew the front of the train to the body, using the long yarn end and making small stitches. [img 3] Once you have sewn on the front of the train, make a long stitch to the base of the wing from where you will sew on the reverse side of the train. [img 1]
Info :
Alternate between small stitches through the train and the body. [img 2 and 3] See result in img 4 to 6.
Info :
Apply a little glue to a wooden toothpick. Use it to style the crest in shape. Leave it to dry. [img 7] You can also apply a drop of glue to the base of the legs to stop them from moving so that your peacock can stand.
Info :
Your peacock is now complete! I hope you enjoyed crocheting him as much as I did.
This delightful peacock pattern combines amigurumi shaping and detailed surface embroidery to create a display-ready ornament. Its wire-reinforced train holds a proud fanned shape, and the embroidered eyes give each feather charming personality. Make one as a gift or keep it as a special handmade accent for your home. 🧶🧵