🧢 Beautiful ✨ Detailed πŸ’ Adorable

Gnome - organizer Amigurumi Pattern

Gnome - organizer Amigurumi Pattern
4.1β˜… Rating
5-7 Hours Time Needed
3.1K Made This
βœ‚οΈ

Intermediate Level

Ideal for those with basic crochet experience, featuring slightly more advanced stitches and techniques to expand your skills.

⏱️

Weekend Treat

Takes 5-7 hours, making it an enjoyable project to finish over a couple of days.

🧸

Cute Companion

An adorable friend to cherish, handcrafted with love to bring comfort and joy for years to come.

About This Gnome - organizer Amigurumi Pattern

This pattern creates a 25 cm / 10 inch gnome organizer that doubles as a practical storage pot for small tools and notions. The design combines a sturdy crocheted base with a removable hat, pockets and playful accessories for a finished, functional toy-like organizer. You will work in continuous rounds and assemble several small parts like legs, hands, nose and pigtails to complete the gnome.

Gnome - organizer Amigurumi Pattern crochet pattern - detailed view of completed project

Techniques used include magic ring, single crochet, increases, decreases and working in BLO/FLO for shaping. The pattern includes full round-by-round instructions, materials list and assembly tips to help you build a stable, attractive organizer.

Why You'll Love This Gnome - organizer Amigurumi Pattern

I absolutely love this pattern because it transforms simple crochet techniques into a whimsical, functional piece that brightens any workspace. I enjoy how the combination of a stable base and decorative elements like the hat and pockets makes it both useful and adorable. I love adding small personal touches like color choices or embroidered accents to make each gnome unique. Working through the separate small parts is very satisfying β€” each part comes together to create a delightful finished organizer.

Gnome - organizer Amigurumi Pattern step 1 - construction progress Gnome - organizer Amigurumi Pattern step 2 - assembly progress Gnome - organizer Amigurumi Pattern step 3 - details and accessories Gnome - organizer Amigurumi Pattern step 4 - final assembly and finishing

Switch Things Up

I love how easy it is to customize this gnome by changing yarn colors β€” try pastel shades for a soft look or bold contrasts for a playful organizer.

I often make the hat taller or shorter by adding or removing hat rounds to change the character's silhouette.

I like to swap the pockets' color and size so the organizer holds different tools, such as scissors, markers or crochet hooks.

For a sturdier version I add extra glass beads or a thicker cardboard base and use a slightly larger hook to make the base denser.

I sometimes embroider small motifs on the pockets or add tiny buttons and ribbons for extra charm and personalization.

If you want a miniature keychain version, use thinner yarn and a smaller hook and skip the internal glass beads for safety.

I enjoy making the pigtails in different lengths and braiding styles; you can knot the ends or attach little bows for a cute finish.

To make a standing toy only (not an organizer), simply omit the cardboard base and beads and stuff more firmly for shape retention.

I often mix yarn textures β€” a fluffy yarn for the hat trim gives a cozy, tactile edge that photographs beautifully.

When gifting, I package the gnome with a set of matching stitch markers and a mini scissors tucked into a pocket for a complete handmade kit.

Common Mistakes & How to Fix Them

βœ— Skipping the cardboard base or glass balls will make the organizer unstable; cut a cardboard or plastic circle to match the crocheted base and add 5-10 glass balls before stuffing to help it stand. βœ— Overstuffing the body causes a distorted shape and bulky seams; stuff gradually as you crochet, placing filler evenly and stopping before the top so parts sew neatly. βœ— Forgetting to work BLO when instructed will change the look of the pants edge; always switch to back loops only where noted to obtain the correct ridge and fit. βœ— Not weaving in or securing ends can lead to unravelling during use; weave in ends securely and break yarn where the pattern instructs to keep seams tidy. βœ— Ignoring stitch counts during increases and decreases leads to uneven shaping; count stitches at the end of each round, especially when working repeated increase/decrease sequences.

Gnome - organizer Amigurumi Pattern

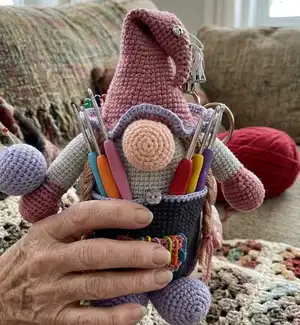
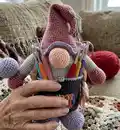
Make a charming crochet gnome organizer that doubles as a useful desk companion. This pattern guides you through crocheting the body, hat, pockets and accessories so you can create a functional and decorative storage piece. With clear rounds and assembly notes, you will enjoy building a unique handmade organizer that stands and holds tools with style.

Intermediate 5-7 Hours

Materials Needed for Gnome - organizer Amigurumi Pattern

β€” Main Fabric

  • 01
    Acrylic yarn 50 g / 125 m (main yarn specification)
  • 02
    Grey yarn - for the lower body and pants, approx. 50 g
  • 03
    White yarn - for the upper body/head, approx. 50 g
  • 04
    Pink yarn - for hat and details, approx. 25-50 g
  • 05
    Purple yarn - for pockets, legs and decorative trim, approx. 25-50 g
  • 06
    Beige (skin tone) yarn - small amount for nose, approx. 10 g
  • 07
    Brown yarn - for pigtails, small amount

β€” Tools Required

  • 01
    Crochet hook size 2.5 mm
  • 02
    Fiberfill stuffing (polyester filling)
  • 03
    Needle for sewing parts
  • 04
    Thread for embroidery
  • 05
    Scissors
  • 06
    Stitch markers
  • 07
    Yarn needle for weaving in ends
  • 08
    Hard cardboard or plastic circle for base
  • 09
    5 to 10 glass balls or marbles for base weight
  • 10
    Pins for assembly

Progress Tracker

0% Complete

β€” Materials & Notes :

Info :

Yarn acryl 50 g / 125m. Crochet 2,5 mm. Fiberfill. Needle. Tread for embroider.

Info :

Cut a circle out of hard cardboard or plastic. The size of the circle should be the same size as the crocheted circle.

Info :

Also put 5 to 10 glass balls inside. This is necessary for the doll to stand well. In the process of crocheting, put filler inside the body.

β€” Body :

Round 1 :

(6 sc) into MR (6)

Round 2 :

(inc) x 6 = 12 sc (12)

Round 3 :

(1sc, inc) x 6 = 18 sc (18)

Round 4 :

(2sc, inc) x 6 = 24 sc (24)

Round 5 :

(3sc, inc) x 6 = 30 sc (30)

Round 6 :

(4sc, inc) x 6 = 36 sc (36)

Round 7 :

(5sc, inc) x 6 = 42 sc (42)

Round 8 :

(6sc, inc) x 6 = 48 sc (48)

Round 9 :

(7sc, inc) x 6 = 54 sc (54)

Round 10 :

(8sc, inc) x 6 = 60 sc (60)

Round 11 :

(9sc, inc) x 6 = 66 sc (66)

Round 12 :

(10sc, inc) x 6 = 72 sc (72)

Round 13 :

BLO = 72 sc (72)

Round 14-15 :

72 sc (2 rounds) (72)

Info :

Cut a circle out of hard cardboard or plastic. The size of the circle should be the same size as the crocheted circle.

β€” Body (white yarn continuation) :

Round 16-42 :

72 sc (27 rounds) (72)

Round 43 :

(10sc, dec) x 6 = 66 sc (66)

Round 44-45 :

66 sc (2 rounds) (66)

Round 46 :

(9sc, dec) x 6 = 60 sc (60)

Round 47-48 :

60 sc (2 rounds) (60)

Round 49 :

(8sc, dec) x 6 = 54 sc (54)

Round 50-51 :

54 sc (2 rounds) (54)

Round 52 :

(7sc, dec) x 6 = 48 sc (48)

Round 53 :

(6sc, dec) x 6 = 42 sc (42)

Round 54 :

(5sc, dec) x 6 = 36 sc (36)

Round 55 :

(4sc, dec) x 6 = 30 sc (30)

Round 56 :

(3sc, dec) x 6 = 24 sc (24)

Round 57 :

(2sc, dec) x 6 = 18 sc (18)

Round 58 :

(1sc, dec) x 6 = 12 sc (12)

Round 59 :

6 dec = 6 (6). To break yarn.

β€” Pants (grey yarn) :

Info :

Attach yarn in round 13 of the body to start the pants.

Round 1 :

FLO (5sc, inc) x 12 = 84 sc (84)

Round 2-27 :

84 sc (26 rounds) (84)

Round 28 (purple yarn) :

84 sc (To break yarn)

β€” Hat (pink yarn) :

Round 1 :

(3 sc) into MR (3)

Round 2 :

3 sc (3)

Round 3 :

(inc) x 3 = 6 sc (6)

Round 4-5 :

6 sc (2 rounds) (6)

Round 6 :

(1sc, inc) x 3 = 9 sc (9)

Round 7-8 :

9 sc (2 rounds) (9)

Round 9 :

(2sc, inc) x 3 = 12 sc (12)

Round 10-11 :

12 sc (2 rounds) (12)

Round 12 :

(3sc, inc) x 3 = 15 sc (15)

Round 13-14 :

15 sc (2 rounds) (15)

Round 15 :

(4sc, inc) x 3 = 18 sc (18)

Round 16-17 :

18 sc (2 rounds) (18)

Round 18 :

(5sc, inc) x 3 = 21 sc (21)

Round 19-20 :

21 sc (2 rounds) (21)

Round 21 :

(6sc, inc) x 3 = 24 sc (24)

Round 22-23 :

24 sc (2 rounds) (24)

Round 24 :

(7sc, inc) x 3 = 27 sc (27)

Round 25-26 :

27 sc (2 rounds) (27)

Round 27 :

(8sc, inc) x 3 = 30 sc (30)

Round 28-29 :

30 sc (2 rounds) (30)

Round 30 :

(9sc, inc) x 3 = 33 sc (33)

Round 31-32 :

33 sc (2 rounds) (33)

Round 33 :

(10sc, inc) x 3 = 36 sc (36)

Round 34-35 :

36 sc (2 rounds) (36)

Round 36 :

(5sc, inc) x 6 = 42 sc (42)

Round 37-38 :

42 sc (2 rounds) (42)

Round 39 :

(6sc, inc) x 6 = 48 sc (48)

Round 40-41 :

48 sc (2 rounds) (48)

Round 42 :

(7sc, inc) x 6 = 54 sc (54)

Round 43 :

54 sc (54)

Round 44 :

(8sc, inc) x 6 = 60 sc (60)

Round 45 :

60 sc (60)

Round 46 :

(9sc, inc) x 6 = 66 sc (66)

Round 47 :

66 sc (66)

Round 48 :

(5sc, inc) x 11 = 77 sc (77)

Round 49 :

(6sc, inc) x 11 = 88 sc (88)

Round 50 (purple yarn) :

(1 sc, 1inc) x 44 = 132 sc (132). To break yarn. To weave in ends.

β€” Hands (2 parts) :

Round 1 :

(6 sc) into MR (6)

Round 2 :

(inc) x 6 = 12 sc (12)

Round 3 :

(1sc, inc) x 6 = 18 sc (18)

Round 4 :

(2sc, inc) x 6 = 24 sc (24)

Round 5-9 :

24 sc (5 rounds) (24)

Round 10 :

(2sc, dec) x 6 = 18 sc (18)

Round 11 :

(1sc, dec) x 6 = 12 sc (12)

Round 12 :

(1sc, inc) x 6 = 18 sc (18)

Round 13 :

18 sc (18)

Round 14 :

BLO 18 sc (18)

Round 15-31 :

18 sc (17 rounds) (18)

Info :

Put the filler inside not completely. Fold the part in half. Crochet 9 sc. To break yarn. To weave in ends.

Info :

Attach hands to the body.

β€” Legs (2 parts) :

Round 1 :

(6 sc) into MR (6)

Round 2 :

(inc) x 6 = 12 sc (12)

Round 3 :

(1sc, inc) x 6 = 18 sc (18)

Round 4 :

(2sc, inc) x 6 = 24 sc (24)

Round 5 :

(3sc, inc) x 6 = 30 sc (30)

Round 6-10 :

30 sc (5 rounds) (30)

Round 11 :

(3sc, dec) x 6 = 24 sc (24)

Round 12 :

24 sc (24)

Round 13 :

(2sc, dec) x 6 = 18 sc (18)

Round 14 :

18 sc (18)

Info :

Put the filler inside not completely. Fold the part in half. Crochet 9 sc. To break yarn. To weave in ends.

Info :

Attach legs to the body.

β€” Nose (beige yarn) :

Round 1 :

(6 sc) into MR (6)

Round 2 :

(inc) x 6 = 12 sc (12)

Round 3 :

(1sc, inc) x 6 = 18 sc (18)

Round 4 :

(2sc, inc) x 6 = 24 sc (24)

Round 5 :

(3sc, inc) x 6 = 30 sc (30)

Round 6-9 :

30 sc (4 rounds) (30)

Round 10 :

(3sc, dec) x 6 = 24 sc (24)

Round 11 :

(2sc, dec) x 6 = 18 sc (18)

Info :

In the process of crocheting, put filler inside the nose. Fold the part in half. Crochet 9 sc. To break yarn. To weave in ends.

Info :

Attach nose to the body.

β€” Needle ball (purple yarn) :

Round 1 :

(6 sc) into MR (6)

Round 2 :

(inc) x 6 = 12 sc (12)

Round 3 :

(1sc, inc) x 6 = 18 sc (18)

Round 4 :

(2sc, inc) x 6 = 24 sc (24)

Round 5 :

(3sc, inc) x 6 = 30 sc (30)

Round 6-9 :

30 sc (4 rounds) (30)

Round 10 :

(3sc, dec) x 6 = 24 sc (24)

Round 11 :

(2sc, dec) x 6 = 18 sc (18)

Round 12 :

(1sc, dec) x 6 = 12 sc (12)

Round 13 :

(6 dec) = 6 (6)

Info :

In the process of crocheting, put filler inside the needle ball. To break yarn. To weave in ends. Attach thread to tie to hand.

β€” Pigtails (brown) :

Info :

Yarn length for a 3-ply braid 15 cm / 6 in. Make braids and attach to sides of the head as shown.
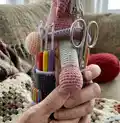
β€” Pockets (3 parts) :

Front pocket (1 part) :

Pink yarn. R1. 13 ch, crochet into the 2nd ch from the hook 12 sc, turn knit. R2-R8. 12 sc, turn knit (7 rounds). To break yarn.

Back pockets (2 parts) :

Purple yarn. R1. 14 ch, crochet into the 2nd ch from the hook 13 sc, turn knit. R2-R10. 13 sc, turn knit (9 rounds). To break yarn. Attach pockets to the pants.

Info :

Attention, pockets are sewn only to the pants. Not to pants and body! Attach the button to the front of the pants and body.

β€” Final Assembly :

Info :

Weave in all ends, sew on nose, attach hands and legs securely, pin pockets to pants and sew, attach pigtails and needle ball by thread. Insert cardboard base, glass beads and stuffing as you work for stability.

Assembly Instructions

  • Cut a cardboard/plastic circle the same diameter as the crocheted base and insert it at the bottom of the body before closing; add 5-10 glass balls on top of the circle for weight, then stuff the body to shape.
  • Attach legs to the bottom front of the body with a tapestry needle, spacing them evenly and sewing through multiple rounds for strength.
  • Fold each hand and leg part as instructed, crochet the edge (9 sc) to close, then sew hands to the sides of the body and secure firmly with whipstitch.
  • Sew the nose to the center front of the face area, stuffing lightly first; secure with sewing thread and weave in ends.
  • Sew pockets only to the pants section (not to body); pin them in place first for accurate positioning, then stitch along the sides and bottom.
  • Attach pigtails to the head by sewing the braided yarn ends into place; add the needle ball to the wrist by tying thread as shown.

Important Notes

  • πŸ’‘Cut a cardboard or plastic circle to match the base and place it inside the bottom before stuffing so the gnome stands steadily.
  • πŸ’‘Add 5-10 glass balls or marbles on top of the cardboard base for extra weight, then add fiberfill β€” this prevents tipping.
  • πŸ’‘Weave in ends as you go and break yarn where the pattern instructs to keep the work tidy and avoid long loose tails.
  • πŸ’‘Use stitch markers when starting rounds and when changes in stitch count occur, especially during increases and decreases.
  • πŸ’‘Stuff parts gradually and not completely where instructed so you can fold and seam pieces neatly without lumps.

This little gnome organizer brings whimsical function to your desk or craft table with pockets for tools and a weighted base for stability. The pattern includes detailed round-by-round instructions for every part so you can assemble a sturdy, adorable organizer. Make one in your favorite colors and enjoy a handmade friend that holds your supplies. 🧢🧡

You ask,

we answer.

FAQs

What size will the finished piece be?

The finished organizer measures approximately 25 cm (10 inches) tall when made with the recommended yarn and 2.5 mm hook.

Can I use different yarn weights for this pattern?

Yes, you can change yarn weight, but it will affect final size and stability; if using lighter or heavier yarn, adjust hook size and consider increasing base weight for stability.

Do I need prior crochet experience for this pattern?

This pattern is rated intermediate; you should be comfortable with magic ring, single crochet, increases, decreases and working in BLO/FLO.

How long does this project typically take to complete?

Most crafters complete this gnome organizer in about 5-7 hours, depending on experience and how many details you add.