🧢 Beautiful ✨ Detailed πŸ’ Adorable

Oh So Sweet Crochet Blanket Pattern

Oh So Sweet Crochet Blanket Pattern
4.8β˜… Rating
12-15 Hours Time Needed
3.3K Made This
βœ‚οΈ

Intermediate Level

Ideal for those with basic crochet experience, featuring slightly more advanced stitches and techniques to expand your skills.

⏱️

Multi-Day Project

A rewarding 12+ hour journeyβ€”perfect for dedicated crafters who love detailed work.

πŸ€—

Soft Hug

Gentle, plush, and full of warmth, creating a sense of comfort and coziness wherever they find a home.

About This Oh So Sweet Crochet Blanket Pattern

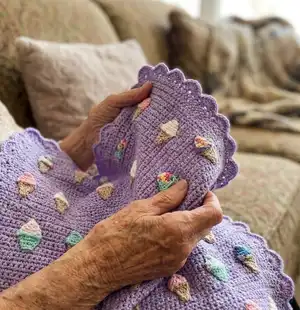
This pattern creates a textured crochet blanket adorned with rows of tiny ice-cream bobbles for a playful, nursery-friendly design. It is worked flat in one piece with the outer edge crocheted in the round to give a neat scalloped finish. The pattern includes charted stitch placement, bobble and picot instructions, and guidance for working with multiple colours.

Oh So Sweet Crochet Blanket Pattern crochet pattern - detailed view of completed project

Includes foundation chain counts for four sizes and approximate yarn consumption per size. Detailed step-by-step rows and edging rounds let you complete a professional-looking blanket.

Why You'll Love This Oh So Sweet Crochet Blanket Pattern

I absolutely love this pattern because the ice-cream bobbles add such a whimsical and tactile detail that kids and adults both adore. I enjoy the interplay of colour and texture β€” switching flavours for each line of ice cream keeps the work interesting. The edging gives the finished blanket a hand-finished, boutique look that makes it feel special. I also like that the pattern is adaptable β€” you can change size or yarn to make it exactly how you want.

Oh So Sweet Crochet Blanket Pattern step 1 - construction progress Oh So Sweet Crochet Blanket Pattern step 2 - assembly progress Oh So Sweet Crochet Blanket Pattern step 3 - details and accessories Oh So Sweet Crochet Blanket Pattern step 4 - final assembly and finishing

Switch Things Up

I love to change the mood of this blanket by swapping the background colour β€” a soft mint or cream makes the ice creams pop in a different way.

I often make the blanket larger or smaller by adjusting the foundation chain in multiples of 14 and the total rows in multiples of 16 to keep the pattern balance.

To get a chunkier, more cuddly blanket I will use a bulkier yarn and a larger hook; conversely use a finer yarn and smaller hook for a delicate mini version.

I sometimes alternate the ColourC ice-cream balls each row for a rainbow effect, making each line of ice cream a different flavour colour.

I like to change the bobble placement density: reduce the number of ice-cream repeats for a simpler look or add more repeats for a dense, playful surface.

Try substituting the picot edging for a shell or scallop border if you want a more pronounced, decorative edge.

I sometimes embroider a tiny name or date into the corner using a contrasting yarn to personalise the blanket for gifts.

For a washable, baby-friendly blanket choose superwash merino or a cotton-blend yarn and follow the wash instructions carefully.

I recommend trying one repeat of the 16-row motif as a sample to experiment with your preferred colour placement before committing to the full blanket.

If you want added posability in a play blanket, you could crochet small appliques and sew them on rather than changing colours in rows β€” it reduces carrying floats and creates dimension.

Common Mistakes & How to Fix Them

βœ— Working bobbles too tightly can cause the bobble to sit flat and not puff out; keep a looser tension on bobble loops so they form a round puff. βœ— Not carrying the non-working yarn correctly causes long floats and tangles; always carry the non-working yarn on the wrong side and pick it up where needed in two steps. βœ— Forgetting to include the initial 3Ch in counts will make rows shorter than expected; always include the 3Ch when counting DC in the row totals. βœ— Skipping the correct corner stitches when working the edging results in uneven corners; follow the corner instructions and add extra stitches before the 5Ch corner every long side.

Oh So Sweet Crochet Blanket Pattern

Create a cozy, charming blanket decorated with tiny ice-cream bobbles and a scalloped picot edge. This pattern guides you through colour changes, bobble stitches and a pretty outer edging so you can make a delightful gift or nursery blanket. Follow the step-by-step rows and chart to crochet a sweet, textured throw that will brighten any room.

Intermediate 12-15 Hours

Materials Needed for Oh So Sweet Crochet Blanket Pattern

β€” Main Fabric

  • 01
    DK (8ply) yarn approximately 50g (1.75oz)/115m (125yrds) per ball - Background Colour A (light purple sample)
  • 02
    Beige Colour B for cones - small amounts per size (see consumption table)
  • 03
    Colour C yarns (ice cream balls): white for vanilla, pink for strawberry, light turquoise for pistachio - small amounts each
  • 04
    Drops Merino Extra Fine 50g (1.75oz)/105m (115yds) suggested colours used: 22 Helllila, 08 Hellbeige, 01 Natur, 40 Puderrosa, 15 Hell Graugrun
  • 05
    Suggested yarns: Debbie Bliss Rialto 100% Merino 50g (1.75oz)/105m, Drops Cotton Merino 50g (1.75oz)/110m, Sublime Baby Cashmere Merino Silk 50g (1.75oz)/110m
  • 06
    Approximate yarn consumption: Size1 Background 500gr, Beige ColourB 50gr, ColourC 30gr each colour (90gr) Total 640gr; Size2 Background 655gr, ColourB 65gr, ColourC 40gr each (120gr) Total 840gr; Size3 Background 1020gr, ColourB 100gr, ColourC 60gr each (180gr) Total 1300gr; Size4 Background 1300gr, ColourB 130gr, ColourC 80gr each (240gr) Total 1670gr

β€” Tools Required

  • 01
    Crochet hook 2.75mm (C/2) or other size to obtain the correct tension

Progress Tracker

0% Complete

β€” Tools and Materials :

Info :

YARN: DK(8ply) yarn approximately 50g (1.75oz)/115m (125yrds). Background colour A (I'm using light purple). Beige colour B for cone. ColourC yarns: white for vanilla, pink for strawberry and light turquoise for pistachio ice cream. I'm using Drops Merino Extra Fine 50g (1.75oz)/105m (115yds) in 22Helllila, 08Hellbeige, 01Natur, 40Puderrosa, 15Hell Graugrun. Suggested yarns: Debbie Bliss Rialto 100%Merino 50g (1.75oz)/105m, Drops Cotton Merino 50g (1.75oz)/110m, Sublime Baby Cashmere Merino Silk 75% Merino Wool 20% Silk 5% Cashmere 50g (1.75oz)/110m.

Info :

Approximate yarn consumption per size: Size1 Background 500gr / Beige 50gr / ColourC 30gr for each colour = 90gr / Total 640gr. Size2 Background 655gr / Beige 65gr / ColourC 40gr each = 120gr / Total 840gr. Size3 Background 1020gr / Beige 100gr / ColourC 60gr each = 180gr / Total 1300gr. Size4 Background 1300gr / Beige 130gr / ColourC 80gr each = 240gr / Total 1670gr.

β€” Gauge :

Info :

18st/9rows in 10x10cm (4x4in) in double crochet stitch.

β€” Abbreviations :

Infos :

RS - right side (the side that faces out on a garment, it is the side you want to showcase). WS - wrong side (the side of a project that won't be visible when finished). St - stitch. Ch - chain. SC - single crochet. DC - double crochet. 2DCtog - 2double crochet stitches together.

β€” Video Help :

Info :

Basic techniques: Chain (Ch). Single crochet (SC). Double crochet. How to make a gauge swatch with DC stitch. 2DCtog - 2double crochet stitches together. Bobble stitch. Picot stitch. Video: Ice cream stitch (link).

β€” Working with Multiple Colours :

Info :

How to change colours: Work as far as the last stitch with the current colour, but leave the last stitch unfinished (1step before finishing). Before working that final stitch, grab a new colour with your crochet hook. Pull it through the remaining two loops on the hook. Once colour is changed, leave non-working yarn on the WS. Work over the non-working colour and carry it along the inside of the project as you work.

Infos :

What to do with non-working yarn at the end of the row: At the end of the row, when there are only background (colourA) stitches left, leave non-working yarn on the WS. In the next row, start picking up non-working yarn 1st before you need it in 2 steps: Step1: Bring it to the working stitch before inserting your hook there. Step2: Complete DC st with the new colour.

β€” Pattern :

Info :

Use Background ColourA. For better convenience stitches are marked with the same colour as they are demonstrated on the chart1. ColourC (ice cream balls) is shown in pink; if you are going to alternate ice cream flavours, make each line of ice cream with different colour.

Info :

Start with foundation chain: Size1 - 141Ch. Size2 - 155Ch. Size3 - 183Ch. Size4 - 211Ch.

Set up Row WS :

starting from the 4th chain from the hook make: 138 (152, 180, 208) DC = 139 (153, 181, 209) DC including 3Ch at the beginning

Row1 RS :

3Ch, 5DC, *with ColourB: 1DC, with ColourA: 13DC* Repeat from* to* At the end of the row: 6DC with ColourA

Row2 WS :

3Ch, 3DC, *2DCtog, with ColourB: 3DC in 1st, with ColourA: 2DCtog, 9DC* Repeat from* to* At the end of the row: 4DC with ColourA

Row3 RS :

3Ch, 2DC, *2DCtog, with ColourB: 2DC in 1st, 1DC, 2DC in 1st, with ColourA: 2DCtog, 7DC* Repeat from* to* At the end of the row: 3DC with ColourA

Info :

Cut ColourB yarn

Row4 WS :

3Ch, 4DC, *with ColourC make a Bobble (push it backwards), 1SC, Bobble (push it backwards), with ColourA: 11DC* Repeat from* to* At the end of the row: 5DC with ColourA

Info :

Bobble stitch: *yarn over, insert the hook into the stitch and pull yarn through, pull yarn trough 2 loops* Repeat from* to* 4 more times, you will end up with 6 loops on your hook. Pull yarn through all of the loops on the hook.

Row5 RS :

3Ch, 5DC, *with ColourC make a Bobble (push it forward), with ColourA: 13DC* Repeat from* to* At the end of the row: 6DC

Info :

Cut ColourC yarn

Rows 6-8 :

With ColorA work 3Ch, 138 (152, 180, 208) DC

Info :

Starting from the next row make the ice cream again but this time they are chequered

Row9 RS :

3Ch, 12DC, *with ColourB: 1DC, with ColourA: 13DC* Repeat from* to* At the end of the row: 13DC with ColourA

Row10 WS :

3Ch, 10DC, *2DCtog, with ColourB: 3DC in 1st, with ColourA: 2DCtog, 9DC* Repeat from* to* At the end of the row: 11DC with ColourA

Row11 RS :

3Ch, 9DC, *2DCtog, with ColourB: 2DC in 1st, 1DC, 2DC in 1st, with ColourA: 2DCtog, 7DC* Repeat from* to* At the end of the row: 10DC with ColourA

Info :

Cut ColourB yarn

Row12 WS :

3Ch, 11DC, *with ColourC make a Bobble (push it backwards), 1SC, Bobble (push it backwards), with ColourA: 11DC* Repeat from* to* At the end of the row: 12DC with ColourA

Row13 RS :

3Ch, 12DC, *with ColourC make a Bobble (push it forward), with ColourA: 13DC* Repeat from* to* At the end of the row: 13DC with ColourA

Info :

Cut ColourC yarn

Rows 14-16 :

With ColorA work 3Ch, 138 (152, 180, 208) DC

Info :

Continue working rows 1-16: For size1 - 3 more times +15 rows = 80 rows from the beginning (including set up row) = 10 ice cream lines. For size2 - 4 more times +15 rows = 96 rows from the beginning (including set up row) = 12 ice cream lines. For size3 - 6 more times +15 rows = 128 rows from the beginning (including set up row) = 16 ice cream lines. For size4 - 7 more times +15 rows = 144 rows from the beginning (including set up row) = 18 ice cream lines.

Info :

Finish after the WS row. Do not cut the yarn continue with outer edging.

β€” Outer Edging :

Info :

RS is facing you. Do not turn, work in round. Chart2 Outer edging (repeat 8st).

Round1 :

1Ch, 3SC in top of DC.

Round1 :

Work 2 SC in each perpendicular DC.

Round1 :

In each corner make 3SC.

Round1 :

On the top and at the bottom of the blanket make 1SC in each DC st.

Round1 :

At the end: Sl st in top of the 1st SC.

Round2 :

1Ch, 1SC in the same st, *5Ch, skip 1st, 6SC*, Repeat from* to*. Make sure you have 5Ch right on top of each corner; at the end of the long side add 2 extra SC before 5Ch at the corner. At the end: Sl st in top of the 1st SC.

Round3 :

Sl st in 5Ch loop, 3Ch, (Picot, 1DC) x 7times, *skip 2SC from the previous round, 1SC in each of the next 2st, skip 2SC, in 5Ch loop: (1DC, Picot)x 6times, 1DC* Repeat from* to*. In the corner 5Ch space add extra: (1DC, Picot)x twice. At the end of the round, in the first corner 5Ch space, make: 1DC, Picot, Sl st in top of 3Ch.

Info :

Picot stitch: Make 3Ch, Sl st in the first Ch.

Info :

Weave in the ends, wash by hand or in washing machine at 30C on a delicate cycle. Dry flat and enjoy!

Assembly Instructions

  • Finish after the WS row of the main pattern and do not cut the yarn; continue directly to the outer edging rounds to create a neat finishing border.
  • When working the corners of the outer edging, make 3SC in each corner and ensure you have 5Ch placed on top of each corner to keep corners square and even.
  • Weave in all loose ends securely on the wrong side of the blanket before washing to prevent pulls; hide ends under adjacent stitches for a tidy finish.
  • After finishing the edging, wash by hand or in a washing machine at 30C on a delicate cycle, then dry flat to set the stitches and preserve shape.
  • When carrying non-working colours, carry the yarn on the WS and pick it up two steps before you need it so colour changes sit neatly without long floats.

Important Notes

  • πŸ’‘Use Background Colour A consistently for the main field; alternate Colour C lines if you want different ice-cream flavours as shown in the chart.
  • πŸ’‘Carry non-working yarn on the wrong side and pick it up in two steps to avoid long floats and tangles when changing colours.
  • πŸ’‘Do not cut the yarn after completing the last WS row; continue immediately to the outer edging rounds to finish the blanket neatly.
  • πŸ’‘Work a gauge swatch in DC to match 18st/9rows per 10x10cm to ensure your final size matches the listed dimensions.

This charming blanket pattern combines playful ice-cream bobbles with a scalloped picot border for a handcrafted nursery classic. The design is worked flat with clear row-by-row instruction and a helpful chart so you can follow along easily. Make it in multiple colours for a chequered effect or keep it sweet and simple in one background shade. 🧢🍦✨

You ask,

we answer.

FAQs

What size will the finished piece be?

Sizes vary by the foundation chain you choose: Size1 Baby 84/94 cm (33/37 in); Size2 Receiving 92/112 cm (36/44 in); Size3 Young Child 108/148 cm (42.5/58 in); Size4 Small Throw 124/166 cm (48.8/65 in).

Can I use different yarn weights for this pattern?

Yes, you can use different yarn weights but this will change the final size and drape; always make a gauge swatch and adjust hook size to achieve 18st/9rows in 10x10cm in DC.

Do I need prior crochet experience for this pattern?

This pattern is rated intermediate due to colour changes, bobble stitches and the edging; familiarity with DC, bobble and basic shaping is recommended.

How should I care for the finished blanket?

Weave in ends, then wash by hand or in a washing machine at 30C on a delicate cycle. Dry flat to maintain shape and texture.