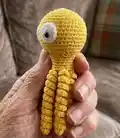
About This Octopus Comforter Amigurumi Pattern
This pattern creates a small octopus comforter with a rounded head/body and eight curly legs, worked in continuous rounds for a seamless finish. It uses DK cotton yarn and simple single crochet shaping to produce a cuddly toy suitable for gifts and nursery use. The pattern includes full round-by-round instructions, eye pieces, and finishing notes to help you complete the project with confidence.
Designed to be quick and fun, it is ideal for crocheters who enjoy small amigurumi projects. No special gauge is required and the pattern gives clear abbreviations and stitch explanations.
Why You'll Love This Octopus Comforter Amigurumi Pattern
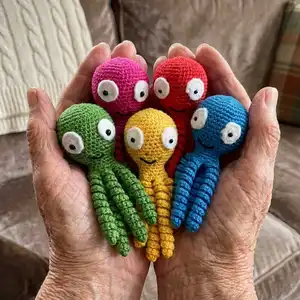
I absolutely love this pattern because it transforms basic stitches into a charming, tactile toy with a lot of personality. I enjoy how the curly legs add playful movement and texture with very little extra effort. The design is forgiving, making it fun to customize colors and sizes to suit your preferences. Seeing each little octopus finished and ready to be cuddled always brings me joy and motivates me to make more as gifts.
Switch Things Up
I love changing up the colours to create a whole family of octopus comforters, from pastels to bright brights.
Try using a thicker yarn and bigger hook to make a chunkier, cuddlier version for a bigger gift.
Use finer yarn and a smaller hook to create mini versions perfect for keychains or bag charms.
Embroider different facial expressions to change personality — a surprised O, sleepy eyelids, or a big grin all work well.
Add stripes, spots, or a tiny heart applique to the head for a personal touch and extra charm.
Consider swapping the curly leg construction to short tentacles or flat fringe for a different look and texture.
I sometimes add a ribbon bow or a tiny crocheted hat to make each octopus unique and gift-ready.
Try attaching a loop at the top to turn it into a stroller or car seat toy for easy hanging and play.
Use variegated or ombre yarn to create natural colour transitions without changing skeins manually.
For baby-safe versions, make sure all pieces are sewn securely and avoid using small detachable parts like buttons or beads.
Common Mistakes & How to Fix Them
✗ Skipping stitch markers while working in continuous rounds can cause lost round starts; place a marker at the beginning of each round and move it up as you work.
✗ Forgetting to stuff gradually leads to lumps and poor shaping; stuff a little at a time, shaping as you go to maintain an even form.
✗ Not counting stitches after increases or decreases results in uneven shaping and mismatched leg placement; count your stitches every few rounds and after any shaping round.
✗ Pulling your yarn too tightly on decreases makes the fabric pucker and distort the head; use consistent, moderate tension and ease up on your last stitch when decreasing.
✗ Attaching the eyes or bottom without pinning can cause misplacement; pin the pieces in position and check them against the photo before sewing to ensure correct alignment.