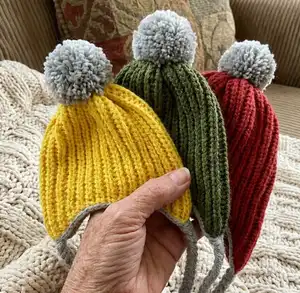
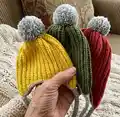
Make a cozy, sideways-knit earflap hat that fits the whole family. This pattern uses yarn-over slip stitches worked in the back loop to create neat ridges, seamless earflaps, and a flattering fit. You can customize with contrast edging and a pompom for a fun, finished look you'll enjoy gifting or wearing.
Progress Tracker
0% Complete
— Hat :
Info :
This hat is worked sideways in turned rows. Turning chains do not count as a stitch (this means that you do not work into them on the next row). For newer crocheters: use a stitch marker to keep track of the first and last stitch of each row to help maintain stitch count. Be sure to watch the video tutorial on the Creative Crochet Corner for tips.
Infos :
Special Stitches: Yarn-over slip stitch (YOslst): YO, insert hook into indicated st, YO and pull up loop, continue to pull loop through both loops on hook. 1 YOslst made. Yarn-over slip stitch blp (YOslst Blp): YO, insert hook into back loop of indicated st, YO and pull up loop, continue to pull loop through both loops on hook. 1 YOslst blp made. Yarn-over slip stitch blp decrease (YOslst2tog Blp): YO, insert hook into back loop of indicated st and through the back loop of the following stitch, YO and pull up loop, continue to pull loop through both loops on hook. 1 YOslst2tog blp made.
Info :
With larger hook, ch 27 (30, 33, 37, 41).
Row 1 :
Beginning with the second ch from hook and working into the bottom of the chain, 1 YOslst into each st. 26 (29, 32, 36, 40) YOslst.
Rows 2-5 (2-7, 2-7, 2-9, 2-9) :
Ch 1, turn, 1 YOslst Blp into each of the next 26 (29, 32, 36, 40) sts.
Row 6 (8, 8, 10, 10) (begins increase section) :
Ch 3, turn, beginning with the second ch from hook YOslst Blp in each of the next 2 chs, YOslst Blp in each of the next 26 (29, 32, 36, 40) sts. 28 (31, 34, 38, 42) YOslst.
Row 7 (9, 9, 11, 11) :
Ch 1, turn, 1 YOslst Blp into each st across until one st remains, YOslst in next st.
Row 8 (10, 10, 12, 12) (increase row) :
Ch 4, turn, beginning with the second ch from hook YOslst Blp in each of the next 3 chs, YOslst Blp in each of the next 28 (31, 34, 38, 42) sts. 31 (34, 37, 41, 45) YOslst.
Row 9 (11, 11, 13, 13) :
Ch 1, turn, 1 YOslst Blp into each st across until one st remains, YOslst in next st.
Row 10 (14, 14, 18, 18) (increase row) :
Ch 2, turn, beginning with the second ch from hook YOslst Blp in the next ch, YOslst Blp in each of the next 31 (37, 40, 47, 51) sts. 32 (38, 41, 48, 52) YOslst.
Rows 11-16 (15-18, 15-20, 19-22, 19-24) :
Ch 1, turn, 1 YOslst Blp into each st across.
Row 17 (19, 21, 23, 25) (begins decrease section) :
Ch 1, turn, YOslst Blp in each of the next 30 (36, 39, 46, 50) sts, YOslst2tog Blp. 31 (37, 40, 47, 51) YOslst.
Row 18 (20, 22, 24, 26) :
Ch 1, turn, 1 YOslst Blp into each st across.
Row 19 (21, 23, 25, 27) (decrease row) :
Ch 1, turn, YOslst Blp in each of the next 27 (33, 36, 43, 47) sts, YOslst2tog Blp twice. 29 (35, 38, 45, 49) YOslst.
Row 20 (22, 24, 26, 28) (decrease row) :
Ch 1, turn, YOslst2tog Blp, YOslst Blp in each of the next 27 (33, 36, 43, 47) sts. 28 (34, 37, 44, 48) YOslst.
Row 21 (23, 25, 27, 29) (decrease row) :
Ch 1, turn, YOslst Blp in each of the next 24 (30, 33, 40, 44) sts, YOslst2tog Blp twice. 26 (32, 35, 42, 46) YOslst.
Row 22 (24, 26, 28, 30) (decrease row) :
Ch 1, turn, YOslst2tog Blp, YOslst Blp in each of the next 24 (30, 33, 40, 44) sts. 25 (31, 34, 41, 45) YOslst.
Row 23 (27, 29, 33, 35) (decrease row) :
Ch 1, turn, YOslst Blp in each of the next 23 (26, 29, 33, 37) sts, YOslst2tog Blp. 24 (27, 30, 34, 38) YOslst.
Row 24 (28, 30, 34, 36) (decrease row) :
Ch 1, turn, YOslst2tog Blp, YOslst Blp in each of the next 22 (25, 28, 32, 36) sts. 23 (26, 29, 33, 37) YOslst.
Rows 25-35 (29-41, 31-45, 35-51, 37-55) (section across forehead) :
Ch 1, turn, 1 YOslst Blp into each st across.
Row 25 (27, 29, 31) (decrease row) :
Ch 1, turn, YOslst Blp in each of the next 27 (30, 37, 41) sts, YOslst2tog Blp twice. 29 (32, 39, 43) YOslst.
Row 26 (28, 30, 32) (decrease row) :
Ch 1, turn, YOslst2tog Blp, YOslst Blp in each of the next 27 (30, 37, 41) sts. 28 (31, 38, 42) YOslst.
For sizes toddler (child/adult small, adult medium, adult large) only :
Row 12 (12, 14, 14) (increase row): Ch 4, turn, beginning with the second ch from hook YOslst Blp in each of the next 3 chs, YOslst Blp in each of the next 34 (37, 41, 45) sts. 37 (40, 44, 48) YOslst.
Row 13 (13, 15, 15) :
Ch 1, turn, 1 YOslst Blp into each st across until one st remains, YOslst in next st.
For sizes adult medium (adult large) only :
Row 16 (16) (increase row): Ch 4, turn, beginning with the second ch from hook YOslst Blp in each of the next 3 chs, YOslst Blp in each of the next 44 (48) sts. 47 (51) YOslst.
Row 17 (17) :
Ch 1, turn, 1 YOslst Blp into each st across.
For sizes adult medium (adult large) only :
Row 31 (33) (decrease row): Ch 1, turn, YOslst Blp in each of the next 34 (38) sts, YOslst2tog Blp twice. 36 (40) YOslst.
Row 32 (34) (decrease row) :
Ch 1, turn, YOslst2tog Blp, YOslst Blp in each of the next 34 (38) sts. 35 (39) YOslst.
Row 36 (42, 46, 52, 56) (begins increase section) :
Ch 3, turn, beginning with the second ch from hook YOslst Blp in each of the next 2 chs, YOslst Blp in each of the next 23 (26, 29, 33, 37) sts. 25 (28, 31, 35, 39) YOslst.
Row 37 (43, 47, 53, 57) :
Ch 1, turn, 1 YOslst Blp into each st across until 1 st remains, YOslst in last st.
Row 38 (44, 48, 54, 58) (increase row) :
Ch 4, turn, beginning with the second ch from hook YOslst Blp in each of the next 3 chs, YOslst Blp in each of the next 25 (28, 31, 35, 39) sts. 28 (31, 34, 38, 42) YOslst.
Rows 39-52 (45-60, 49-66, 55-74, 59-80) :
Repeat Rows 7-20 (9-24, 9-26, 11-30, 11-32).
Row 53 (61, 67, 75, 81) (decrease row) :
Ch 1, turn, YOslst Blp in each of the next 26 (29, 32, 36, 40) sts, YOslst2tog Blp. 27 (30, 33, 37, 41) YOslst.
Row 54 (62, 68, 76, 82) (decrease row) :
Ch 1, turn, YOslst2tog Blp, YOslst Blp in each of the next 25 (28, 31, 35, 39) sts. 26 (29, 32, 36, 40) YOslst.
Rows 55-60 (63-68, 69-76, 77-84, 83-92) :
Ch 1, turn, 1 YOslst Blp into each st across.
Seaming row :
Turn as if to work another row, fold hat, matching ends, with foundation row directly behind last row worked. Working through both loops of row in front (working row) and front loops of row in back (foundation edge), sl st across. Do not fasten off. Turn so that seam is on the inside of hat.
— Edging :
Info :
Change to smaller hook (two sizes smaller than hook used for hat). With CC, ch 1 (does not count as a stitch), SC around edge of hat as follows: SC in each row-end across to earflap, SC along edge of earflap making one SC into each ridge and either 1, 2, OR 3 SC between ridges. If the edge seems constricted, use fewer stitches (or a larger hook), if the edge becomes stretched out or wavy, use fewer stitches (or a smaller hook). The goal here is make a tidy border of SC that does not stretch or constrict the edge. Continue making a border of SC, placing 1 SC in each row-end across the straight edges, and working second earflap same as the first. Slst into the first SC of edging round and fasten off.
Info :
Continuing with smaller hook and CC, pull up loop in same st as join, YOslst in each st around, sl st to fasten off.
— Finishing :
Info :
Use a double-stranded length of MC to weave through each ridge along top edge of hat, and pull tight to close top of hat as much as possible. Turn Hat inside out and use yarn tails to sew remaining hole at top of hat closed. Weave in ends, turn RS out and block.
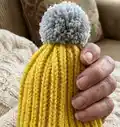
— PomPom :
Info :
Cut 1 piece of CC yarn to 16" [40.5 cm] and set aside. Cut 1 piece of CC yarn to 32" [81 cm] and set aside. Wrap CC yarn loosely around piece of 3.5" [9 cm] cardboard about 140-160 times. Before removing loops from cardboard, tie the 16" [40.5 cm] piece of yarn tightly around loops near center of cardboard. Fold the 32" [81 cm] piece of yarn in half, then holding the yarn doubled, tie the center of the opposite side of pompom in a tight knot. (Now there is a knot on each side of the cardboard). Carefully slide loops off cardboard and tie the doubled piece of yarn around the center of the loops, this time around both sides- make sure you tie a very tight knot. Use scissors to cut all of the loops of the pom-pom, being careful not to cut either of the two longer strands that were used to tie the pom-pom together. Fluff pom-pom, and trim ends of pom-pom into a 3.5" [9 cm] ball. Using yarn needle and long strands of yarn, attach pom-pom to top of hat. Weave in ends.
— Tie ends :
Info :
Cut 24 pieces of CC at 32" [81.5 cm]. Set 12 of these pieces aside for the second tie. Insert hook from WS to RS through earflap near tip, lay center of 12 strands of cut yarn over hook, and use hook to pull through earflap until a large enough loop forms to pull all 24 ends through. Divide strands into 3 equal sections (8 ends in each section) and braid until desired length. Tie in overhand knot and trim ends. Repeat for opposite tie end with remaining 12 strands of yarn.
This Oak Grove Earflap Hat pattern makes a warm, textured, and highly customizable hat for babies through adults. Add contrast edging and a fluffy pompom to suit any color scheme or team spirit. The sideways construction with YOslst Blp ridges creates a beautifully stretchy fabric that fits comfortably. 🧶 Make one for everyone you love and enjoy gifting handmade warmth! 🎁