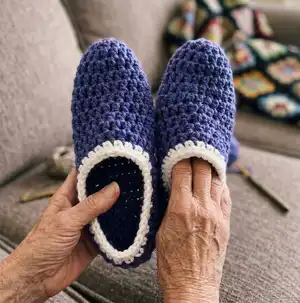
๐Ÿงถ Beautiful โœจ Detailed ๐Ÿ’ Adorable

Simple Slippers Pattern

Simple Slippers Pattern
4.0โ˜… Rating
2-4 Hours Time Needed
2.8K Made This
โœ‚๏ธ

Beginner Friendly Level

Perfect for those just starting their crochet journey, with clear instructions and simple techniques

โฑ๏ธ

Bite-Sized Project

Finishes in 2-4 hoursโ€”perfect for an afternoon of creative relaxation.

๐Ÿงฃ

Snug Essential

Everyday comfort with practical charm, designed for both functionality and style through changing seasons.

About This Simple Slippers Pattern

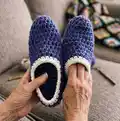
This pattern creates a pair of simple, cozy slippers worked in bulky weight yarn using half-double crochet rounds and short rows. The construction starts from the toe in a magic circle and works up to a shaped foot with a folded heel. You can use scrap bulky yarn to create colorful, textured slippers quickly. The pattern includes finished edge instructions for a neat, completed look.

Simple Slippers Pattern crochet pattern - detailed view of completed project

Instructions are written round-by-round and include multiple sizes (6โ€“9) so you can choose the best fit. Finished edge rounds are included to give each slipper a tidy border.

Why You'll Love This Simple Slippers Pattern

I absolutely love this pattern because it turns leftover bulky yarn into something warm and useful very quickly. I enjoy how simple the construction isโ€”starting with a magic circle and working simple HDC rounds keeps things fast and satisfying. The short row section creates a comfortable fit over the foot without complicated shaping. I also love that it is easy to customize the size by adding or removing rows, so each pair can be tailored perfectly. Making slippers like this feels cozy and rewarding, and they make great handmade gifts.

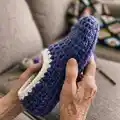
Simple Slippers Pattern step 1 - construction progress Simple Slippers Pattern step 2 - assembly progress Simple Slippers Pattern step 3 - details and accessories Simple Slippers Pattern step 4 - final assembly and finishing

Switch Things Up

I love customizing these slippers by mixing bulky yarn scraps for a striped effectโ€”it's a great way to use leftover skeins and create a unique look.

I sometimes change the hook size to make the slippers larger or smaller; using an 8mm hook will give a slightly smaller fabric while a 10mm will make it roomier.

I often add a contrasting finished edge color to highlight the openingโ€”choose a bright accent or a neutral trim depending on your style.

If you want a more fitted slipper, remove one or two short rows before starting the heel to reduce the length across the top of the foot.

For a more secure heel, you can sew the seam with a yarn needle instead of slip stitching, which gives a stronger hold if the slippers will see heavy wear.

I sometimes line the bottom with non-slip fabric or grip dots to make these safe for wooden floorsโ€”this is especially helpful if you plan to gift them to kids or seniors.

Try using boucle or textured bulky yarns for a plush, cozy surface, or use smooth yarn for a more structured look.

I like to play with yarn weight and hook combinations: using a lighter weight yarn and smaller hook makes an adorable mini slipper for ornaments or keychains.

Adding a little embroidery or a crocheted button tab at the back can personalize the slippers and make them instantly gift-ready.

Don't be afraid to experiment with different stitch patterns for the foot sectionโ€”substituting a row of single crochet or half double cluster stitches can change the texture and fit in fun ways.

Common Mistakes & How to Fix Them

โœ— Skipping the magic circle tightening can leave a loose, gaping toe; pull the magic circle tightly closed before continuing and secure with the first slip stitch. โœ— Counting stitches only occasionally leads to uneven rounds and incorrect increases; count your stitches at the end of each round to ensure the stitch counts match the pattern. โœ— Not turning at the correct time during the short row section can create a misshapen foot; follow the RW turning instructions exactly and keep track of row numbers. โœ— Failing to leave a long tail when cutting yarn makes seaming difficult later; cut a 10โ€“12 inch tail as instructed for easy slip-stitching and weaving. โœ— Overstuffing or pulling yarn too tight when finishing the heel seam will distort the shape; weave ends and seam gently, adjusting tension for a smooth finish.

Simple Slippers Pattern

Make cozy, quick slippers using bulky weight yarn and a large hook. This pattern guides you through simple half-double crochet rounds and short rows to shape a comfy slipper that fits multiple sizes. Perfect for using up scrap yarn and creating warm, handmade gifts. Clear round-by-round instructions make it easy to follow along and adjust sizing as needed.

Beginner Friendly 2-4 Hours

Materials Needed for Simple Slippers Pattern

โ€” Main Fabric

  • 01
    Bulky weight yarn (5) โ€” roughly 90 to 110 yards of scrap/bulky yarn for a pair (amount may vary by size)
  • 02
    Accent/contrast yarn for finished edge (small amount, optional)

โ€” Tools Required

  • 01
    Size 9mm (N) crochet hook
  • 02
    Yarn (bulky 5 weight)
  • 03
    Crochet hooks (additional sizes if you choose to swatch)
  • 04
    Scissors

Progress Tracker

0% Complete

โ€” What you need :

Info :

Size 9mm/N hook

Info :

You will require roughly 90 to 110 yards bulky 5 weight yarn. I have been using all my bulky yarn scraps to create these cute little slippers.

Info :

Yarn, crochet hooks and scissors

โ€” Gauge :

Infos :

Width: 10 ST = 4". Length: 8 RW = 4"

โ€” Pattern Notes :

Info :

I always wear out my slippers so when my last pair where on the way out I quickly whipped up a new pair to wear. These slippers are quick and easy and I am thrilled with how cozy they are.

Info :

The CH 1 at the beginning of each row will NOT be counted as a stitch. However, you will also work your first stitch in the CH 1 Space.

Info :

If you find the size you are working on is to big remove 1 or 2 rows before you start working on the heel. You may also remove 1 or 2 rows from the heel. Depending on the bulky yarn you choose to work with you may have to make small adjustments. Feel free to contact me at anytime if you need some extra guidance in sizing.

โ€” Size 6 :

Round 1 :

RND 1 - 10 HDC in magic circle, SL ST to the 1st ST

Round 2 :

RND 2 โ€“ CH 1, 2 HDC in the same ST as CH 1, HDC in next ST, *2 HDC in next ST, HDC in next ST, RPT from * all around, SL ST to 1ST HDC, (15)

Round 3 :

RND 3 - CH 1, 2 HDC in the same ST as CH 1, HDC in next 2 STs, *2 HDC in next ST, HDC in next 2 STs, RPT from * all around, SL ST to 1ST HDC, (20)

Round 4 :

RND 4 โ€“ CH 1, HDC each ST around, SL ST to 1ST HDC (20)

Round 5-9 :

RND 5-9 โ€“ RPT RND 4

Round RW 10 :

RW 10 โ€“ CH 1, HDC into the next 14 (14)

Round RW 11 :

RW 11 โ€“ CH 1, turn your work so you are now working back across your work, HDC across (14)

Round RW 12-15 :

RW 12-15 โ€“ RPT RW 13

Info :

Cut yarn leaving 10 โ€“ 12 inch tail. Flip slipper inside out and SL ST the end together. Weave in all ends.

Finished Edge RND 1 :

RND 1 - Starting at the back of the slipper SL ST yarn on SC 23 STs evenly around, SL ST to 1ST SC (23)

Finished Edge RND 2 :

RND 2 โ€“ SC in each ST around, SL ST to 1ST SC, Cut yarn, weave in end (23)

โ€” Size 7 :

Round 1 :

RND 1 - 10 HDC in magic circle, SL ST to the 1st ST

Round 2 :

RND 2 โ€“ CH 1, 2 HDC in the same ST as CH 1, HDC in next ST, *2 HDC in next ST, HDC in next ST, RPT from * all around, SL ST to 1ST HDC, (15)

Round 3 :

RND 3 - CH 1, 2 HDC in the same ST as CH 1, HDC in next 2 STs, *2 HDC in next ST, HDC in next 2 STs, RPT from * all around, SL ST to 1ST HDC, (20)

Round 4 :

RND 4 โ€“ CH 1, HDC each ST around, SL ST to 1ST HDC (20)

Round 5-10 :

RND 5-10 โ€“ RPT RND 4

Round RW 11 :

RW 11 โ€“ CH 1, HDC into the next 14 (14)

Round RW 12 :

RW 12 โ€“ CH 1, turn your work so you are now working back across your work, HDC across (14)

Round RW 13-17 :

RW 13-17 โ€“ RPT RW 13

Info :

Cut yarn leaving 10 โ€“ 12 inch tail. Flip slipper inside out and SL ST the end together. Weave in all ends.

Finished Edge RND 1 :

RND 1 - Starting at the back of the slipper SL ST yarn on SC 24 STs evenly around, SL ST to 1ST SC (24)

Finished Edge RND 2 :

RND 2 โ€“ SC in each ST around, SL ST to 1ST SC, Cut yarn, weave in end (24)

โ€” Size 8 :

Round 1 :

RND 1 - 10 HDC in magic circle, SL ST to the 1st ST

Round 2 :

RND 2 โ€“ CH 1, 2 HDC in the same ST as CH 1, HDC in next ST, *2 HDC in next ST, HDC in next ST, RPT from * all around, SL ST to 1ST HDC, (15)

Round 3 :

RND 3 - CH 1, 2 HDC in the same ST as CH 1, HDC in next 2 STs, *2 HDC in next ST, HDC in next 2 STs, RPT from * all around, SL ST to 1ST HDC, (20)

Round 4 :

RND 4 โ€“ CH 1, HDC each ST around, SL ST to 1ST HDC (20)

Round 5-11 :

RND 5-11 โ€“ RPT RND 4

Round RW 12 :

RW 12 โ€“ CH 1, HDC into the next 14 (14)

Round RW 13 :

RW 13 โ€“ CH 1, turn your work so you are now working back across your work, HDC across (14)

Round RW 14-19 :

RW 14-19 โ€“ RPT RW 13

Info :

Cut yarn leaving 10 โ€“ 12 inch tail. Flip slipper inside out and SL ST the end together. Weave in all ends.

Finished Edge RND 1 :

RND 1 - Starting at the back of the slipper SL ST yarn on SC 25 STs evenly around, SL ST to 1ST SC (25)

Finished Edge RND 2 :

RND 2 โ€“ SC in each ST around, SL ST to 1ST SC, Cut yarn, weave in end (25)

โ€” Size 9 :

Round 1 :

RND 1 - 10 HDC in magic circle, SL ST to the 1st ST

Round 2 :

RND 2 โ€“ CH 1, 2 HDC in the same ST as CH 1, HDC in next ST, *2 HDC in next ST, HDC in next ST, RPT from * all around, SL ST to 1ST HDC, (15)

Round 3 :

RND 3 - CH 1, 2 HDC in the same ST as CH 1, HDC in next 2 STs, *2 HDC in next ST, HDC in next 2 STs, RPT from * all around, SL ST to 1ST HDC, (20)

Round 4 :

RND 4 โ€“ CH 1, HDC each ST around, SL ST to 1ST HDC (20)

Round 5-13 :

RND 5-13 โ€“ RPT RND 4

Round RW 14 :

RW 14 โ€“ CH 1, HDC into the next 14 (14)

Round RW 15 :

RW 15 โ€“ CH 1, turn your work so you are now working back across your work, HDC across (14)

Round RW 16-20 :

RW 16-20 โ€“ RPT RW 13

Info :

Cut yarn leaving 10 โ€“ 12 inch tail. Flip slipper inside out and SL ST the end together. Weave in all ends.

Finished Edge RND 1 :

RND 1 - Starting at the back of the slipper SL ST yarn on SC 26 STs evenly around, SL ST to 1ST SC (26)

Finished Edge RND 2 :

RND 2 โ€“ SC in each ST around, SL ST to 1ST SC, Cut yarn, weave in end (26)

โ€” Finishing Notes :

Info :

I hope you enjoy making these slippers as much as I do! Have fun using up all your scarp yarn and make some cozy slippers.

Info :

Please note that you are welcome to sell your finished products

Assembly Instructions

  • Flip the slipper inside out and slip stitch the open end together using the 10โ€“12 inch tail; pull securely and weave in the tail to hide the join.
  • For the finished edge, start at the back of the slipper and slip stitch yarn onto SC 23โ€“26 STs evenly around (number depends on size), then join and single crochet around as instructed.
  • When working the short-row foot section, turn at the indicated rows so the top of the foot is shaped correctly before folding and seaming the heel.
  • Weave in all ends neatly after finishing the border to prevent fraying and to create a tidy final appearance.

Important Notes

  • ๐Ÿ’กThe CH 1 at the beginning of each row is not counted as a stitch, but the first stitch is worked into the CH 1 space.
  • ๐Ÿ’กGauge: 10 stitches = 4 inches width and 8 rows = 4 inches length; check gauge if precise sizing is needed.
  • ๐Ÿ’กCut a 10โ€“12 inch tail to allow easy slip-stitch seaming of the heel; this makes assembly much simpler.

Make cozy slippers quickly from bulky yarn scrapsโ€”perfect for handmade gifts and comfy evenings at home. These slippers are fast to work and easy to customize to your size and yarn. Have fun using up your stash and creating warm, personalized slippers for friends and family. ๐Ÿงถโœจ

You ask,

we answer.

FAQs

What sizes are included in this pattern?

This pattern includes instructions for Sizes 6, 7, 8, and 9 with finished edge counts and row guidance for each size.

What yarn and hook should I use?

Use bulky weight yarn (5) and a Size 9mm/N crochet hook as recommended; this gives the correct gauge and a cozy fabric.

Can I adjust the size if the slipper is too big?

Yes. The pattern notes advise removing 1 or 2 rows before the heel or from the heel to make small adjustments for fit.

How do I finish the slipper opening cleanly?

Cut a 10โ€“12 inch tail, flip the slipper inside out, slip stitch the end together, then weave in all ends; finished edge rounds are provided for a neat border.