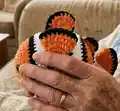
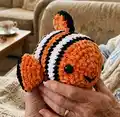
About This Nemo The Clown Fish Amigurumi Pattern
This pattern creates a plush Nemo-style clown fish using Himalaya Velvet yarn with striking orange, white, and black stripes. It includes round-by-round instructions for the body, side fins, upper fins, and tail, plus step-by-step assembly and smiling face embroidery. The pattern uses continuous spiral rounds, color changes and simple shaping to produce a soft, squeezable toy that measures roughly 20-24 cm with the recommended materials.

Clear abbreviations and helpful photos are included to guide you through tricky color changes and fin construction. You will also find tips for stuffing, eye placement, and finishing stitches for a neat, professional look.
Why You'll Love This Nemo The Clown Fish Amigurumi Pattern
I absolutely love this pattern because it brings so much personality into a small, cuddly amigurumi form. I enjoy the dramatic stripe colorwork — switching between orange, white and black gives such a bold, cheerful look. The construction is satisfying: shaping the body with increases and decreases gives a lovely rounded silhouette. I also love how the separate fins and tail assemble to create a realistic little fish that is perfect for gifting or decorating a nursery.
Switch Things Up
I love how easy it is to customize this Nemo pattern by changing colors; try pastel shades for a softer look or bright neons for a modern twist.
I sometimes change the yarn weight and hook size to make different sizes — using bulky yarn creates a chunky, huggable version while a finer yarn makes a tiny keychain friend.
I also add embroidered details like freckles or a tiny heart on the side to personalize each fish I make.
If you want a weighted bottom so the fish sits upright, add a small plastic pellet bag inside the stuffing near the base.
I recommend experimenting with eye types: safety eyes give a glossy look while embroidered eyes are fully washable and child-safe.
To create an entire family, make several sizes by using different hooks and yarns; arrange them as a nursery mobile or shelf display.
I sometimes adjust the length of the fins to create a more stylized or realistic silhouette — trimming or extending a few rows changes the personality instantly.
If you prefer a felt mouth, cut and glue or stitch a small felt smile instead of embroidering, for a bold graphic look.
For gifting, I like to add a removable tiny scarf or ribbon around the neck to give Nemo a seasonal outfit.
Finally, I encourage you to try subtle surface embroidery on the stripes for texture — a few simple stitches can make your creation uniquely yours.
Common Mistakes & How to Fix Them
✗ Skipping stitch markers during the spiral rounds can cause you to lose track of the beginning of the round; use a marker and move it each round to keep counts accurate.
✗ Not placing safety eyes before stuffing makes positioning difficult later; attach safety eyes between the 5th and 6th row before you stuff the body.
✗ Overstuffing the body will distort shaping and make seams hard to close; stuff gradually and check the shape frequently to maintain a smooth profile.
✗ Ignoring color-change techniques may leave messy joins and loose ends; carry yarn neatly or weave in ends as you switch to keep stripes tidy and secure.