🧢 Beautiful ✨ Detailed πŸ’ Adorable

Ragdoll Pocket Jellyfish Amigurumi Pattern

Ragdoll Pocket Jellyfish Amigurumi Pattern
4.4β˜… Rating
2-3 Hours Time Needed
1.2K Made This
βœ‚οΈ

Beginner Friendly Level

Perfect for those just starting their crochet journey, with clear instructions and simple techniques

⏱️

Bite-Sized Project

Finishes in 2-4 hoursβ€”perfect for an afternoon of creative relaxation.

🧸

Cute Companion

An adorable friend to cherish, handcrafted with love to bring comfort and joy for years to come.

About This Ragdoll Pocket Jellyfish Amigurumi Pattern

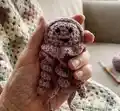
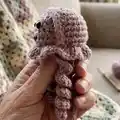
This pattern creates a tiny ragdoll-style pocket jellyfish with a soft domed head and playful curly tentacles. It is written in US terms and uses basic stitches like single crochet, double crochet and slip stitch. The design is compact, quick to make, and perfect for converting scrap yarn into a cute amigurumi.

Ragdoll Pocket Jellyfish Amigurumi Pattern crochet pattern - detailed view of completed project

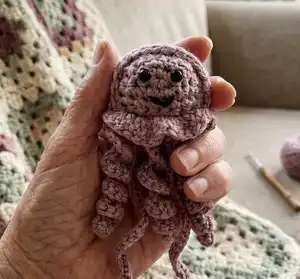
You will work two identical body halves, join them together and add curly tentacles and facial details. Full photo instructions are included at the end to make assembly easy and printer friendly.

Why You'll Love This Ragdoll Pocket Jellyfish Amigurumi Pattern

I absolutely love this pattern because it turns a few simple stitches into a charming little companion that fits in your pocket. I adore the playful curly tentacles β€” they give the jellyfish so much personality with minimal effort. The pattern is quick to make, which is perfect when I want a fast handmade gift. I also love that it uses DK yarn and a small hook for a nicely dense fabric that holds shape well.

Ragdoll Pocket Jellyfish Amigurumi Pattern step 1 - construction progress Ragdoll Pocket Jellyfish Amigurumi Pattern step 2 - assembly progress Ragdoll Pocket Jellyfish Amigurumi Pattern step 3 - details and accessories Ragdoll Pocket Jellyfish Amigurumi Pattern step 4 - final assembly and finishing

Switch Things Up

I love customizing this pattern by switching yarn colors for a playful look; try variegated DK for a fun speckled body.

I sometimes use cotton yarn for a firmer, smoother finish that is great for keyrings and gifts.

To make a larger version, I use worsted weight yarn and a 4.5mm hook for a chunkier jellyfish with more body.

For an ultra-tiny version, I choose fingering-weight yarn and a 2.5mm hook to create miniature pocket jellyfish and charms.

I like to add beads or tiny sequins to the tentacles for a sparkly, sea-inspired touch when making decorative versions.

Try embroidering different facial expressionsβ€”smiles, surprised O mouths, or sleepy eyesβ€”to give each jellyfish its own personality.

You can shorten or lengthen the chain counts in the tentacle sections to create longer or shorter curls depending on the look you want.

I sometimes insert a small keyring or clip before finishing so the jellyfish becomes a practical decorative accessory.

If making for children, I replace safety eyes with embroidered eyes for a fully soft, safe toy.

I also like to group several jellyfish in a little handheld garland or mobile β€” just make more bodies and attach them at staggered lengths for whimsy.

Common Mistakes & How to Fix Them

βœ— Skipping the placement of safety eyes before closing the second body side can make them hard to secure later; place the eyes while the piece is still flat and before you start joining. βœ— Closing the straight edge without stuffing results in a flat, misshapen head; stuff gradually as you join the two body halves to maintain a rounded shape. βœ— Cutting the yarn at the end of the first body half will create extra ends to weave; follow the note and keep the yarn attached on the second side to carry it through the project. βœ— Working DC tentacles too tightly will prevent the coils from forming properly; keep a relaxed tension for the chains and double crochets so the spiral curls naturally.

Ragdoll Pocket Jellyfish Amigurumi Pattern

Make this tiny, squishy Ragdoll Pocket Jellyfish to brighten your day or give as a handmade gift. The pattern uses simple stitches and clear step-by-step instructions so you can crochet a cute pocket-sized jellyfish quickly. Ideal for using leftover DK yarn and creating a sweet little amigurumi with curly tentacles. Photos are included at the end to help you follow assembly and finishing.

Beginner Friendly 2-3 Hours

Materials Needed for Ragdoll Pocket Jellyfish Amigurumi Pattern

β€” Main Fabric

  • 01
    DK weight acrylic yarn (or cotton yarn alternative), small amount (approx 20-30g) main color
  • 02
    Black embroidery thread for mouth and details
  • 03
    Polyester fibrefill or scraps of yarn for stuffing

β€” Tools Required

  • 01
    Crochet hook size 3.5mm
  • 02
    1mm safety eyes (2 pieces)
  • 03
    Scissors
  • 04
    Metal yarn needle
  • 05
    Stitch markers (optional)
  • 06
    Polyester stuffing (fibrefill) or scraps of yarn
  • 07
    Black embroidery thread
  • 08
    (optional) Keyring

Progress Tracker

0% Complete

β€” Notes :

Info :

Written in US terms; Pictures are at the end of pattern to make it printer friendly.

Info :

ABBREVIATIONS: CH – chain. ST – stitch. SLST – slip stitch. SC – single crochet. DC – double crochet. INC – increase = single crochet 2 times in the same stitch or chain.

Info :

MATERIALS: DK acrylic yarn is what I used, but you are free to use cotton yarn as well. 3.5mm hook. Black embroidery thread. 1mm safety eyes. Scissors. Metal yarn needle. Polyester fibrefill, or scraps of yarn. (optional) Keyring. *starting from the second body side we will work with the same yarn without cutting it until project is finished

β€” Body (MAKE 2) :

Round 1 :

slipknot, CH 2, SC 3 times in the 2nd CH from hook

Round 2 :

SC 2 times in each ST (6 sts total) CH 1, turn

Round 3 :

INC, SC 1, repeat until end of row (9 sts total), CH 1, turn

Round 4 :

INC, SC 2, repeat until end of row (13 sts total) CH 1

Round 5 :

starting from where the row ended and working on the bottom (the straight side) SC in 8 ST spaces to form a straight row (picture is marked to show which ST spaces)

Round 6 :

SC in each ST – CH 1, turn

Round 7 :

SC in each ST, fasten and cut yarn

Info :

*on the second body part don’t fasten yarn, add the safety eyes on each side of the starting centre point (the row above the straight row)

Info :

*bring both sides together and start to SC along the edges

Info :

*stuff as you go

Info :

*when reaching the straight part, SC only in the inside loops until closed

Info :

*when that row is finished CH 1 and start working in the loops on the exterior

Round 8 :

DC 3 times in each loop around (39 sts in total), SLST in the CH from the beginning of this row

Info :

*working in the middle row (the one in between the DC sts) make: SLST in first ST. SLST in next ST, CH 21, starting form 2nd CH SC 2 times in each CH, SLST back in the same ST. SLST in next ST, CH 28, starting form 2nd CH SLST in each CH, SLST back in the same ST. SLST in next ST. SLST in next ST, CH 21, starting form 2nd CH SC 2 times in each CH, SLST back in the same ST. SLST in next ST, CH 28, starting form 2nd CH SLST in each CH, SLST back in the same ST. SLST in next ST. SLST in next ST, CH 21, starting form 2nd CH SC 2 times in each CH, SLST back in the same ST, fasten, cut and weave in yarn tail.

Info :

*with black thread add a mouth in V shape working through the back, make a knot and tuck in ends.

Assembly Instructions

  • On the second body part, do not fasten off the yarn; place the 1mm safety eyes on each side of the starting centre point (the row above the straight row) before joining.
  • Bring both body halves together and single crochet along the edges to join, stuffing gradually as you go to create a rounded head.
  • When you reach the straight inner edge, crochet only into the inside loops until the edge is closed, then CH 1 and begin working into the exterior loops to form the tentacle base.
  • Work DC 3 times in each exterior loop around (39 DC total), then SLST into the initial CH to finish that round.
  • Work in the middle row (the row between the DC stitches) to create tentacles: follow the sequence of SLST and chains (CH 21 and CH 28 sections) and return with SC or SLST as indicated, then fasten off and weave in tails.
  • Using black embroidery thread, embroider a small V-shaped mouth through the back loops or chosen stitches, knot securely and tuck in the ends.

Important Notes

  • πŸ’‘Start the second body half without fastening off the yarn so you can carry the yarn through to the joining and tentacles section.
  • πŸ’‘Insert safety eyes while the piece is flat and before closing the two halves to ensure correct placement.
  • πŸ’‘Stuff the body as you join the halves, using small amounts of fibrefill for even shaping and a smooth dome.

This tiny Ragdoll Pocket Jellyfish makes a delightful handmade gift or a cheerful keyring accent. It is quick to crochet, uses minimal yarn, and the curly tentacles add so much charm. Perfect for crafting with leftovers and gifting to friends or little ones. 🧢😊

You ask,

we answer.

FAQs

What size will the finished piece be?

The finished jellyfish is pocket-sized, approximately 6-8 cm tall (including tentacles) when made with DK yarn and a 3.5mm hook, though size will vary with yarn and tension.

Can I use different yarn weights for this pattern?

Yes, you can use different yarn weights; using a thicker yarn and larger hook will create a larger jellyfish, while thinner yarn with a smaller hook makes a smaller, more delicate version.

Do I need prior crochet experience for this pattern?

This pattern is beginner friendly, but you should be comfortable with basic stitches (SC, DC, SLST, CH) and simple shaping to follow the instructions easily.

How long does this project typically take to complete?

Most crocheters finish this small project in about 2-3 hours, depending on experience and how many tentacles you add.