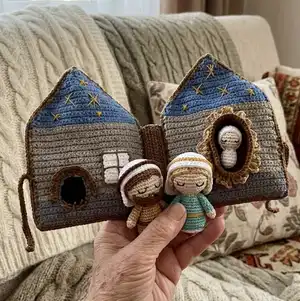
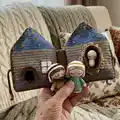
Create a charming nativity scene in a tiny crochet book with three adorable dolls: baby, mother and father. This pattern walks you through every piece — bodies, heads, hoods, wigs, beards and the little storybook house pages — so you can stitch a complete set to display or gift. Clear step-by-step rounds, photos and finishing tips help you make a polished, heirloom-style piece you will love to give.
Progress Tracker
0% Complete
— Baby Doll :
Round 1 :
With white yarn. 6sc in MR
Info :
Place row marker here.
Round 3-6 :
12sc (4 rounds)
Info :
Stuff the body with fiberfill.
Round 8 :
Change color to milky. 6inc (12)
Round 9 :
(1sc, inc) *6 (18)
Round 10-12 :
18sc (3 rounds)
Info :
Stuff the head with fiberfill.
Round 13 :
(1sc, dec) *6 (12)
Info :
Fasten off, cut the yarn, weave in the yarn ends.
— Hood :
Round 1 :
With white yarn. 6sc in MR
Info :
Place row marker here.
Round 3 :
(1sc, inc) *6 (18)
Round 4-5 :
18sc (2 rounds)
Info :
Leave long tail for sewing. Put the hood on your head and sew it on.
Info :
Embroider eyes with black yarn. Use pink pastel to tint the cheeks.
Info :
Congrats your baby doll is ready!!!
— Mother Doll : Arms (make 2)
Round 1 :
With milky yarn. 6sc in MR
Info :
Place row marker here.
Round 3 :
Change color to light blue.
Round 4-7 :
6sc (4 rounds)
Info :
Fasten off, cut the yarn, weave in the yarn ends.
— Mother Doll : Body
Round 1 :
With light blue yarn. 6sc in MR
Info :
Place row marker here.
Round 3 :
(1sc, inc) *6 (18)
Round 4 :
(2sc, inc) *6 (24)
Round 6-8 :
24sc (3 rounds)
Info :
Cut out a circle from thick cardboard and put it on the bottom. Stuff with fiberfill in the process.
Round 11 :
(2sc, dec) *6 (18)
Round 13 :
You will turn three pieces: body and two arms into one: 3sc on left arm and body, 6sc on the body, 3sc on right arm and body, 6sc on the body (18)
Round 14 :
3sc on left arm, 6sc on the body, 3sc on right arm, 6sc on the body (18)
Info :
When you crochet your arms, insert the wire, bend it, and wrap with adhesive plaster. Stuff the body and arms with fiberfill.
Round 15 :
Change color to milky. (1sc, dec) *6 (12)
— Mother Doll : Head
Round 17 :
(3sc, inc) *6 (30)
Round 18-23 :
30sc (6 rounds)
Round 24 :
(3sc, dec) *6 (24)
Info :
Stuff the head with fiberfill.
Round 25 :
(2sc, dec) *6 (18)
Round 26 :
(1sc, dec) *6 (12)
Info :
Fasten off, cut the yarn, weave in the yarn ends.
— Mother Doll : Hair Wig
Round 1 :
With beige yarn. 6sc in MR
Round 3 :
(1sc, inc) *6 (18)
Round 4 :
(2sc, inc) *6 (24)
Round 5 :
(3sc, inc) *6 (30)
Round 6-8 :
30sc (3 rounds)
Round 10 :
ch1, 1sl st, 6sc, Crochet the curls: (sl st, 5ch, from the second chain on the hook 4sc, sl st into the base) *8, 6sc, sl st.
Info :
Leave long tail for sewing.
— Mother Doll : Headdress
Round 1 :
With white yarn. 6sc in MR
Info :
Place row marker here.
Round 3 :
(1sc, inc) *6 (18)
Round 4 :
(2sc, inc) *6 (24)
Round 5 :
(3sc, inc) *6 (30)
Round 6 :
(4sc, inc) *6 (36)
Round 7-8 :
36sc (2 rounds)
Round 10 :
36sc, turn (36)
Round 11-14 :
ch1, 18sc, turn (4 rounds)
Info :
Fasten off, cut the yarn, weave in the yarn ends.
Info :
Return to round 9 of the headdress and work with yellow yarn (Alize Forever Sim) through front loops: FLO ch1, 36sc, sl st, Cut the yarn and fasten off.
Info :
Return to round 5 of the body and work with white yarn through front loops: FLO ch1, 24 reverse sc. Cut the yarn and fasten off.
Info :
Sew the hair wig to the head.
Info :
Embroider eyes with black yarn. Use pink pastel to tint the cheeks. Put a headdress on the doll's head.
Info :
Congrats your mother doll is ready!!!
— Father Doll : Arms (make 2)
Round 1 :
With milky yarn. 6sc in MR
Info :
Place row marker here.
Round 3 :
Change color to beige.
Round 4-7 :
6sc (4 rounds)
Info :
Fasten off, cut the yarn, weave in the yarn ends.
— Father Doll : Body
Round 1 :
With beige yarn. 6sc in MR
Info :
Place row marker here.
Round 3 :
(1sc, inc) *6 (18)
Round 4 :
(2sc, inc) *6 (24)
Round 6-9 :
24sc (4 rounds)
Info :
Cut out a circle from thick cardboard and put it on the bottom. Stuff with fiberfill in the process.
Round 12 :
(2sc, dec) *6 (18)
Round 14 :
You will turn three pieces: body and two arms into one: 3sc on left arm and body, 6sc on the body, 3sc on right arm and body, 6sc on the body (18)
Round 15 :
3sc on left arm, 6sc on the body, 3sc on right arm, 6sc on the body (18)
Info :
When you crochet your arms, insert the wire, bend it, and wrap with adhesive plaster. Stuff the body and arms with fiberfill.
Round 16 :
Change color to milky. (1sc, dec) *6 (12)
— Father Doll : Head
Round 18 :
(3sc, inc) *6 (30)
Round 19-24 :
30sc (6 rounds)
Round 25 :
(3sc, dec) *6 (24)
Info :
Stuff the head with fiberfill.
Round 26 :
(2sc, dec) *6 (18)
Round 27 :
(1sc, dec) *6 (12)
Info :
Fasten off, cut the yarn, weave in the yarn ends.
— Father Doll : Hair Wig
Round 1 :
With brown yarn. 6sc in MR
Round 3 :
(1sc, inc) *6 (18)
Round 4 :
(2sc, inc) *6 (24)
Round 5 :
(3sc, inc) *6 (30)
Round 6-9 :
30sc (4 rounds)
Round 10 :
1sl st, 26sc, 2dc, sl st. Leave long tail for sewing.
— Father Doll : Beard
Row 1 :
With brown yarn. Chain 15. From the second chain on the hook: dec, 10sc, dec, turn (12)
Row 2 :
ch1, dec, 8sc, dec (10)
Info :
Leave long tail for sewing. Sew the beard to the head. Embroider a mustache with brown yarn. Embroider eyes with black yarn. Put a headdress on the doll's head.
Info :
Congrats your father doll is ready!!!
— Book : Page 1 (House Panel)
Info :
With green yarn. Work in rows.
Row 1 :
Chain 35. From the second chain on the hook: 34sc, turn (34)
Row 2 :
Ch1, 34sc, turn (34)
Row 3 :
Change color to gray. BLO ch1, 34sc, turn
Row 4 :
Attention! Crochet in jacquard technique from Row 4 to 20. Add white yarn (these stitches are highlighted in red). Add brown yarn (these stitches are highlighted in blue) ch1, 20sc, 10sc, 4sc, turn (34)
Row 5 :
ch1, 4sc, 10sc, 20sc, turn (34)
Row 6 :
ch1, 20sc, 10sc, 4sc, turn (34)
Row 7 :
ch1, 4sc, 10sc, 20sc, turn (34)
Row 8 :
ch1, 20sc, 10sc, 4sc, turn (34)
Row 9 :
ch1, 4sc, 10sc, 20sc, turn (34)
Row 10 :
ch1, 20sc, 10sc, 4sc, turn (34)
Row 11 :
ch1, 4sc, 10sc, 6sc, 8sc, 6sc, turn (34)
Row 12 :
ch1, 6sc, 8sc, 6sc, 10sc, 4sc, turn (34)
Row 13 :
ch1, 4sc, 10sc, 6sc, 8sc, 6sc, turn (34)
Row 14 :
ch1, 6sc, 8sc, 6sc, 10sc, 4sc, turn (34)
Row 15 :
ch1, 4sc, 10sc, 6sc, 8sc, 6sc, turn (34)
Row 16 :
ch1, 6sc, 8sc, 6sc, 10sc, 4sc, turn (34)
Row 17 :
ch1, 4sc, 10sc, 6sc, 8sc, 6sc, turn (34)
Row 18 :
ch1, 6sc, 8sc, 6sc, 10sc, 4sc, turn (34)
Row 19 :
ch1, 4sc, 10sc, 6sc, 8sc, 6sc, turn (34)
Row 20 :
ch1, 6sc, 8sc, 6sc, 10sc, 4sc, turn (34)
Row 21-29 :
With gray yarn ch1, 34sc, turn (9 rows)
Row 30 :
Change color to beige. FLO ch1, 34sc, turn
Row 31 :
ch1, dec, 30 loop stitches, dec, turn (32)
Row 32 :
ch1, dec, 28sc, dec, turn (30)
Row 33 :
ch1, dec, 26 loop stitches, dec, turn (28)
Row 34 :
ch1, dec, 24sc, dec, turn (26)
Row 35 :
ch1, dec, 22 loop stitches, dec, turn (24)
Row 36 :
ch1, dec, 20sc, dec, turn (22)
Row 37 :
ch1, dec, 18 loop stitches, dec, turn (20)
Row 38 :
ch1, dec, 16sc, dec, turn (18)
Row 39 :
ch1, dec, 14 loop stitches, dec, turn (16)
Row 40 :
ch1, dec, 12sc, dec, turn (14)
Row 41 :
ch1, dec, 10 loop stitches, dec, turn (12)
Row 42 :
ch1, dec, 8sc, dec, turn (10)
Row 43 :
ch1, dec, 6 loop stitches, dec, turn (8)
Row 44 :
ch1, dec, 4sc, dec, turn (6)
Row 45 :
ch1, dec, 2 loop stitches, dec, turn (4)
Row 46 :
ch1, 2dec, turn (2)
Info :
Fasten off, cut the yarn, weave in the yarn ends.
— Book : Page 2 (Second Panel and Roof/Finishing)
Info :
With dark gray yarn. Work in rows.
Row 1 :
Chain 35. From the second chain on the hook: 34sc, turn (34)
Row 2-7 :
ch1, 34sc, turn (6 rows) (34)
Row 8 :
Change color to gray ch1, 34sc, turn (34)
Row 9-10 :
ch1, 34sc, turn (2 rows)
Row 11-20 :
Attention! Crochet in jacquard technique from Row 11 to 20. Add white yarn (these stitches are highlighted in blue). ch1, 6sc, 6sc, 22sc, turn (34)
Row 12 :
ch1, 22sc, 6sc, 6sc, turn (34)
Row 13 :
ch1, 6sc, 6sc, 22sc, turn (34)
Row 14 :
ch1, 22sc, 6sc, 6sc, turn (34)
Row 15 :
ch1, 6sc, 6sc, 22sc, turn (34)
Row 16 :
ch1, 22sc, 6sc, 6sc, turn (34)
Row 17 :
ch1, 6sc, 6sc, 22sc, turn (34)
Row 18 :
ch1, 22sc, 6sc, 6sc, turn (34)
Row 19 :
ch1, 6sc, 6sc, 22sc, turn (34)
Row 20 :
ch1, 22sc, 6sc, 6sc, turn (34)
Row 21-29 :
With gray yarn ch1, 34sc, turn (9 rows)
Row 30 :
Change color to blue FLO ch1, 34sc, turn (34)
Row 31 :
ch1, dec, 30sc, dec, turn (32)
Row 32 :
ch1, dec, 28sc, dec, turn (30)
Row 33 :
ch1, dec, 26sc, dec, turn (28)
Row 34 :
ch1, dec, 24sc, dec, turn (26)
Row 35 :
ch1, dec, 22sc, dec, turn (24)
Row 36 :
ch1, dec, 20sc, dec, turn (22)
Row 37 :
ch1, dec, 18sc, dec, turn (20)
Row 38 :
ch1, dec, 16sc, dec, turn (18)
Row 39 :
ch1, dec, 14sc, dec, turn (16)
Row 40 :
ch1, dec, 12sc, dec, turn (14)
Row 41 :
ch1, dec, 10sc, dec, turn (12)
Info :
Continue shaping roof and loop stitches as illustrated; create loop stitch thatch rows to form roof and attach to top of panel. Fasten off and weave in ends.
This Nativity Book pattern brings tiny holiday magic to your hands and home with delicate crochet details and three tiny dolls. Each piece is designed to be stitched with love and finished with embroidered features for a charming heirloom effect. Make a sweet keepsake or a heartfelt gift that captures the spirit of the season. 🧶✨🎁