🧢 Beautiful ✨ Detailed πŸ’ Adorable

Bunny Bag Pattern

Bunny Bag Pattern
4.8β˜… Rating
2-4 Hours Time Needed
2.7K Made This
βœ‚οΈ

Intermediate Level

Ideal for those with basic crochet experience, featuring slightly more advanced stitches and techniques to expand your skills.

⏱️

Bite-Sized Project

Finishes in 2-4 hoursβ€”perfect for an afternoon of creative relaxation.

✨

Stylish Touch

An elegant detail to elevate any look, combining traditional techniques with contemporary design sensibilities.

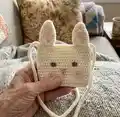
About This Bunny Bag Pattern

This pattern creates a small, cream-colored bunny bag with cute ears, embroidered face, and a cord strap. It uses half double crochet shaping worked in rows and simple sewn-on elements, finished with a wooden button closure. The instructions include photos and a link to a cord technique video for guidance.

Bunny Bag Pattern crochet pattern - detailed view of completed project

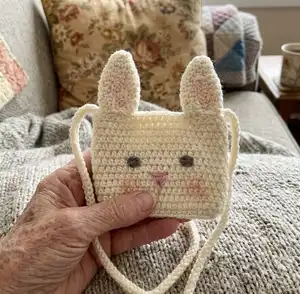
Ideal for gifting or a playful accessory, the bag measures roughly 11 x 13 cm with the recommended materials. Techniques covered include hdc shaping, working into a magic ring for ears, cord strap construction, and simple embroidery.

Why You'll Love This Bunny Bag Pattern

I absolutely love this pattern because it turns basic stitches into an irresistibly cute bunny bag that brightens any outfit. I enjoy the balance of a short, focused project with a satisfying finish β€” the ears and sewn details add such personality. The cord strap technique is clever and creates a neat, durable finish I like using again and again. Making a set of these in different colors is a fun, quick way to practice consistent tension and finishing skills.

Bunny Bag Pattern step 1 - construction progress Bunny Bag Pattern step 2 - assembly progress Bunny Bag Pattern step 3 - details and accessories Bunny Bag Pattern step 4 - final assembly and finishing

Switch Things Up

I love customizing this bunny bag by changing the yarn color; try pastel pink, soft gray, or mint for different looks.

I sometimes make a mini version using finer yarn and a smaller hook to create keychain-sized bunny bags.

Want it more durable? Use a slightly thicker yarn and a tighter tension to give the bag extra structure.

I often replace the wooden button with a cute shaped button or a magnetic snap for a cleaner closure.

Try embroidering different facial expressions β€” a smile, closed eyes, or freckles give each bag its own personality.

I like adding tiny crocheted bows or scarves to one ear for a playful accessory option.

If you want a crossbody for adults, lengthen the strap to 120cm or use two cords sewn together for a stronger strap.

I sometimes line the bag with fabric for extra stability and a neat interior finish; sew the lining before attaching the strap and ears.

Mix yarn textures by using a boucle or chenille yarn for a plush effect, but adjust hook size to suit the yarn thickness.

I recommend practicing the cord technique on a small swatch first; once comfortable, you can make straps in any length or color combinations.

For gifting, I add a small tag with the maker's name and care instructions; hand wash gently to preserve shape and color.

Common Mistakes & How to Fix Them

βœ— Skipping the instruction to make a slst at the end of each round can break the row alignment; always finish rounds with slst and begin new rounds with ch2 as instructed to keep edges neat. βœ— Not counting stitches after increases or decreases can cause the bag sides to become uneven; count stitches at the end of each round especially after rounds with increases to ensure you have the correct stitch count.
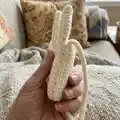
 βœ— Pulling tension too tight while crocheting the cord strap will make it stiff and difficult to sew; maintain a relaxed, even tension and check the strap length as you go to reach the desired 85cm. βœ— Sewing the ears only to one row can make them loose or flip; sew the strap with two rows of the ears and fasten them together as instructed so the ears stay secure and upright. βœ— Forgetting to leave a long yarn tail when fastening off small pieces will make sewing difficult; always leave a long tail for sewing on ears, eyes and the closure piece to simplify assembly.

Bunny Bag Pattern

Make an adorable bunny-shaped small crossbody bag with this clear, photo-supported crochet pattern. You'll learn simple hdc shaping, a cord strap technique, and how to sew ears and features for a polished finish. Perfect as a gift or a cute everyday accessory, this pattern gives step-by-step instructions and helpful tips so you can create a charming bunny bag with confidence.

Intermediate 2-4 Hours

Materials Needed for Bunny Bag Pattern

β€” Main Fabric

  • 01
    Alize Cotton Gold Pratica yarn - color 63 Cream - 220m/100g (main yarn, quantity depends on project, approx 50-100g)
  • 02
    Catania brand (or similar) Pink yarn - small amount for nose and cheek shading (approx 5g)
  • 03
    Catania brand (or similar) Brown yarn - small amount for embroidered eyes (approx 5g)

β€” Tools Required

  • 01
    Crochet hook size 3.0mm (for body and ears)
  • 02
    Crochet hook size 3.5mm (for bag strap cord technique)
  • 03
    Crochet hook size 2.2mm (for eyes/details)
  • 04
    Needle for sewing and embroidery
  • 05
    Scissors
  • 06
    Wooden button (for closure)
  • 07
    Stitch markers (optional)
  • 08
    Powder crayon or powder blush for cheek and ear coloring (optional)

Progress Tracker

0% Complete

β€” Notes :

Info :

Chains at the beginning of the rounds won't be counted as hdc. It can be useful to use stitch marker or different colored yarn to see the beginning of round. The bag will be 11cm (4,33inch) length and 13cm (5,11inch) width if you use the same materials with me. (except ears)

β€” Bunny Body :

Info :

Make a slst at the end of each round and begin with ch2 at the beginnings new round. With cream color yarn and 3mm hook;

Info :

Ch22, turn back and starting from 3rd;

Round 1 :

1- 19hdc, into same st; 4hdc, Continue with otherside 18hdc, into last st; 3hdc (44)

Round 2 :

2- (20hdc, 2hdcinc)*2 (48)

Round 3-14 :

3-14 (12 rounds) 48hdc (48)

Info :

Fasten off and cut the yarn.

β€” Closure Piece :

Info :

Now we're going to crochet a tiny closure piece for the bag. Make a slst at the end of each round and begin with ch2 at the beginnings new round.

Info :

Count back at the finishing point and add yarn to the 15th stitch.

Round 1-6 :

1-6 (6 rounds) 8hdc

Round 7 :

7- 2hdc, ch3 (skip 3sts) starting from 4th; 3hdc.

Info :

Now sew a wooden button on the back. Now you can close your bag whenever you want ☺

β€” Bunny Ears :

Info :

Make 2 of them. With cream color yarn and 3mm hook; Make a slst at the end of each round and begin with ch2 at the beginnings new round.

Round 1 :

1- Into MR 6hdc (6)

Round 2 :

2- (2hdc, 1hdcinc)*2 (8)

Round 3 :

3- (3hdc, 1hdcinc)*2 (10)

Round 4 :

4- (1hdc, 1hdcinc)*5 (15)

Round 5-10 :

5-10 (6 rounds) 15hdc (15)

Info :

Fasten off with a slst and cut the yarn long for sewing.

Info :

Fasten the ears to the 7 loops on both sides of the tiny flap in the middle of the bag. Sew the back of the ear to the back loop and the front to the front loop. You can get support from the photos.

β€” Bag Strap :

Info :

With cream color yarn and 3.5mm hook; I crocheted with the cord technique β†’ When starting, leave enough yarn for sewing.

Info :

Ch2, skip first st and crochet 1sc. Rotate the cord and crochet 1sc into the loop I showed in the photo. Turn it again and from two loops insert your hook under them, crochet 1sc. We will do the same until we reach 85cm in length.

Info :

You can get support from photos. My friend's youtube video will help you with this. Link is here. https://youtu.be/9VfL0iB7308

Info :

Sew the strap just side the ears. Don't cut the yarn! Sew the strap with two rows of ears and fasten them together. This way the ears will not fall off.

β€” Bunny Eyes :

Info :

Make 2 of them. With brown color yarn and 2.2mm hook;

Round 1 :

1- Into MR 6sc

Info :

Fasten off and cut the yarn long for sewing. Count from top to bottom. Sew the eyes to the 7th row with a distance of 7hdc

β€” Nose :

Info :

Embroider a tiny nose as in the photo with pink yarn and needle.

Info :

Finally, you can color the cheeks and ears if you want. I used make-up blush because I didn't want it to be permanent.

Assembly Instructions

  • Sew the tiny closure piece to the top middle flap and attach a wooden button on the back so the flap can close over the front of the bag securely.
  • Sew the ears to the 7 loops on both sides of the tiny flap in the middle of the bag; sew the back of each ear to the back loop and the front to the front loop for correct positioning.
  • Position and sew the eyes to the 7th row from the top with a distance of 7hdc between them, using brown yarn and a long tail to secure and hide ends.
  • Sew the strap to the sides of the bag just beside the ears; do not cut the strap yarn, join and sew the strap with two rows of ear stitches and fasten together so the ears remain secure.
  • Embroider the nose with pink yarn and needle at the center between the eyes, then add blush or powder crayon to cheeks and inner ears as desired.
  • Weave in all ends on the wrong side and check symmetry before final fastening to ensure a neat, professional finish.

Important Notes

  • πŸ’‘Use stitch markers or a different colored yarn to mark the beginning of each round because chains at the beginning are not counted as hdc.
  • πŸ’‘Stuffing and shaping are not required for this bag, but maintain consistent tension for even edges and accurate final dimensions.
  • πŸ’‘Leave long yarn tails when fastening off small elements (ears, eyes, closure tab) to make sewing easier and more secure.
  • πŸ’‘Sew the strap together with two rows of ears and fasten them to prevent the ears from falling off and to reinforce attachment points.

You did it β€” a cute Bunny Bag to love and show off! 🐰 This little bag is perfect for gifting or for adding a playful touch to any outfit. 🧢 Make more in different colors and mix-and-match ears and faces for an adorable collection. ✨

You ask,

we answer.

FAQs

What size will the finished piece be?

The bag will be approximately 11 cm (length) x 13 cm (width) with the recommended yarn and hook sizes, not including the ears.

Can I use different yarn weights for this pattern?

Yes, you can use different yarn, but the final size will change; adjust your hook size accordingly and expect differences in dimensions and stitch counts.

Do I need prior crochet experience for this pattern?

This pattern is rated intermediate; you should be comfortable with hdc, magic ring, increases and basic sewing; the cord strap technique is shown with photos and a video link.

How long does this project typically take to complete?

Most crocheters finish this small bunny bag in about 2-4 hours depending on experience and familiarity with the cord technique.

How do I secure the ears so they do not fall off?

Sew the strap with two rows of the ears and fasten them together as instructed; sew both the back loop and front loop attachment points for stability.