🧢 Beautiful ✨ Detailed πŸ’ Adorable

Mr. Pistachio the Dinosaur Amigurumi Pattern

Mr. Pistachio the Dinosaur Amigurumi Pattern
4.8β˜… Rating
5-7 Hours Time Needed
2.8K Made This
βœ‚οΈ

Intermediate Level

Ideal for those with basic crochet experience, featuring slightly more advanced stitches and techniques to expand your skills.

⏱️

Weekend Treat

Takes 5-7 hours, making it an enjoyable project to finish over a couple of days.

🧸

Cute Companion

An adorable friend to cherish, handcrafted with love to bring comfort and joy for years to come.

About This Mr. Pistachio the Dinosaur Amigurumi Pattern

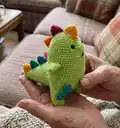
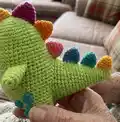
This pattern creates Mr. Pistachio, a small handmade dinosaur with a rounded body, stubby legs, a tapered tail and colorful spikes. You will crochet pieces in the round and join them to form a single cuddly toy. The pattern uses simple stitches with clear round-by-round instructions for shaping and finishing. Photos and placement notes help you assemble the character for the best result.

Mr. Pistachio the Dinosaur Amigurumi Pattern crochet pattern - detailed view of completed project

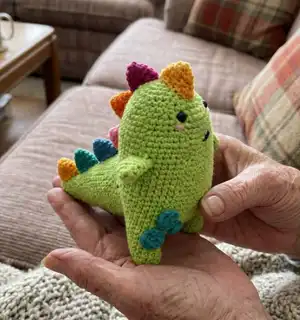
Perfect for making a unique gift or a toy to treasure, the pattern includes yarn color suggestions and all finishing steps. You will learn to join legs into a body tube and sew on spikes and dots for personality.

Why You'll Love This Mr. Pistachio the Dinosaur Amigurumi Pattern

I absolutely love this pattern because it turns simple stitches into a character full of personality. I enjoyed designing the slightly curved tail and colorful spikes that give Mr. Pistachio his playful look. I love how forgiving the shaping is β€” small changes in stuffing or stitch tension create delightful variations. I hope you feel the same joy making and gifting this little dinosaur as I did while designing him.

Mr. Pistachio the Dinosaur Amigurumi Pattern step 1 - construction progress Mr. Pistachio the Dinosaur Amigurumi Pattern step 2 - assembly progress Mr. Pistachio the Dinosaur Amigurumi Pattern step 3 - details and accessories Mr. Pistachio the Dinosaur Amigurumi Pattern step 4 - final assembly and finishing

Switch Things Up

I love how easy it is to customize Mr. Pistachio with different colors for the spikes and dots to create a unique personality.

I often swap the main color to a pastel shade for a baby-safe gift or a bright neon for a playful look.

If you want a larger dinosaur, use a bulkier yarn and a larger hook and keep the same stitch counts to get a chunkier, cuddlier toy.

For a tiny keychain version, use fingering weight yarn with a very small hook and safety eyes or embroidered eyes for safety.

I sometimes embroider a tiny heart or initials on the belly to personalize gifts for friends and family.

Try changing the placement of the spikes for a different silhouetteβ€”closer together for a rowed look or staggered for a whimsical feel.

I recommend using felt for tiny accessories like a scarf or a tiny hat for seasonal variations, sewing them on after finishing.

To make the limbs posable, consider threading a small length of wire inside the arms and tail before stuffing and closing.

Play with facial expressions by moving the eyes or changing the mouth embroidery to make Mr. Pistachio look surprised, sleepy or smiling.

I enjoy creating a family set by making different sizes and colors so they can sit together as a decorative group.

Common Mistakes & How to Fix Them

βœ— Skipping stitch counts when joining the legs can result in an uneven body; recount after joining and ensure you have 48 stitches before continuing. βœ— Forgetting to stuff gradually leads to lumps and shape issues; stuff a little at a time and shape carefully as you crochet each round. βœ— Placing safety eyes too early or too low can change facial proportions; follow the guidance to place eyes between rounds 34-35 and check placement against the photo. βœ— Cutting yarn too short when fastening off makes sewing parts difficult; leave long tails for sewing and weaving in to ensure secure joins.

Mr. Pistachio the Dinosaur Amigurumi Pattern

Make a charming, pocket-sized dinosaur amigurumi with this friendly crochet pattern. You will work in the round to build cute legs, a rounded body, tail, arms and colorful spikes. Clear step-by-step rounds and finishing instructions help you bring Mr. Pistachio to life. Perfect for gifting or decorating a nursery with handmade personality.

Intermediate 5-7 Hours

Materials Needed for Mr. Pistachio the Dinosaur Amigurumi Pattern

β€” Main Fabric

  • 01
    Paintbox DK Cotton lime green 429 - 50 g (main color)
  • 02
    Paintbox DK Cotton seville orange 419 - small amount (approx 2 g) for spikes
  • 03
    Paintbox DK Cotton bubblegum pink 451 - small amount for details
  • 04
    Paintbox DK Cotton slate green 427 - small amount for dots
  • 05
    Paintbox DK Cotton raspberry pink 444 - small amount for cheeks or accents
  • 06
    Paintbox DK Cotton dolphin blue 437 - small amount for spikes/dots
  • 07
    Paintbox DK Cotton mustard yellow 424 - small amount for spikes

β€” Tools Required

  • 01
    Crochet hook 3.00 mm
  • 02
    Safety eyes 7 mm (2 pieces)
  • 03
    Fiberfill stuffing
  • 04
    Tapestry needle for sewing and weaving ends
  • 05
    Scissors

Progress Tracker

0% Complete

β€” Legs, Bosy and Head :

First Leg :

Start with lime green colour and make a magic ring

Round 1 :

6 sc

Round 2 :

inc in all stitches (12)

Round 3 - 7 :

sc in all stitches (12)

Round Info :

Fasten off, leaving a long tail for sewing

Second leg and body :

Start with a magic ring

Round 1 :

6 sc

Round 2 :

inc all stitches (12)

Round 3 - 7 :

sc in all stitches (12)

Info :

Don't cut the yarn, we will join the legs.

Round 8 :

after finishing the last sc of second leg, crochet 12 chains and connect another leg with slip stitch. Make a sc in same stitch and and continue crocheting around two legs and chain. 12 sc second leg, 12 sc over the 12 ch, 12 sc first leg, 12 sc back side of the 12 ch = so you will have 48 sc

Round 9 - 31 :

48 sc (23 rnds)

Info :

Start stuffing legs and continue stuffing while you go

Round 32 :

6 sc, dec (42)

Round 33 - 34 :

sc in all stitches (42)

Round 35 :

5 sc, dec (36)

Round 36 :

sc in all stitches (36)

Info :

Place safety eyes between 34. - 35. rounds and continue to stuffing. Embroider the cheeks and the mouth (see the photo)

Round 37 :

4 sc, dec (30)

Round 38 :

3 sc, dec (24)

Round 39 :

2 sc, dec (18)

Round 40 :

1 sc, dec (12)

Round 41 :

dec (6)

Info :

Leave a long tail, cut the yarn, weave the end

β€” Tail :

Info :

Start with lime green colour and make a magic ring

Round 1 :

6 sc

Round 2 :

sc in all stitches (6)

Round 3 :

inc, 1 sc (9)

Round 4 :

sc in all stitches (9)

Round 5 :

inc, 2 sc (12)

Round 6 :

sc in all stitches (12)

Round 7 :

inc, 3 sc (15)

Round 8 :

sc in all stitches (15)

Round 9 :

inc, 4 sc (18)

Round 10 :

sc in all stitches (18)

Round 11 :

inc, 5 sc (21)

Round 12 :

sc in all stitches (21)

Round 13 :

inc, 6 sc (24)333

Round 14 :

sc in all stitches (24)

Round 15 :

inc, 7 sc (27)

Round 16 :

sc in all stitches (27)

Round 17 :

inc, 8 sc (30)

Round 18 :

sc in all stitches (30)

Round 19 :

inc, 9 sc (33)

Round 20 :

sc in all stitches (33)

Round 21 :

inc, 10 sc (36)

Round 22 :

sc in all stitches (36)

Round 23 :

inc, 11 sc (39)

Round 24 :

sc in all stitches (39)

Round 25 :

inc, 12 sc (42)

Round 26 :

inc, 13 sc (45)

Info :

Leave a long tail, cut the yarn, weave the end

β€” Arms :

Info :

(make 2) Start with a magic circle

Round 1 :

8 sc

Round 2 - 8 :

sc in all stitches (8)

Info :

Leave a long tail, cut the yarn, weave the end

β€” Spikes :

Info :

(make 7) Start with a magic ring

Round 1 :

5 sc

Round 2 :

sc in all stitches (5)

Round 3 :

inc (10)

Round 4 :

sc in all stitches (10)

Round 5 :

1 sc, inc (15)

Round 6 :

sc in all stitches (15)

Info :

Leave a long tail, cut the yarn, weave the end

β€” Dinosaur Dots :

Info :

With slate green colour make a magic ring

Dot 1 :

6 sc in magic ring

Dot 2 :

8 hdc in magic ring

Dot 3 :

10 hdc in magic ring

β€” Finishing :

Info :

1. Sew the arms between the rounds 25 - 26

Info :

2. Sew the tail back of the body between to legs.

Info :

3. Sew the spikes as seen in the photo.

Info :

4. Sew the dots on the body

Info :

Mr. Pistacio is ready for new adventures.

Assembly Instructions

  • Sew the arms between rounds 25-26 on each side of the body, matching the height on both sides and securing with backstitches.
  • Sew the tail to the back of the body between the legs, aligning the tail base so it sits centered and sew securely through several rounds.
  • Arrange and sew the spikes along the back from head to tail as shown in the photo, spacing them evenly and securing with hidden stitches.
  • Attach the dinosaur dots to the body in a cluster or scattered placement like the photo, sewing each dot securely with matching thread.
  • Place safety eyes between rounds 34-35 before closing the head, then embroider cheeks and mouth with embroidery thread as pictured.

Important Notes

  • πŸ’‘Place safety eyes before final stuffing between rounds 34 and 35 to ensure correct facial placement and safety.
  • πŸ’‘Stuff firmly but gradually to keep smooth shaping; overstuffing can distort the silhouette while understuffing leaves gaps.
  • πŸ’‘Leave long tails when fastening off to allow for easy sewing and neat finishing when attaching parts.

This little dinosaur was designed to celebrate uniquenessβ€”he is different and proud of it, and now he can go on adventures with you. Make him in vibrant spikes or soft pastels to match your style and home. Share your creation and spread handmade joy! 🧢✨

You ask,

we answer.

FAQs

What size will the finished piece be?

The finished amigurumi measures approximately 18-22 cm tall depending on tension and stuffing when using DK cotton and a 3.0 mm hook.

Can I use different yarn weights for this pattern?

Yes, you can use different yarn weights, but this will affect the final size; choose an appropriate hook for your yarn and adjust stitch counts if necessary.

Do I need prior crochet experience for this pattern?

This pattern is rated intermediate because it includes joining pieces, increases and decreases; some experience with amigurumi shaping is helpful.

How long does this project typically take to complete?

Most crocheters complete this project in 5-7 hours, though time may vary based on experience level and working pace.

How many spikes and dots do I need to make?

Make 7 spikes and three sizes of dots as listed in the pattern; you can adjust the number and colors to customize the look.