🧢 Beautiful ✨ Detailed πŸ’ Adorable

Monster Frankenstein Amigurumi Pattern

Monster Frankenstein Amigurumi Pattern
4.1β˜… Rating
5-7 Hours Time Needed
3.7K Made This
βœ‚οΈ

Intermediate Level

Ideal for those with basic crochet experience, featuring slightly more advanced stitches and techniques to expand your skills.

⏱️

Weekend Treat

Takes 5-7 hours, making it an enjoyable project to finish over a couple of days.

🧸

Cute Companion

An adorable friend to cherish, handcrafted with love to bring comfort and joy for years to come.

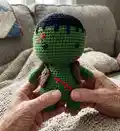
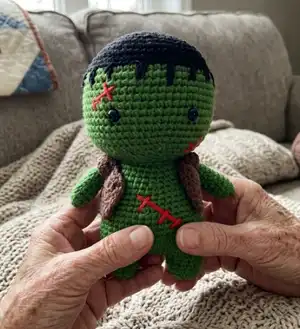
About This Monster Frankenstein Amigurumi Pattern

This pattern creates a small, adorable Frankenstein-style amigurumi with embroidered stitch details and a little removable sweater. You will crochet the head, body, legs, arms and a tiny sweater then assemble them with simple sewing. Photographs guide key steps so you can follow along easily.

Monster Frankenstein Amigurumi Pattern crochet pattern - detailed view of completed project

Perfect for gift-making and seasonal crafting, the design is easily customizable with different yarn colors. Basic amigurumi experience is helpful to achieve the best results.

Why You'll Love This Monster Frankenstein Amigurumi Pattern

I absolutely love this pattern because it combines simple amigurumi shaping with charming character details like embroidered scars and a little sweater. I enjoy how quickly the doll comes together, making it ideal for a weekend project. Sewing the head to the body and adding the final details always brings the little monster to life for me. I hope you feel the same joy as you stitch and assemble each part.

Monster Frankenstein Amigurumi Pattern step 1 - construction progress Monster Frankenstein Amigurumi Pattern step 2 - assembly progress Monster Frankenstein Amigurumi Pattern step 3 - details and accessories Monster Frankenstein Amigurumi Pattern step 4 - final assembly and finishing

Switch Things Up

I love customizing this pattern by swapping colors; try pastel greens and soft greys for a gentler look.

You can change the yarn weight and hook size to make a bigger or smaller version β€” bulky yarn creates a chunky buddy while fingering weight makes a tiny collectible.

I often add embroidered eyebrows, freckles or different scar styles to change the character’s expression.

For a more playful version, use safety eyes with eyelashes or embroidered eyes for a handmade feel.

I sometimes add a tiny hat, a mini scarf, or different outfits to create a whole set of monsters.

If you want posable arms, consider inserting thin wire inside the arms before sewing them to the body for adjustable posing.

Try using sport or DK weight yarn with a slightly larger hook to keep the fabric soft and squishy for kids to cuddle.

I recommend experimenting with surface crochet or duplicate stitch for additional markings or clothing details after assembly.

Turn your amigurumi into a keychain by using thinner yarn, a smaller hook and adding a keyring to the top of the head.

I also enjoy making couples or families by adjusting size and accessories to give each character a unique personality.

Common Mistakes & How to Fix Them

βœ— Skipping the color change instruction at Round 11 can leave a visible black ring; change to green yarn exactly at Round 11 to hide the transition. βœ— Not counting stitches after increases or decreases causes incorrect shaping and uneven rounds; count your stitches at the end of each round to ensure the correct stitch count. βœ— Overstuffing the head or body creates hard lumps and distorted shaping; stuff gradually and evenly, adding small amounts until you reach the desired firmness. βœ— Cutting the first leg thread before making the second leg prevents seamless joining to the body; after the first leg cut the thread only if you plan to sew separately, otherwise leave it when instructed to continue to the body. βœ— Forgetting to fasten off with a long tail leaves you short when sewing parts together; always leave a long tail for sewing as instructed so you can attach pieces securely.

Monster Frankenstein Amigurumi Pattern

Make a cute Monster Frankenstein amigurumi you will love to crochet. This pattern guides you step-by-step through head, body, legs, arms and a little sweater with clear rounds and photos. You can customize colors and yarn weight to make it your own. Ideal for gift-making or seasonal decor.

Intermediate 5-7 Hours

Materials Needed for Monster Frankenstein Amigurumi Pattern

β€” Main Fabric

  • 01
    Alize Cotton Gold 126 (used for main green body color) - use approximately 50-100g depending on size
  • 02
    Alize Cotton Gold 493 (used for black hair) - use approximately 20-50g
  • 03
    Alize Cotton Gold 60 (used for brown sweater) - use approximately 20-50g
  • 04
    Small amount of red or coral yarn for embroidered scars and details
  • 05
    Polyester fiberfill for stuffing (use as needed)

β€” Tools Required

  • 01
    Crochet hook size 2.00 mm (or a hook that fits your yarn)
  • 02
    6 mm safety eyes (2 pieces)
  • 03
    Scissors
  • 04
    Yarn needle for sewing
  • 05
    Stitch markers
  • 06
    Polyester fiberfill
  • 07
    Pins for assembly (optional)

Progress Tracker

0% Complete

β€” Head :

Round 1 :

6 sc in magic ring (6)

Round 2 :

(inc) x6 (12)

Round 3 :

(sc, inc) (18)

Round 4 :

(inc, 2 sc) x6 (24)

Round 5 :

(3 sc, inc) x6 (30)

Round 6 :

2 sc, inc, (4 sc, inc) x5, 2 sc (36)

Round 7 :

(5 sc, inc) (42)

Round 8 :

3 sc, inc, (6 sc, inc) x5, 3 sc (48)

Round 9 :

(7 sc, inc) x6 (54)

Round 10 :

4 sc, inc, (8 sc, inc) x5, 4 sc (60)

Round 11 :

sc around (60) *change to green yarn

Round 12 :

BLO Sc around (60)

Round 13-23 :

Sc around (60) (11 rnds)

Round 24 :

(3 sc, dec) x12 (48)

Round 25 :

(2 sc, dec) x12 (36)

Round 26 :

2 sc, dec, (4 sc, dec) x5, 2 sc (30)

Round 27 :

(3 sc, dec) x6 (24)

Round 28 :

sc around (24)

β€” Leg :

Round 1 :

7 sc in magic ring (7)

Round 2 :

(inc) x7 (14)

Round 3-5 :

sc around (14) *make 2 pieces.

Info :

*After making the first leg, cut the thread. When making the second leg, do not cut the thread and continue to the body.

β€” Body :

Round 6 :

ch4, join the first leg with the sc. Crochet on the first leg: 2 sc, (inc, 5 sc) x2, working on the chain: inc, 2 sc, inc, crochet on the second leg: (5 sc, inc) x2, 2 sc, working on the chain: 4 sc (42)

Round 7 :

(13 sc, inc) x3 (45)

Round 8-12 :

sc around (45) (5 rnds)

Round 13 :

(13 sc, dec) x3 (42)

Round 14-16 :

sc around (42) (3 rnds)

Round 17 :

(5 sc, dec) x6 (36)

Round 18-20 :

sc around (36) (3 rnds)

Round 21 :

(4 sc, dec) x6 (30)

Round 22-24 :

sc around (30)

Round 25 :

(3 sc, dec) x6, slst (24)

Info :

*Fasten off and leaving a long tail for sewing. Stuff the body. Sew the Head with the Body.

β€” Arm :

Round 1 :

6 sc in magic ring (6)

Round 2 :

(sc, inc) x3 (9)

Round 3-11 :

sc around (9) (9 rnds)

Info :

*I don't fill arms.

β€” Sweater :

Round 1 :

Ch 25, (sc, inc) x12 (36) ch1, turn

Round 2 :

(2 sc, inc) x12 (48) ch1, turn

Round 3 :

Sc around (48) ch1, turn

Round 4 :

7 sc, ch3, skip 10 sc, 14 sc, ch3, skip 10 sc, 7 sc, ch1, turn

Round 5-7 :

Sc around (34) (3 rnds) ch1, turn. Cut the yarn and hide.

Assembly Instructions

  • After making the first leg, cut the thread. When making the second leg, do not cut the thread and continue to the body so both legs are joined seamlessly in Round 6.
  • Fasten off and leave a long tail for sewing after finishing Body Round 25 to attach pieces securely.
  • Stuff the body firmly but evenly before closing and sew the Head to the Body using the long tail left for sewing.
  • Arms are not filled according to the pattern; sew the finished arms to the sides of the body in the positions shown in the photos.

Important Notes

  • πŸ’‘Change yarn color exactly at the instruction (Round 11) to avoid visible color lines on the head.
  • πŸ’‘Use stitch markers to mark the beginning of each round so you don't lose your place while working in continuous rounds.
  • πŸ’‘Stuff the pieces gradually and evenly to avoid lumps and to maintain the desired shape when finishing.
  • πŸ’‘Leave long tails when fastening off parts you will sew to other pieces to make assembly easier.
  • πŸ’‘Weave in and hide yarn tails as you go to keep the finished toy neat and tidy.

Your Monster Frankenstein is complete and ready to charm! Make more in different colorways to build a spooky collection. Thank you for trying this pattern and sharing your creations with me. πŸ§ΆπŸŽƒ

You ask,

we answer.

FAQs

What size will the finished piece be?

The finished amigurumi measures approximately 15-20 cm tall depending on your tension and yarn choice when using the recommended hook size.

Can I use different yarn weights for this pattern?

Yes, you can use different yarn weights, but this will change the final size; choose an appropriate hook for your yarn and adjust stuffing accordingly.

Do I need prior crochet experience for this pattern?

This pattern is rated intermediate, so basic knowledge of single crochet, increases, decreases and working in the round is recommended.

How long does this project typically take to complete?

Most crocheters complete this project in 5-7 hours, though time may vary by skill level and how many details you add.

Where should I place the safety eyes?

Place the 6 mm safety eyes approximately where shown in the photos around Head rounds 8-10; ensure spacing is even before securing the eyes.