🧶 Beautiful ✨ Detailed 💝 Adorable

My Little Husky Dog Amigurumi Pattern

My Little Husky Dog Amigurumi Pattern
4.3★ Rating
5-7 Hours Time Needed
1.4K Made This
✂️

Intermediate Level

Ideal for those with basic crochet experience, featuring slightly more advanced stitches and techniques to expand your skills.

⏱️

Weekend Treat

Takes 5-7 hours, making it an enjoyable project to finish over a couple of days.

🧸

Cute Companion

An adorable friend to cherish, handcrafted with love to bring comfort and joy for years to come.

About This My Little Husky Dog Amigurumi Pattern

This pattern creates a small plush husky amigurumi worked in continuous rounds with plush chenille yarn for a soft, velvety finish. You will crochet separate pieces—head, body, muzzle, ears, four limbs and a tail—and sew them together to form a charming puppy. The pattern includes stitch counts, color change instructions, and placement notes for eyes and muzzle to help you make a neat finished toy.

My Little Husky Dog Amigurumi Pattern crochet pattern - detailed view of completed project

Designed using chenille/velvet yarn with a 4 mm hook, the finished husky measures approximately 11 cm tall by 19 cm long with the recommended materials. Detailed sewing and finishing tips are included to ensure a tidy result.

Why You'll Love This My Little Husky Dog Amigurumi Pattern

I absolutely love this pattern because the plush chenille yarn gives the husky an irresistibly soft texture that kids and adults both adore. I enjoyed designing the facial markings so they are simple to crochet yet give the character a lot of personality. I love that the pattern is modular — you crochet small, manageable pieces and assemble them, which keeps progress satisfying and steady. I take pride in adding clear placement notes for eyes and ears so your finished pup looks balanced and professional. I hope making this little husky brings you the same joy I felt designing it.

My Little Husky Dog Amigurumi Pattern step 1 - construction progress My Little Husky Dog Amigurumi Pattern step 2 - assembly progress My Little Husky Dog Amigurumi Pattern step 3 - details and accessories My Little Husky Dog Amigurumi Pattern step 4 - final assembly and finishing

Switch Things Up

I love how easily this pattern adapts to different colors — try pastels for a kawaii look or two-tone browns for a realistic pup.

Want a bigger husky? Use bulkier chenille yarn and a larger hook to scale up the entire toy while keeping the same stitch counts.

For a tiny keychain version, switch to thin yarn and a smaller hook; you may need to reduce rounds slightly to keep proportions.

I often add embroidered eyebrows or tiny felt accessories like scarves to change the character and show personality.

If you want more poseability, try inserting a short piece of flexible wire into limbs before final sewing to allow gentle movement.

Experiment with eye size — smaller buttons or embroidered eyes give a softer expression while larger safety eyes create a toy-like look.

I recommend mixing yarn textures: keep the face in chenille but try a different fuzzy yarn for the tail or accents for contrast.

You can make a set by varying face markings; swap where the white and gray rounds go to create unique patterns for each puppy.

For holiday gifts, stitch tiny accessories like hats or bows directly onto the body or make removable outfits using basic crochet rectangles.

If you enjoy customization, sketch the face placement before sewing and try slight changes in eye spacing to produce different expressions.

Common Mistakes & How to Fix Them

✗ Skipping the stitch marker in continuous rounds makes it easy to lose the beginning of each round; always place and move a marker to keep your counts accurate. ✗ Not stuffing as you go causes lumps or misses in shaping; stuff gradually and evenly while working shaping rounds for smooth curves. ✗ Changing color incorrectly can leave loose ends or gaps; change color in the last sc of the round as instructed and weave ends in neatly. ✗ Pulling stitches too tight with chenille yarn can distort the plush texture; keep a relaxed tension and test your gauge before continuing.

My Little Husky Dog Amigurumi Pattern

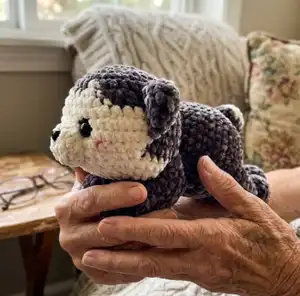
Make an adorable little husky amigurumi using plush chenille yarn and simple crochet techniques. This pattern guides you step-by-step through head, body, limbs, ears, muzzle and assembly so you can create a cuddly companion. Clear stitch counts and photos help you place features and finish like a pro. Perfect for gifting or keeping, this husky has a compact, lovable shape you'll enjoy crocheting.

Intermediate 5-7 Hours

Materials Needed for My Little Husky Dog Amigurumi Pattern

— Main Fabric

  • 01
    Plush/Velvet/Chenille yarn (examples: Himalaya Velvet, Himalaya Dolphin Baby, YarnArt Dolce, Premier Parfait Chunky)
  • 02
    Gray chenille yarn - approx. 120 m (about 1.2 skeins) for main body and head markings
  • 03
    White chenille yarn - approx. 40 m (about 0.5 skein) for muzzle and belly details

— Tools Required

  • 01
    Crochet hook size 4.0 mm
  • 02
    Safety eyes 14 mm (2 pieces)
  • 03
    Safety nose 8 mm (1 piece)
  • 04
    Stuffing - polyester fiber fill
  • 05
    Tapestry needle (white and black recommended)
  • 06
    Scissors
  • 07
    Pins for assembly
  • 08
    Stitch marker

Progress Tracker

0% Complete

— Head :

Round 1 :

MR 8 sc. (8)

Round 2 :

8 inc. (16)

Round 3 :

(1 sc, inc) x 8 times. (24)

Round 4 :

1 sc, inc, (2 sc, inc) x 7 times, 1 sc. (32)

Round 5 :

(3 sc, inc) x 8 times. (40)

Info :

Use both Gray yarn and White yarn from Round 6 onward for facial markings.

Round 6 :

Gray 16 sc, White 2 sc, Gray 4 sc, White 2 sc, Gray 16 sc. (40)

Round 7 :

Gray 15 sc, White 4 sc, Gray 2 sc, White 4 sc, Gray 15 sc. (40)

Round 8 :

Gray 14 sc, White 5 sc, Gray 2 sc, White 5 sc, Gray 14 sc. (40)

Round 9 :

Gray 10 sc, White 6 inc, 8 sc, 6 inc, Gray 10 sc. (52)

Round 10 - 11 :

Gray 10 sc, White 32 sc, Gray 10 sc. (52)

Round 12 :

Gray 10 sc, White 6 dec, 8 sc, 6 dec, Gray 10 sc. (52)

Info :

Insert the safety eyes between rounds 10 and 11. The distance between the two eyes is 7 sts. Start stuffing the head after placing the eyes.

Round 13 :

(8 sc, dec) x 4 times. (36)

Round 14 :

36 sc. (36)

Round 15 :

(4 sc, dec) x 6 times. (30)

Round 16 :

(3 sc, dec) x 6 times. (24)

Round 17 :

12 dec. (12)

Info :

Stuff the head firmly with fiberfill before continuing.

Round 18 :

6 dec. (6)

Info :

Fasten off, leaving a long tail for sewing. Weave the yarn tail through the front loops of the last round and pull it tight to close the hole. Hide the yarn tail inside the head.

— Muzzle :

Round 1 :

MR 6 sc. (6)

Round 2 :

(1 sc, inc) x 3 times. (9)

Round 3 :

6 sc, 3 inc, slst. (12)

Info :

Fasten off, leaving a long tail for sewing the muzzle to the head between the eyes; attach the safety nose or embroider the nose as preferred.

— Body :

Round 1 :

MR 8 sc. (8)

Round 2 :

8 inc. (16)

Round 3 :

(1 sc, inc) x 8 times. (24)

Round 4 :

(1 sc, inc, 1 sc) x 8 times. (32)

Round 5 :

(3 sc, inc) x 8 times. (40)

Round 6 - 10 :

40 sc for 5 rounds. (40)

Round 11 :

(3 sc, dec) x 8 times. (32)

Round 12 - 14 :

32 sc for 3 rounds. (32)

Round 15 :

(14 sc, dec) x 2 times. (30)

Round 16 :

30 sc, slst. (30)

Info :

Fasten off leaving a long tail for sewing. Stuff the body firmly with fiberfill.

— Arms/Legs (Make 4) :

Round 1 :

MR 6 sc. (6)

Round 2 :

6 inc. (12)

Round 3 - 12 :

10 rounds: 4 sc, inc, 5 sc, dec. (12)

Info :

Stuff the arms/legs firmly with fiberfill. Flatten the opening of the arm/leg and work the next round by single crochet through both layers to close (see tips on page 3).

Round 13 :

6 sc, slst. (6)

Info :

Fasten off, leaving a long tail for sewing the limbs to the body.

— Ears (Make 2) :

Round 1 :

MR 6 sc. (6)

Round 2 :

(1 sc, inc) x 3 times. (9)

Info :

Use both Gray yarn and White yarn for inner ear details starting at Round 3.

Round 3 :

Gray (2 sc, inc) x 2 times, White sc, Gray sc, inc. (12)

Round 4 :

Gray 7 sc, White 3 sc, Gray 2 sc. (12)

Round 5 :

Gray 3 sc, inc, 3 sc, White inc, 3 sc, Gray inc. (15)

Info :

Do not stuff the ears. Flatten the opening of the ear and work the next round through both layers to close (see tips on page 3).

Round 6 :

7 sc, slst. (7)

Info :

Fasten off leaving a long tail for sewing the ears to the head.

— Tail :

Round 1 :

MR 6 sc. (6)

Round 2 :

(1 sc, inc) x 3 times. (9)

Info :

Change to Gray yarn at this point and cut White yarn as instructed.

Round 3 :

(2 sc, inc) x 3 times. (12)

Round 4 - 5 :

12 sc for 2 rounds. (12)

Info :

Fasten off leaving a long tail for sewing. Stuff the tail lightly with fiberfill.

Info :

So you have crocheted all the parts of the little Husky dog: 1 head, 1 body, 2 arms, 2 legs, 2 ears, 1 muzzle, 1 tail.

— Sewing / Assembly :

Item Name (Sewing muzzle) :

Sew the muzzle of the head between the eyes, then attach the safety nose. You can also embroider the nose with yarn if preferred.

Item Name (Sewing ears) :

Sew the ears of the head between rounds 4 & 8. The distance between the two ears is 8 sts; use pins to mark positions before sewing.

Item Name (Create eye sockets) :

Create eye sockets for the little dog as shown in photos and attach safety eyes securely; ensure symmetry and correct spacing (7 sts apart).

Item Name (Eyelashes) :

Create eyelashes with White and Black yarn as desired for facial expression.

Item Name (Sew head to body) :

Place the body and head on a flat surface and use pins to mark alignment. Sew the body to the head: one stitch on the body, one stitch on the head, around the join for an even seam.

Item Name (Sew legs) :

Sew the legs at round 6 of the body. The distance between the two legs is 10 sts; pin and check positioning before securing.

Item Name (Sew arms) :

Sew the arms to the body at rounds 12 - 15 of the body; use photos as position reference and pin before stitching.

Item Name (Sew tail) :

Sew the tail onto the body in a position that balances the figure; pin first and sew firmly so the tail sits naturally.

Info :

Weave in ends neatly and hide yarn tails inside the plush when possible. Pin all parts in place and double-check symmetry before final sewing. Enjoy your finished little husky!

Assembly Instructions

  • Sew the muzzle to the head centered between the eyes and attach the safety nose; use the muzzle tail to secure with hidden stitches.
  • Position and sew the ears between rounds 4 and 8 of the head, spacing them 8 stitches apart for symmetry and pin before sewing.
  • Attach the head to the body by aligning the pieces on a flat surface, pinning evenly, then sewing one stitch on the body to one stitch on the head around the seam.
  • Sew the legs to round 6 of the body. Space the two front (or back) legs 10 stitches apart as shown in the photos for balanced posture.
  • Sew the arms to rounds 12-15 of the body, pinning to check angle; finish by sewing the tail to the body and embedding any loose tails inside.

Important Notes

  • 💡Work in a continuous spiral unless otherwise stated; do not join rounds unless instructed.
  • 💡Use a stitch marker to mark the beginning of each round for accurate stitch counts and placement.
  • 💡If using the same materials, the finished size is approximately 11 cm height and 19 cm length; changing yarn weight or hook size will alter the final size.
  • 💡Stuff firmly but not overstuffed; even stuffing helps the plush keep its shape without distorting stitches.

You made a delightful little husky using soft chenille yarn and simple shaping techniques. This compact amigurumi is perfect for gifts, decor, or a sweet handmade companion. Keep experimenting with colors and expressions to create a whole pack of personalities. 🧶🐾

You ask,

we answer.

FAQs

What size will the finished piece be?

The finished amigurumi measures approximately 11 cm tall and 19 cm long when using the recommended chenille yarn and a 4.0 mm hook.

Can I use different yarn weights for this pattern?

Yes, you can use different yarn weights, but the final size will change; choose an appropriate hook for your yarn and expect differences in stitch definition when not using chenille.

Do I need prior crochet experience for this pattern?

This pattern is rated intermediate; basic knowledge of amigurumi techniques—magic ring, single crochet, increases, decreases, and sewing pieces together—is recommended.

How long does this project typically take to complete?

Most crocheters complete this project in 5-7 hours, though the time may vary depending on experience level, yarn type, and how much time you spend on assembly and finishing touches.