🧢 Beautiful ✨ Detailed πŸ’ Adorable

Minimal Frog Amigurumi Pattern

Minimal Frog Amigurumi Pattern
4.2β˜… Rating
5-7 Hours Time Needed
2.6K Made This
βœ‚οΈ

Intermediate Level

Ideal for those with basic crochet experience, featuring slightly more advanced stitches and techniques to expand your skills.

⏱️

Weekend Treat

Takes 5-7 hours, making it an enjoyable project to finish over a couple of days.

🧸

Cute Companion

An adorable friend to cherish, handcrafted with love to bring comfort and joy for years to come.

About This Minimal Frog Amigurumi Pattern

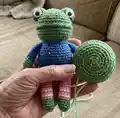
This pattern creates a 15 cm (5.9 in) minimal frog amigurumi complete with striped body, snout, eyes, arms and a tiny cross bag. It uses worsted yarn and simple amigurumi shaping techniques with step-by-step photos to guide assembly. Youll learn color changes for the striped body and secure finishing for all small parts.

Minimal Frog Amigurumi Pattern crochet pattern - detailed view of completed project

Includes charts for the leg/body stripes and detailed rounds for head, legs, eyes, snout, arms and mini bag. Ideal for makers familiar with standard amigurumi stitches who want a playful, compact project.

Why You'll Love This Minimal Frog Amigurumi Pattern

I absolutely love this pattern because it combines simple shaping with adorable character details that make the frog instantly charming. I enjoy the striped body design and the tiny cross bag β€” they add personality without too much extra work. The pattern uses straightforward rounds and visible photos so I can check my shaping as I go. Sewing the snout and eyes in place is so satisfying and gives a great finished look. I also love how customizable the colors are, so I always end up making several variations.

Minimal Frog Amigurumi Pattern step 1 - construction progress Minimal Frog Amigurumi Pattern step 2 - assembly progress Minimal Frog Amigurumi Pattern step 3 - details and accessories Minimal Frog Amigurumi Pattern step 4 - final assembly and finishing

Switch Things Up

I love how easy it is to customize the color palette for this frog β€” try pastel greens and soft neutrals for a baby-friendly version or bright neons for a playful twist.

I often change the stripe colors on the body to create seasonal versions, like autumn tones or holiday red and green stripes.

To make a larger frog, I switch to a bulkier yarn and a larger hook; this gives a big, squishy friend perfect for cuddling.

For a tiny keychain version, I use finer yarn and an appropriate small hook, then add a keyring to the top of the head before closing.

I like adding embroidered eyebrows or a stitched smile to change the frog’s expression and personality β€” a few stitches can make it look sleepy, surprised or happy.

Try swapping the 5mm plastic eyes for safety eyes in different sizes, or embroider the pupils for a softer, child-safe option.

Make alternate accessories like a tiny scarf, hat or different shaped bag to create a whole frog wardrobe you can mix and match.

When I want a posable frog, I add a bit of floral wire inside the arms for slight movement and positioning of the limbs.

Consider using textured or boucle yarn for the body to give the frog an interesting tactile finish and a unique look.

I often gift a set of frogs in varied color combos β€” they’re quick to make and small enough to produce several in an afternoon.

Common Mistakes & How to Fix Them

βœ— Skipping the stitch marker when dividing the legs can cause misplacement of the leg openings; place markers at the division points and count stitches carefully before separating the legs. βœ— Not changing yarn colors exactly where the chart indicates produces uneven striping; follow the symbol pattern and change color at the specified rounds to keep stripes aligned. βœ— Understuffing or overstuffing the head and legs alters the intended shape badly; stuff gradually and frequently check the shape so the head and legs keep their roundness. βœ— Forgetting to leave a long tail when fastening off prevents neat sewing and closing; always leave a long tail for sewing and use it to weave through front loops to close openings.

Minimal Frog Amigurumi Pattern

Make a charming minimal frog amigurumi with clear, photo-assisted steps and color-change charts. This pattern walks you through the head, body, legs, eyes, snout, arms and a tiny cross bag so you can create a lovable toy. Youll enjoy the neat striping and small details β€” perfect for gifting or collecting.

Intermediate 5-7 Hours

Materials Needed for Minimal Frog Amigurumi Pattern

β€” Main Fabric

  • 01
    Worsted weight yarn (recommended) - Light green yarn (main body/head)
  • 02
    Worsted weight yarn - Blue yarn (body upper/stripe area)
  • 03
    Worsted weight yarn - White yarn (stripe and eye base)
  • 04
    Worsted weight yarn - Red yarn (stripes and cross bag)
  • 05
    Worsted weight yarn - Orange yarn (small details)
  • 06
    Note: Size listed for 15 cm finished piece; if using fingering weight yarn use a 3 mm hook as suggested

β€” Tools Required

  • 01
    Crochet hook 5/0 (3mm)
  • 02
    Yarn needle for sewing and weaving ends
  • 03
    Scissors
  • 04
    Stitch markers
  • 05
    Fiberfill stuffing
  • 06
    Glue (to glue the eyes on the face if needed)
  • 07
    5mm black plastic eyes x2
  • 08
    Optional: wooden pin for straightening the doll feet

Progress Tracker

0% Complete

β€” Head :

Round 1 :

scx6 in the yarn loop, tighten the loop [6 sts]

Round 2 :

(2-sc inc) x 6 [12]

Round 3 :

(scx1, 2-sc inc) x 6 [18]

Round 4 :

(scx2, 2-sc inc) x 6 [24]

Round 5 :

(scx3, 2-sc inc) x 6 [30]

Round 6 :

(scx4, 2-sc inc) x 6 [36]

Round 7 :

(scx5, 2-sc inc) x 6 [42]

Round 8 :

(scx6, 2-sc inc) x 6 [48]

Round 9~35 :

sc in all 48 st [48]

β€” Divide the Legs :

Info :

To make a leg, identify the center space between the legs by the 6 stitches, and each leg identifies the other by 18.(Use stitch markers to help.) Sc at the 31th st of the Rnd 35. This sc is the first st of the first leg (left leg). Continue working on the first leg (left leg).

β€” First leg (Left leg) :

Round 36~39 :

sc in all 18 st [18]

Round 40 :

(scx1, sc2tog) x 6 [12]

Round 41 :

(sc2tog) x 6 [6]

Info :

Fasten off, leaving a long tail. Stuff the leg. Using a yarn needle, weave the yarn tail through the front loop of each remaining st and pull tight to close.

β€” Second leg (Right leg) :

Info :

Rejoin the White yarn to 7th back unworked st of Rnd 35. This sc is the first st for the second leg (right Leg). Continue working the second leg (right leg) the same way as the first leg (left leg), from Rnd 36~41. Using a yarn needle, sew the 6 sts between the legs.

β€” Eye x2 :

Round 1 :

scx6 in the yarn loop, tighten the loop [6 sts]

Round 2 :

(2-sc inc) x 6 [12]

Round 3 :

< Light green > (scx1, 2-sc inc) x 6 [18]

Round 4 :

sc in all 18 st [18]

Round 5 :

(scx1, sc2tog) x 6 [12]

Round 6 :

sc in all 12 st [12]

Round 7 :

(sc2tog) x 6 [6]

Info :

Fasten off, Leaving a long tail for sewing. Stuff the eye. Using a yarn needle, weave the yarn tail through the front loop of each remaining st and pull tight to close.

β€” Snout :

Round 1 :

scx6 in the yarn loop, tighten the loop [6 sts]

Round 2 :

(2-sc inc) x 6 [12]

Round 3 :

(scx1, 2-sc inc) x 6 [18]

Round 4 :

(scx2, 2-sc inc) x 6 [24]

Round 5 :

(scx3, 2-sc inc) x 6 [30]

Round 6 :

(scx4, 2-sc inc) x 6 [36]

Round 7 :

(scx5, 2-sc inc) x 6 [42]

Round 8 :

(scx6, 2-sc inc) x 6 [48]

Round 9 :

(scx7, 2-sc inc) x 6 [54]

Info :

Fasten off, Leaving a long tail for sewing. Connect the same color to the marked points.

β€” Mini cross bag :

Info :

Use the Red yarn to make 7 chains.

Round 1 :

scx1 in second ch from hook, scx6 [6 sts]

Round 2~9 :

ch 1, turn, scx6 [6] and ch 55

Info :

Fasten off, Leaving a long tail for sewing. Fold the bag in half and sew it. Connect the hand holder of the cross bag to complete it.

β€” Arm x2 :

Round 1 :

scx5 in the yarn loop, tighten the loop [5 sts]

Round 2 :

(2-sc inc) x 5 [10]

Round 3~11 :

sc in all 10 st [10]

Info :

Fasten off, Leaving a long tail for sewing. Flatten the ARM, do not stuff.

Assembly Instructions

  • Sew the 6 sts between the legs together using a yarn needle to close the crotch area after finishing both legs (as directed in the second leg instructions).
  • Attach each eye to the top of the head at the marked positions shown in the photos; use the long tail to sew through the front loops and secure firmly, then glue the 5mm black plastic eyes if additional security is desired.
  • Sew the snout to the head by aligning the marked colored points; use the long tail to stitch and adjust placement so the snout edge meets the head evenly.
  • Fold the mini cross bag in half and sew the sides with the tail left long, then attach the hand holder (strap) to the bag and sew the bag to the frog’s side as shown in the illustrations.
  • Flatten each arm and sew the arm to either side of the body between the indicated rounds so they sit naturally at the frog’s sides; do not stuff the arms.
  • Weave in all ends and secure color-change tails neatly on the inside of the piece; use stitch markers and pins to position parts before final sewing for accurate symmetry.

Important Notes

  • πŸ’‘Change the color of the yarn according to the SYMBOL PATTERNS on page 1; changing the yarn color is not always mentioned again in the descriptive rounds.
  • πŸ’‘Use the single stitch method in the squared chart areas unless a different symbol is shown for a specific stitch.
  • πŸ’‘Use stitch markers to keep track of rounds and the leg division points, especially when separating and rejoining for legs.
  • πŸ’‘Leave long tails when fastening off components so you have enough yarn for sewing pieces together and for closing openings.

This minimal frog is small, sweet and perfect for gifting or collecting β€” a tiny character with big personality. Make one for a friend or keep it on your shelf to smile at every day. The pattern is photo-rich and easy to follow, with striped body charts and clear finishing tips. 🧢✨

You ask,

we answer.

FAQs

What size will the finished piece be?

The finished amigurumi measures approximately 15 cm (5.9 inches) when using the recommended worsted yarn and a 3 mm crochet hook.

Can I use different yarn weights for this pattern?

Yes, you can use different yarn weights but it will change the final size; for a similar size use worsted weight on a 3 mm hook or try fingering weight on 3 mm for a slightly different result.

Do I need prior crochet experience for this pattern?

This pattern is rated intermediate, so basic knowledge of single crochet, increases, decreases, magic ring and simple color changes is recommended.

How long does this project typically take to complete?

Most crocheters complete this project in 5-7 hours, though time may vary based on experience, color changes, and assembly pace.