🧢 Beautiful ✨ Detailed πŸ’ Adorable

Mini Sunflower Turtle Amigurumi Pattern

Mini Sunflower Turtle Amigurumi Pattern
4.7β˜… Rating
2-3 Hours Time Needed
3.4K Made This
βœ‚οΈ

Intermediate Level

Ideal for those with basic crochet experience, featuring slightly more advanced stitches and techniques to expand your skills.

⏱️

Bite-Sized Project

Finishes in 2-4 hoursβ€”perfect for an afternoon of creative relaxation.

🧸

Cute Companion

An adorable friend to cherish, handcrafted with love to bring comfort and joy for years to come.

About This Mini Sunflower Turtle Amigurumi Pattern

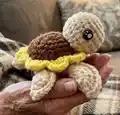
This pattern creates a tiny sunflower-themed turtle amigurumi with a textured brown shell edged in sunny yellow petals. It uses bulky and chenille-style yarn to give a plush, snuggly finish and features simple shaping for the legs, tail, head, and body. Clear round-by-round instructions make construction straightforward and enjoyable.

Mini Sunflower Turtle Amigurumi Pattern crochet pattern - detailed view of completed project

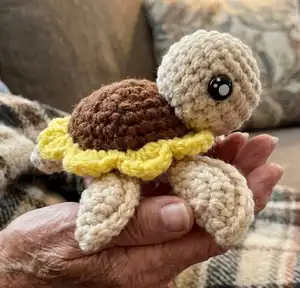
Perfect for gifting or as a decorative plushie, this pattern requires basic amigurumi skills and introduces a fun triple-crochet petal detail. Photos and placement notes help with assembly and finishing.

Why You'll Love This Mini Sunflower Turtle Amigurumi Pattern

I absolutely love this pattern because it combines playful sunflower details with a classic turtle silhouette, making a tiny amigurumi that feels special. The bulky chenille yarn gives it a plush, tactile finish that is so satisfying to crochet and cuddle. I appreciate how the pattern balances simple rounds with one special petal round so you get a polished result without complexity. Sewing the legs and tail directly into the body creates a neat, professional finish that I always enjoy. Making these little turtles is a fast, gratifying project I like to make for quick gifts and craft markets.

Mini Sunflower Turtle Amigurumi Pattern step 1 - construction progress Mini Sunflower Turtle Amigurumi Pattern step 2 - assembly progress Mini Sunflower Turtle Amigurumi Pattern step 3 - details and accessories Mini Sunflower Turtle Amigurumi Pattern step 4 - final assembly and finishing

Switch Things Up

I love how easy it is to customize this pattern by swapping yarn colors; try pastel tones for a soft, nursery-friendly turtle or jewel tones for a bold look.

If you want a smaller version, use a lighter weight yarn and a smaller hook; for a fluffier, larger turtle choose a chunkier yarn and a larger hook.

I sometimes embroider a tiny smile or freckle dots on the head to give each turtle a unique personality that photos alone don't capture.

Try different eye options: safety eyes, embroidered eyes, or small felt circles glued in place for a different expression and safety level.

Make a whole family by varying shell colors and petal counts β€” mix cocoa, caramel and cream shells with contrasting petal shades.

For a poseable turtle, consider inserting a short length of wire in the legs before sealing, or crochet a small flat base inside the body to help it sit upright.

Add tiny accessories like a crocheted bow, hat, or a little scarf to create seasons or holiday-themed turtles I gift every year.

If you like texture, experiment with a loop stitch or bobble stitch for the shell center instead of flat SC rounds to give a more 3D effect.

I also sometimes use a slightly different stitch sequence for the petals (adding one extra TC group) to make the sunflower edge fuller and more dramatic.

Don't be afraid to change placement: moving eyes or shifting the head slightly up or down dramatically changes expression and charm, so pin before sewing to preview variations.

Common Mistakes & How to Fix Them

βœ— Not using stitch markers with fluffy or chenille yarn can make you lose your starting point; place a marker at the start of every round to stay accurate. βœ— Forgetting to stuff gradually will make shaping difficult later; add small amounts of stuffing as you go and shape evenly for a smooth finish. βœ— Skipping the color change instructions on the shell can make the sunflower edge uneven; change yarn at the indicated round and work the petal round carefully. βœ— Pulling your tension too tight when working with bulky chenille will close up stitches and distort shape; keep a relaxed, even tension for consistent stitches. βœ— Not securing safety eyes before stuffing can shift their placement; insert safety eyes between the recommended rows and add stuffing afterward to lock position.

Mini Sunflower Turtle Amigurumi Pattern

Make a charming mini sunflower turtle that doubles as a sunny little companion. This pattern guides you through crocheting a textured shell, cute head and four cuddly legs using bulky/chenille yarn. You will enjoy simple shaping, a fun color-change for the sunflower edge, and clear assembly notes to complete your amigurumi.

Intermediate 2-3 Hours

Materials Needed for Mini Sunflower Turtle Amigurumi Pattern

β€” Main Fabric

  • 01
    Size 5 yarn (Yarn Bee Velvety Smooth) - Ivory (used for head, legs, tail and body edge)
  • 02
    Size 6 chenille/bulky yarn (Premier Just Chenille) - Yellow (for sunflower petals)
  • 03
    Size 6 chenille/bulky yarn (Premier Just Chenille) - Cocoa (for brown shell)
  • 04
    Note: The Premier Just Chenille yarn is very similar in size to the Yarn Bee brand used; it is not a super bulky yarn.

β€” Tools Required

  • 01
    Crochet hook size 3.5mm (E-5)
  • 02
    Tapestry needle
  • 03
    Scissors
  • 04
    Safety eyes 12mm (2 pieces)
  • 05
    Poly-Fil for stuffing
  • 06
    Stitch markers (recommended for FLO/BLO rounds)

Progress Tracker

0% Complete

β€” Front Legs :

Infos :

Using Ivory Yarn. (Make 2)

Round 1 :

6SC in MR (6)

Round 2 :

Inc (12)

Round 3 :

SC, Inc (18)

Round 4 :

2SC, Inc (24). SISt into next St. Fold your circle in half to make a half circle, SC around the half circle through both stitches.

Info :

SISt into the last stitch, BO, weave in the yarn tail. You do not need to leave a tail for sewing, it will be single crocheted into the body later.

β€” Back Legs :

Infos :

Using Ivory Yarn. (Make 2)

Round 1 :

6SC in MR (6)

Round 2 :

Inc (12)

Round 3 :

SC, Inc (18)

Round 4 :

2SC, Inc (24). SISt into next St. Fold your circle in half to make a half circle, SC around the half circle through both stitches.

Info :

SISt into the last stitch, BO, weave in the yarn tail. You do not need to leave a tail for sewing, it will be single crocheted into the body later.

β€” Tail :

Infos :

Using Ivory Yarn

Round 1 :

3SC in MR (3)

Round 2 :

Inc (6)

Round 3-4 :

SC (6)

Info :

SISt into the last stitch, BO, weave in the yarn tail. You do not need to leave a tail for sewing, it will be single crocheted into the body later.

β€” Head :

Infos :

Using Ivory Yarn

Round 1 :

8SC in MR (8)

Round 2 :

Inc (16)

Round 3 :

SC, Inc (24)

Round 4 :

3SC, Inc (30)

Round 5-6 :

SC (30)

Round 7 :

3SC, Dec (24)

Round 8 :

SC, Dec (16)

Round 9 :

SC (16)

Info :

SlSt and leave a pretty long tail for sewing (I leave about a foot of yarn). Add Safety Eyes and stuffing. I added my safety eyes between row 4 and 5, about 8 stitches apart.

β€” Body :

Infos :

Using Brown Yarn

Round 1 :

8SC into MR (8)

Round 2 :

Inc (16)

Round 3 :

SC, Inc (24)

Round 4 :

3SC, Inc (30)

Round 5 :

4SC, Inc (36)

Round 6 :

3SC, Inc (45)

Info :

Color change to Yellow yarn using your preferred method

Round 7 :

Working in FLO (You may want to put stitch markers in the back loops so you can find them in the next round) 5SC, [(SC, TC, TC2*, TC, SC) x 7], 5SC (52)

Info :

*Triple crochet two times in one stitch

Info :

Color change to Ivory yarn using your preferred method

Round 8 :

SC into BLO of R6 where you placed your stitch markers (45)

Round 9 :

This is the row you will crochet the legs and tail into. When attaching, push your hook through the stitch(s) of the leg or tail first, then through the stitch of the body and complete your single crochet. - 5SC - Grab the first big leg, attach using 3SC (refer to photo for placement, the curve of the leg should be on your right) - 5SC - Grab the first small leg, attach using 2SC (refer to photo above for placement, the curve of the leg should be on your right) - 6SC - Grab your tail and attach using 3SC (see photo for placement) - 6SC - Grab the second small leg, attach using 2SC (refer to photo below for placement, the curve of the leg should be on your left) - 5SC - Grab the second big leg, attach using 3SC (refer to photo below for placement, the curve of the leg should be on your left)

Info :

You are working clockwise in the direction of the red arrow in the left photo above.

Round 10 :

3SC, Dec (36)

Round 11 :

2SC, Dec (27)

Info :

Stuff the body to your desired firmness

Round 12 :

SC, Dec (18)

Round 13 :

Dec (9)

Info :

Add stuffing again if necessary

Info :

SlSt, cut yarn leaving a short tail to sew the hole closed. Weave the yarn tail back and forth into the stitches around then pull tight to close. Tie to secure and weave the rest of the yarn tail into the body.

Info :

Sew on the head, placing it between the two front legs. I like to place the head over 3-4 rows of the shell and 1-2 rows of the bottom body. To make it easier and keep placement even, I use long sewing pins to pin it to the body in place.

Assembly Instructions

  • Sew the head between the two front legs, positioning it over 3-4 rows of the shell and 1-2 rows of the bottom body, then secure with a whipstitch.
  • Attach the big and small legs and tail into Round 9 of the body by pushing your hook through the leg or tail stitches first, then through the body stitch and completing a single crochet as described.
  • Use long sewing pins to pin pieces in place before sewing to ensure even placement and symmetry.
  • Weave yarn tails back and forth through the closing stitches, pull tight to close the hole, tie to secure, and weave the remaining tail into the body.
  • Add safety eyes between rows 4 and 5 of the head (about 8 stitches apart) before final head stuffing and closing.

Important Notes

  • πŸ’‘If you are not used to using fluffy/chunky yarn, use stitch markers to help you find your stitches and rows until you can feel them reliably.
  • πŸ’‘You do not need to leave a tail for sewing on the legs or tail because they will be single crocheted into the body later.
  • πŸ’‘Stuff firmly but in small increments to avoid lumps and to shape the head and body evenly for best results.

This mini sunflower turtle is a delightful quick amigurumi with a cheerful sunflower shell edge and fluffy chenille texture. Perfect for gifts, key decorations, or a little handmade desk companion that brightens any day. Ready in an afternoon, it makes a sunny, heartwarming project to share. 🧢🌻

You ask,

we answer.

FAQs

What size will the finished piece be?

The finished amigurumi measures approximately 6 inches long, 6 inches wide, and 2 inches tall when using the recommended yarn and a 3.5mm hook.

Can I use different yarn weights for this pattern?

Yes, you can use different yarn weights but it will affect final size and texture; choose a corresponding hook and note that chenille yarn gives a plush finish.

Do I need prior crochet experience for this pattern?

This pattern is rated intermediate and assumes familiarity with single crochet, increases, decreases, and working in FLO/BLO, so basic amigurumi experience is helpful.

How long does this project typically take to complete?

Most crocheters finish this mini turtle in 2-3 hours, though time may vary based on experience, yarn choice, and assembly detail.