🧢 Beautiful ✨ Detailed πŸ’ Adorable

Mini Sunflower Turtle Amigurumi Pattern

Mini Sunflower Turtle Amigurumi Pattern
4.8β˜… Rating
5-7 Hours Time Needed
3.0K Made This
βœ‚οΈ

Intermediate Level

Ideal for those with basic crochet experience, featuring slightly more advanced stitches and techniques to expand your skills.

⏱️

Weekend Treat

Takes 5-7 hours, making it an enjoyable project to finish over a couple of days.

🧸

Cute Companion

An adorable friend to cherish, handcrafted with love to bring comfort and joy for years to come.

About This Mini Sunflower Turtle Amigurumi Pattern

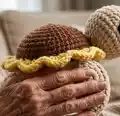
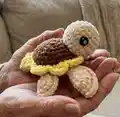
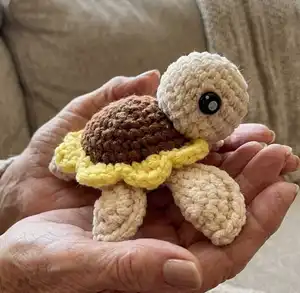
This pattern creates a small, plush sunflower-themed turtle amigurumi using bulky chenille and velvety yarn. Youll make a textured brown shell, a bright yellow sunflower ruffle, and a soft ivory body with four little legs and a tail. The pattern features specific rounds for shaping, working in front or back loops, and attaching limbs directly to the body.

Mini Sunflower Turtle Amigurumi Pattern crochet pattern - detailed view of completed project

Perfect for makers who enjoy small toy projects with fun texture and color changes. Photos and clear instructions help guide your placement and finishing touches.

Why You'll Love This Mini Sunflower Turtle Amigurumi Pattern

I absolutely love this pattern because the sunflower ruffle transforms a simple turtle into something playful and unique. I enjoyed combining two different chenille yarns to create warm contrast and a squishy texture that feels great to hold. The assembly is satisfying β€” attaching the legs and tail directly while crocheting saves time and keeps everything secure. I also love how quick this makes a finished gift; youll have a delightful little companion in just a few hours.

Mini Sunflower Turtle Amigurumi Pattern step 1 - construction progress Mini Sunflower Turtle Amigurumi Pattern step 2 - assembly progress Mini Sunflower Turtle Amigurumi Pattern step 3 - details and accessories Mini Sunflower Turtle Amigurumi Pattern step 4 - final assembly and finishing

Switch Things Up

I love customizing this turtle by switching yarn colors β€” use pastel tones for a soft baby-safe version, or jewel tones for a bold playful look.

If you want a smaller version, use a lighter weight yarn and a smaller hook; for a chunkier, cuddlier toy, choose a bulkier yarn and larger hook.

I sometimes embroider a tiny smile or freckles on the head to give my turtles more personality.

Try replacing safety eyes with embroidered eyes for a fully washable baby-safe toy.

Change the sunflower ruffle color to pink, blue, or even multicolor to create themed turtles for holidays or nursery decor.

Add a tiny crocheted bow or a felt leaf accessory sewn to the shell for an extra cute detail.

Experiment with different shell centers β€” use variegated yarn or carry a second color to create stripes or rings.

Make a set in graduated sizes to create a family of turtles β€” vary hook and yarn to scale pieces up or down consistently.

I like to add a loop of chain to the top of the shell to make a keychain or ornament version that fits on backpacks or holiday trees.

For a poseable option, consider adding a thin wire inside the legs for gentle shaping β€” tuck wire ends securely so they dont poke through the yarn.

Common Mistakes & How to Fix Them

βœ— Not using stitch markers with fluffy or chenille yarn can make rounds hard to follow; place stitch markers at the start of rounds and when working special loops to keep your place. βœ— Overstuffing the body can distort the shape and make sewing difficult; stuff gradually, checking the shape as you go and adding small amounts until the desired firmness is reached. βœ— Forgetting to change color neatly will leave loose tails and messy joins; use your preferred method for color changes and weave ends in promptly for a clean finish. βœ— Skipping placement photos or pins can lead to uneven features; use long sewing pins to position the head and limbs before sewing to achieve symmetrical placement.

Mini Sunflower Turtle Amigurumi Pattern

Create a sweet Mini Sunflower Turtle with cozy chenille yarn β€” a charming little amigurumi that makes a perfect gift or shelf buddy. This pattern walks you through each piece, from shell to tiny legs, with clear instructions and helpful photos. Youll enjoy the soft texture and sunny sunflower detail while practicing basic shaping and attachment techniques.

Intermediate 5-7 Hours

Materials Needed for Mini Sunflower Turtle Amigurumi Pattern

β€” Main Fabric

  • 01
    Size 5 Bulky yarn - Yarn Bee Velvety Smooth - Ivory (used for body, legs, tail, head)
  • 02
    Size 6 Chenille yarn - Premier Just Chenille - Yellow (used for sunflower ruffle)
  • 03
    Size 6 Chenille yarn - Premier Just Chenille - Cocoa (used for shell center)
  • 04
    General: Size 5 and/or 6 bulky chenille-style yarn for a plush texture

β€” Tools Required

  • 01
    Crochet hook size 3.5mm (E-5)
  • 02
    Tapestry needle
  • 03
    Scissors
  • 04
    Safety eyes 12mm (2 pieces)
  • 05
    Poly-fil stuffing
  • 06
    Stitch markers (recommended for fluffy yarn)
  • 07
    Long sewing pins for positioning pieces during assembly

Progress Tracker

0% Complete

β€” Front Legs :

Info :

Using Ivory Yarn (Make 2)

Round 1 :

6SC in MR

Round 2 :

Inc (12)

Round 3 :

SC, Inc (18)

Round 4 :

2SC, Inc (24)

Info :

SlSt into next St. Fold your circle in half to make a half circle, SC around the half circle through both stitches.

Info :

SlSt into the last stitch, BO, weave in the yarn tail. You do not need to leave a tail for sewing, it will be single crocheted into the body later.

β€” Back Legs :

Info :

Using Ivory Yarn (Make 2)

Round 1 :

6SC in MR

Round 2 :

Inc (12)

Round 3 :

SC, Inc (18)

Info :

SlSt into next St. Fold your circle in half to make a half circle, SC around the half circle through both stitches.

Info :

SlSt into the last stitch, BO, weave in the yarn tail. You do not need to leave a tail for sewing, it will be single crocheted into the body later.

β€” Tail :

Info :

Using Ivory Yarn

Round 1 :

3SC in MR

Round 2 :

Inc (6)

Round 3-4 :

SC (6)

Info :

SlSt into the last stitch, BO, weave in the yarn tail. You do not need to leave a tail for sewing, it will be single crocheted into the body later.

β€” Head :

Info :

Using Ivory Yarn

Round 1 :

8SC in MR

Round 2 :

Inc (16)

Round 3 :

SC, Inc (24)

Round 4 :

3SC, Inc (30)

Round 5-6 :

SC (30)

Round 7 :

3SC, Dec (24)

Round 8 :

SC, Dec (16)

Round 9 :

SC (16)

Info :

SlSt and leave a pretty long tail for sewing (I leave about a foot of yarn)

Info :

Add Safety Eyes and stuffing. I added my safety eyes between row 4 and 5, about 8 stitches apart.

β€” Body :

Info :

Using Brown Yarn

Round 1 :

8SC into MR

Round 2 :

Inc (16)

Round 3 :

SC, Inc (24)

Round 4 :

3SC, Inc (30)

Round 5 :

4SC, Inc (36)

Round 6 :

3SC, Inc (45)

Info :

Color change to Yellow yarn using your preferred method

Round 7 :

Working in FLO (You may want to put stitch markers in the back loops so you can find them in the next round) 5SC, [(SC, TC, TC2*, TC, SC) x 7], 5SC (52)

Info :

*Triple crochet two times in one stitch

Info :

Color change to Ivory yarn using your preferred method

Round 8 :

SC into BLO of R6 where you placed your stitch markers (45)

Round 9 :

This is the row you will crochet the legs and tail into. When attaching, push your hook through the stitch(s) of the leg or tail first, then through the stitch of the body and complete your single crochet. 5SC. Grab the first big leg, attach using 3SC (refer to photo for placement, the curve of the leg should be on your right). 5SC. Grab the first small leg, attach using 2SC (refer to photo above for placement, the curve of the leg should be on your right). 6SC. Grab your tail and attach using 3SC (see photo for placement). 6SC. Grab the second small leg, attach using 2SC (refer to photo below for placement, the curve of the leg should be on your left). 5SC. Grab the second big leg, attach using 3SC (refer to photo below for placement, the curve of the leg should be on your left).

Round 10 :

3SC, Dec (36)

Round 11 :

2SC, Dec (27)

Info :

Stuff the body to your desired firmness

Round 12 :

SC, Dec (18)

Round 13 :

Dec (9)

Info :

Add stuffing again if necessary

Info :

SlSt, cut yarn leaving a short tail to sew the hole closed. Weave the yarn tail back and forth into the stitches around then pull tight to close. Tie to secure and weave the rest of the yarn tail into the body.

β€” Assembly :

Info :

Sew on the head, placing it between the two front legs. I like to place the head over 3-4 rows of the shell and 1-2 rows of the bottom body. To make it easier and keep placement even, I use long sewing pins to pin it to the body in place.

Info :

Ensure legs and tail are attached during Round 9 as described above by crocheting them into the body stitches for secure placement.

Info :

Weave in any remaining ends and trim. Adjust stuffing if needed and ensure all pieces are secure before gifting or display.

Assembly Instructions

  • Attach legs and tail during Round 9 by pushing your hook through the leg or tail stitch first, then through the corresponding body stitch and completing single crochet stitches as directed for placement.
  • Sew on the head between the two front legs, placing it over 3-4 rows of the shell and 1-2 rows of the bottom body; use long sewing pins to pin it in place for accurate positioning.
  • Close the body opening by weaving the short tail back and forth through the remaining stitches, pulling tight and tying to secure, then weave the yarn tail into the body.
  • Weave in all yarn tails neatly; trim excess and check that safety eyes are secure before final finishing.
  • Use stitch markers when working in FLO/BLO rounds to mark placement for subsequent rounds and to help locate where legs and tail will be attached.

Important Notes

  • πŸ’‘Use stitch markers to keep track of rounds and back-loop/front-loop work, especially when using fluffy or chenille yarn.
  • πŸ’‘Stuff gradually to maintain shape and avoid overfilling which can distort the amigurumi form.
  • πŸ’‘Place safety eyes before stuffing and close to the recommended rows (between rows 4 and 5) and about 8 stitches apart as suggested for correct placement.
  • πŸ’‘Weave in ends securely after color changes to keep the chenille yarn from unraveling and to present a neat finish.

This Mini Sunflower Turtle is a tiny bundle of cozy texture and sunny charm, perfect for gifting or keeping on a shelf. The chenille yarn makes it irresistibly soft to touch and the sunflower ruffle adds a cheerful pop of color. Make one for friends, family, or a special handmade market β€” happy crocheting! 🧢🌻

You ask,

we answer.

FAQs

What size will the finished piece be?

The finished amigurumi measures approximately 6 inches long, 6 inches wide, and 2 inches tall using the recommended yarn and hook size.

Can I use different yarn weights for this pattern?

Yes, you can use different yarn weights, but changing yarn weight will affect final size and texture; adjust hook size accordingly and expect a different finished dimension.

Do I need prior crochet experience for this pattern?

This pattern is rated intermediate and uses increases, decreases, working in FLO/BLO, and a triple crochet cluster; basic crochet experience and familiarity with these techniques is recommended.

How long does this project typically take to complete?

Most crocheters complete this project in 5-7 hours, though time may vary with experience level, yarn choice, and how long you spend on assembly and finishing.