🧢 Beautiful ✨ Detailed πŸ’ Adorable

Mini Dragon Amigurumi Pattern

Mini Dragon Amigurumi Pattern
4.1β˜… Rating
5-7 Hours Time Needed
2.9K Made This
βœ‚οΈ

Intermediate Level

Ideal for those with basic crochet experience, featuring slightly more advanced stitches and techniques to expand your skills.

⏱️

Weekend Treat

Takes 5-7 hours, making it an enjoyable project to finish over a couple of days.

🧸

Cute Companion

An adorable friend to cherish, handcrafted with love to bring comfort and joy for years to come.

About This Mini Dragon Amigurumi Pattern

This pattern creates an 11-inch mini dragon using worsted weight yarn and a 3.25 mm hook. You will crochet the head, body, arms, legs, ears, horns, spikes, tail, belly and wings, then assemble them into a sweet stuffed dragon. The pattern uses standard amigurumi techniques with color changes, bobble stitches and simple shaping.

Mini Dragon Amigurumi Pattern crochet pattern - detailed view of completed project

Clear round-by-round instructions are provided for every piece so you can follow along easily. Photos and assembly tips show placement and finishing for a professional result.

Why You'll Love This Mini Dragon Amigurumi Pattern

I absolutely love this pattern because it brings a small, characterful dragon to life with simple, repeatable rounds and charming details. I enjoy how the color changes and bobble stitches add texture and personality with minimal extra effort. The design is versatile β€” you can make it in any color palette and it still reads as a friendly little dragon. Sewing the pieces together and seeing it take shape is always so rewarding for me.

Mini Dragon Amigurumi Pattern step 1 - construction progress Mini Dragon Amigurumi Pattern step 2 - assembly progress Mini Dragon Amigurumi Pattern step 3 - details and accessories Mini Dragon Amigurumi Pattern step 4 - final assembly and finishing

Switch Things Up

I love how easy it is to customize this mini dragon by simply changing yarn colors; try soft pastels for a baby-themed dragon or jewel tones for a dramatic look.

You can make a tiny keychain version by using sport weight yarn and a smaller hook for a mini keepsake dragon.

To make a larger cuddly version, use bulky yarn and a larger hook size and increase stuffing for a plush result.

I often add embroidered eyelashes or different eye sizes to alter the dragon's expression and personality.

Swap the bobble spikes for embroidered ridges if you want a flatter, simpler back detail that is better for small children.

Try adding a ribbon collar or a tiny crocheted scarf to give the dragon character and make it a themed gift.

If you want poseable limbs, insert thin craft wire into the arms or legs before finishing to allow gentle shaping.

Create an entire family by varying color sets and spike countsβ€”mix and match wings, horns and spike colors for unique sets.

I often attach a small bell or bell bead inside the tail for a playful touch, ensuring it is sewn securely and safely hidden.

Experiment with safety eyes vs. embroidered eyes for different age-appropriateness: embroidered eyes are best for babies and toddlers.

Common Mistakes & How to Fix Them

βœ— Skipping stitch markers while working in continuous rounds can lead to losing track of your start point; use a stitch marker at the beginning of each round to stay aligned. βœ— Changing colors without securing the yarn ends can cause the color to pull loose later; weave in or secure each color change as you go to keep neat joins. βœ— Not stuffing gradually causes lumps or uneven shaping in the head and body; add fiberfill in small amounts while shaping to achieve smooth curves. βœ— Forgetting to count stitches after increases and decreases results in incorrect shaping and mismatched pieces; count your stitches at the end of each round, especially after shaping rounds. βœ— Overstuffing small pieces such as spikes or horns will distort their shape; do not stuff spikes and only lightly stuff horns if needed, then sew closed neatly.

Mini Dragon Amigurumi Pattern

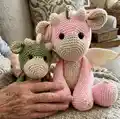
Make a charming mini dragon amigurumi with this complete crochet pattern. You will create a cuddly dragon with detailed features like ears, horns, spikes, wings, belly and a curled tail. The pattern walks you through each piece step-by-step so you can assemble a polished finished toy. Perfect for gifting or keeping as a sweet handmade companion.

Intermediate 5-7 Hours

Materials Needed for Mini Dragon Amigurumi Pattern

β€” Main Fabric

  • 01
    Worsted weight yarn (#4) - Color A: Green (main body color), amount as needed
  • 02
    Worsted weight yarn (#4) - Color B: Cream (snout/belly/inner ear), amount as needed
  • 03
    Worsted weight yarn (#4) - Color C: Pink (spikes/accents), amount as needed

β€” Tools Required

  • 01
    Crochet hook size D / 3.25 mm
  • 02
    12 mm safety eyes (2 pieces)
  • 03
    Scissors
  • 04
    Sewing needle for finishing
  • 05
    Stitch markers
  • 06
    Polyester fiberfill stuffing

Progress Tracker

0% Complete

β€” Head :

Round 1 :

Make 6 sc into a magic ring= 6

Round 2 :

Increase in each st around= 12

Round 3 :

(sc, inc) x 6= 18

Round 4 :

(2 sc, inc) x 6= 24

Round 5 :

(3 sc, inc) x 6= 30

Round 6 :

FLO 4 sc, bob st, 8 sc, bob st, 16 sc= 30

Round 7-9 :

sc in each st around

Info :

Change to Color A

Round 10 :

sc in each st around

Round 11 :

(4 sc, inc) x 6= 36

Round 12 :

(5 sc, inc) x 6= 42

Round 13 :

(6 sc, inc) x 6= 48

Info :

Place eyes between rows 12 and 13, leaving 10 holes between them.

Round 14-19 :

sc in each st around

Round 20 :

(6 sc,dec ) x 6= 42

Round 21 :

sc in each st around

Round 22 :

(5 sc, dec) x 6= 36

Info :

Start stuffing the head

Round 23 :

(4 sc, dec) x 6= 30

Round 24 :

(3 sc, dec) x 6= 24

Round 25 :

(2 sc, dec) x 6= 18

Round 26 :

(sc, dec) x 6= 12

Round 27 :

dec x 6= 6

Info :

F/O and sew the hole closed

β€” Body :

Round 1 :

Make 6 sc into a magic ring= 6

Round 2 :

Increase in each st around= 12

Round 3 :

(sc, inc) x 6= 18

Round 4 :

(2 sc, inc) x 6= 24

Round 5 :

(3 sc, inc) x 6= 30

Round 6 :

(4 sc, inc) x 6= 36

Round 7 :

(5 sc, inc) x 6= 42

Round 8 :

(6 sc, inc) x 6= 48

Round 9-12 :

sc in each st around

Round 13 :

(6 sc, dec) x 6= 42

Round 14-15 :

sc in each st around

Round 16 :

(5 sc, dec) x 6= 36

Round 17-18 :

sc in each st around

Info :

Start stuffing the body

Round 19 :

(4 sc, dec) x 6= 30

Round 20-22 :

sc in each st around

Round 23 :

(3 sc, dec) x 6= 24

Round 24-25 :

sc in each st around

Round 26 :

(2 sc, dec) x 6= 18

Info :

F/O and leave a long tail for sewing

β€” Arms (Make 2) :

Round 1 :

Make 6 sc into a magic ring= 6

Round 2 :

Increase in each st around= 12

Round 3 :

(sc, inc) x 6= 18

Round 4 :

2 sc, change to Color B: bob st, change to color a: 2 sc, change to color B: bob st, change to color A: 2 sc, change to color B: bob st, Change to color A: 9 sc= 18

Round 5-6 :

Sc in each st around

Round 7 :

Dec, 16 sc= 17

Round 8-9 :

Sc in each st around

Round 10 :

Dec, 15 sc= 16

Info :

Start stuffing the legs

Round 11 :

Dec, 14 sc= 15

Round 12-13 :

Sc in each st around

Round 14 :

Dec, 13 sc= 14

Round 15-16 :

Sc in each st around

Info :

Stop stuffing the arms

Round 17 :

Dec, 12 sc= 13

Round 18-19 :

Sc in each st around

Round 20 :

Dec, 11 sc= 12

Round 21 :

sc in each st around

Info :

F/O and leave a long tail for sewing

β€” Ears (Make 2 of each color) :

Round 1 :

Make 6 sc into a magic ring= 6

Round 2 :

Increase in each st around= 12

Round 3 :

(sc, inc) x 6= 18

Info :

Do not fasten off green ears. Continue by single crocheting the edges of the ears together. Place the back sides of each ear together and single crochet around the edges with green yarn.

β€” Legs (Make 2) :

Round 1 :

Make 6 sc into a magic ring= 6

Round 2 :

Increase in each st around= 12

Round 3 :

(sc, inc) x 6= 18

Round 4 :

(2 sc, inc) x 6= 24

Round 5 :

2 sc, Change to Color B: bob st, Change to color A: 2 sc, Change to color B: bob st, Change to Color A: 2 sc, Change to Color B: bob st, Change to Color A: 15 sc

Round 6 :

sc in each st around

Round 7 :

(6 sc, dec) x 3= 21

Round 8 :

sc in each st around

Round 9 :

(5 sc, dec) x 3= 18

Round 10-11 :

sc in each st around

Info :

Start stuffing the legs

Round 12 :

Dec, 16 sc= 17

Round 13-14 :

sc in each st around

Round 15 :

Dec, 15 sc= 16

Round 16-17 :

sc in each st around

Info :

Stop stuffing the legs

Round 18 :

(2 sc, dec) x 4= 12

Round 19 :

sc in each st around

Info :

F/O and leave a long tail for sewing

β€” Tail :

Round 1 :

Make 6 sc into a magic ring= 6

Round 2 :

(inc, 2 sc) x 2= 8

Round 3 :

sc in each st around

Round 4 :

(inc, 3 sc) x 2= 10

Round 5 :

sc in each st around

Round 6 :

(inc, 4 sc) x 2= 12

Round 7 :

Sc in each st around

Round 8 :

(inc, 5 sc) x 2= 14

Round 9 :

Sc in each st around

Round 10 :

(inc, 6 sc) x 2= 16

Round 11 :

Sc in each st around

Info :

Stuff the tail as you work

β€” Tail Continued :

Round 12 :

(inc, 7 sc) x 2= 18

Round 13 :

sc in each st around

Round 14 :

(inc, 8 sc) x 2= 20

Round 15 :

sc in each st around

Info :

F/O and leave a long tail for sewing

β€” Spikes (Make 5) :

Round 1 :

Make 4 sc into a magic ring= 4

Round 2 :

(inc, sc) x 2= 6

Round 3 :

(inc, 2 sc) x 2= 9

Round 4-5 :

sc in each st around

Info :

Do not stuff the spikes. Sew the spike Closed, F/O and leave a long tail for sewing

β€” Horns (Make 2) :

Round 1 :

Make 4 sc into a magic ring= 4

Round 2 :

(inc, sc) x 2= 6

Round 3 :

(inc, 2 sc) x 2= 9

Round 4 :

Sc in each st around

Info :

F/O and leave a long tail for sewing

β€” Belly :

Info :

With Color B: Ch 6

Round 1 :

sc in 2nd chain from hook, 3 sc, inc3 in last chain, working on the opposite side of the chain, 3 sc, inc= 12

Round 2 :

inc, 3 sc, inc x 3, 3 sc, inc x 2= 18

Round 3 :

sc, inc, 4 sc, inc, sc, inc, sc, inc, 4 sc, inc, sc, inc= 24

Round 4 :

2 sc, inc, 5 sc, inc, 2 sc, inc, 2 sc, inc, 5 sc, inc, 2 sc, inc= 30

Info :

F/O and leave a long tail for sewing

β€” Wings (Make 2) :

Info :

Ch 5

Round 1 :

sc in 2nd chain from hook, 2 sc, sl st, ch 1, turn= 4

Round 2 :

sc, inc, 2 sc, ch 2, turn

Round 3 :

sc in 2nd chain from hook,3 sc, inc, sl st, ch 1, turn

Round 4 :

3 sc, inc, 3 sc, ch 3, turn

Round 5 :

sc in 2nd chain from hook, sc in next chain, 5 sc, inc, sc, sl st, ch 1, turn

Round 6 :

4 sc, inc, 6 sc, ch 3, turn

Round 7 :

sc in 2nd chain from hook, sc in next ch, 7 sc, inc, 3 sc, sl st

Info :

F/O and leave a long tail for sewing

β€” Assembly :

Info :

Pin the head onto the body for extra support. You may need to add more stuffing as you sew. Sew the head onto the body.

Info :

Pin the belly onto the body and sew into place.

Info :

Pin the arm in a forward facing angle. There are no particular rows I place them on as it depends on how you stuff, shape, etc. its just better to judge how you want them. Sew the arm onto the body.

Info :

Turn the body upside down with the nose facing away from you. Pin the legs onto the bottom of the body. Sew the legs onto the body.

Info :

Pin the tail onto the back of the body. Sew the tail onto the body.

Info :

Pinch the ears at the bottom and sew about 3 stitches together to give it a closed look. Pin the ears onto the head and sew them into place.

Info :

Pin the horns onto the top of the head right near the ears and sew into place.

Info :

Pin the spikes onto the back of the body going down to the tail and sew them into place.

Info :

Pin the wings onto the back of the body and sew them into place.

Assembly Instructions

  • Pin the head onto the body for extra support; you may need to add more stuffing as you sew, then sew the head onto the body securely.
  • Pin the belly onto the front of the body, adjust position until symmetrical, and sew the belly into place with a whipstitch or invisible stitch.
  • Pin each arm in a forward-facing angle to your liking and sew the arms onto the sides of the body, ensuring even placement on both sides.
  • Turn the body upside down with the nose facing away, pin the legs to the bottom of the body where they look balanced, then sew the legs on firmly for stability.
  • Pin the tail to the back of the body in a position you like and sew it on; adjust stuffing if needed to get the desired curve.
  • Pin ears, horns and spikes into place (ears near top sides of head, horns near ears, spikes down the back) and sew each piece securely.
  • Pin wings onto the back and sew them into place; check symmetry and fasten tails and ends neatly to hide joins.

Important Notes

  • πŸ’‘Do not join rounds unless stated; work in a continuous spiral for smooth amigurumi shaping.
  • πŸ’‘Use a stitch marker to mark the beginning of each round to avoid losing your place when working in spiral rounds.
  • πŸ’‘All stitches are worked in both loops unless stated otherwise; follow BLO/FLO notes where provided for edge definition.
  • πŸ’‘Place safety eyes between rows 12 and 13 of the head, leaving 10 holes between them as directed for correct placement.

Thank you for choosing this Mini Dragon pattern β€” I hope it becomes a treasured handmade companion! Make one in your favorite colors and enjoy the creative process of stitching and assembling the pieces. Share your finished dragon with me β€” I love seeing your versions and color choices! 🧢✨

You ask,

we answer.

FAQs

What size will the finished piece be?

The finished amigurumi measures approximately 11 inches tall from bottom of foot to top of head when using worsted weight #4 yarn and a 3.25 mm hook.

Can I use different yarn weights for this pattern?

Yes, you can use different yarn weights but the final size will change; choose an appropriate hook for your yarn and expect the dragon to be larger with bulkier yarn and smaller with finer yarn.

Do I need prior crochet experience for this pattern?

This pattern is rated intermediate, so basic knowledge of single crochet, increases, decreases, working in the round, and color changes is recommended.

How long does this project typically take to complete?

Most crafters finish this project in about 5-7 hours depending on experience, assembly speed, and any customization you add.