🧢 Beautiful ✨ Detailed πŸ’ Adorable

Crochet Bluebell Pattern

Crochet Bluebell Pattern
4.5β˜… Rating
2-3 Hours Time Needed
2.4K Made This
βœ‚οΈ

Beginner Friendly Level

Perfect for those just starting their crochet journey, with clear instructions and simple techniques

⏱️

Bite-Sized Project

Finishes in 2-4 hoursβ€”perfect for an afternoon of creative relaxation.

🏑

Cozy Accent

A warm touch for your space that transforms ordinary corners into inviting nooks filled with handmade charm.

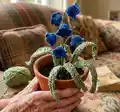
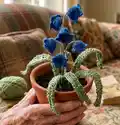
About This Crochet Bluebell Pattern

This pattern shows you how to crochet charming bluebell flowers, wired stems and shaped leaves to create a delightful potted display. It uses small hooks and lightweight yarns to make tight stitches so the petals hold their shape. You will learn a short round flower, a simple wired leaf and an assembly method to arrange the finished pieces beautifully.

Crochet Bluebell Pattern crochet pattern - detailed view of completed project

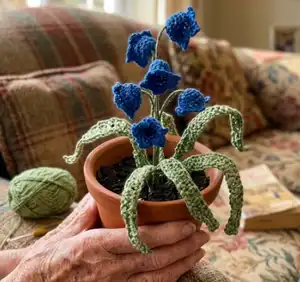
Perfect for using scrap yarn, these bluebells are quick to make and great for gifts or home accents. The pattern includes clear row-by-row instructions and tips for wiring and arranging the stems.

Why You'll Love This Crochet Bluebell Pattern

I absolutely love this pattern because it turns tiny scraps of yarn into a beautiful, long-lasting floral display that never wilts. I enjoy the satisfying, quick rounds that form each bell and the creative assembly when arranging stems and leaves. The technique is simple but rewarding, letting me personalise colours and sizes for different looks. Making a cluster of bluebells feels like putting together a miniature bouquet you can keep forever.

Crochet Bluebell Pattern step 1 - construction progress Crochet Bluebell Pattern step 2 - assembly progress Crochet Bluebell Pattern step 3 - details and accessories Crochet Bluebell Pattern step 4 - final assembly and finishing

Switch Things Up

I love how easily this pattern can be customised by changing yarn weight and hook size to create different scales of bluebells.

I often make mini versions with fingering yarn and a 0.75-1mm hook for tiny posies and keychain charms.

For a chunkier, more dramatic look I use bulky yarn and a larger hook to create oversized blossoms that become statement pieces.

I sometimes embroider a tiny dot at the centre or add a small bead for more detail inside each bell.

I like to mix colours on a single stem for a gradient effectβ€”try three similar shades for a soft ombre bouquet.

I also experiment with metallic or sparkly yarn for a festive version perfect for holiday decor.

Try making the leaves shorter or longer and bend the wire to change the posture of your plant for a realistic or whimsical arrangement.

I sometimes add a dab of fabric stiffener to the petals if I want them even firmer for display in a sunny spot.

If you want a faux wildflower bunch, vary stitch counts slightly to create petals of slightly different shapes for a more organic feel.

I suggest making an extra flower or two as practice before assembling the final stem so you can tweak tension and shaping to your liking.

Common Mistakes & How to Fix Them

βœ— Using a hook that is too large will make petals floppy and lose shape; use the smallest hook you can to keep stitches tight and petals firm.
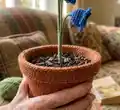
 βœ— Forgetting to weave in the wire securely will cause stems to twist or work loose; twist and anchor the wire behind the flower and weave it firmly through the foundation chain for leaves. βœ— Not counting stitches after rounds can cause uneven petals; always count at the end of each round to ensure you have the correct stitch total. βœ— Pulling the yarn too tightly while making the magic circle can distort your centre; keep a relaxed tension when forming the magic circle and tighten evenly to shape the centre. βœ— Skipping the picot in the petal row removes the decorative tip and changes petal shape; follow the (dc, dc, picot, dc) sequence exactly to get the correct petal tip. βœ— Cutting wire to incorrect lengths makes assembly awkward; cut 20cm per flower stem and add 15cm extra for each leaf as recommended for neat finishing.

Crochet Bluebell Pattern

Create delicate crochet bluebell flowers and leaves to craft a charming potted display. This pattern walks you through making tiny bell-shaped blooms, wired stems and sculpted leaves so you can arrange a lasting bouquet. Ideal for using leftover yarn and adding a handmade accent to your home or gifts. Clear step-by-step instructions and helpful photos guide you through every stage.

Beginner Friendly 2-3 Hours

Materials Needed for Crochet Bluebell Pattern

β€” Main Fabric

  • 01
    Blue yarn - approximately 2 meters per flower (or any yarn from your stash) - use 6-8 flowers per stem recommended
  • 02
    Green cotton yarn - doubled thickness of your flower yarn, approximately 14 meters for leaves/stems
  • 03
    Lace yarn (sample) used with 1mm hook for small flowers in sample photos
  • 04
    Optional doubled lace yarn used with 2.2mm hook to make longer 14cm leaves (sample)

β€” Tools Required

  • 01
    Matching crochet hook to your yarn (sample used 1mm for flower, 2.2mm for leaves)
  • 02
    Yarn needle
  • 03
    Scissors
  • 04
    Florist wire (approx 3 meters total suggested for multiple stems)
  • 05
    Cutting pliers
  • 06
    Stitch marker (optional for rounds)

Progress Tracker

0% Complete

β€” Materials :

Infos :

2 meters blue yarn (or any yarn from your stash) per flower I would recommend making 6-8 flowers per stem. 14 meters double the thickness of your flower yarn Green cotton yarn. Matching crochet hook to your yarn. Yarn needle. Scissors. 3 meters florist wire. Cutting pliers.

Info :

Gauge: N/A. Use the smallest crochet hook you can with your chosen yarn to create tight stitches, this will help your petals keep the form & not flop.

Info :

Size: With my lace yarn & 1mm crochet hook my Crochet Bluebell flowers were 2cm in diameter. I doubled my lace yarn & used a 2.2mm crochet hook to make 14cm long leaves.

Info :

Notes: The flowers are worked in the round. I would recommend making 6-8 flowers to make a full stem. Then the leaves will be made individually with wire inserted into the foundation chain. Once all the parts have been made the flower stem will be made first then the leaves placed around the stem.

β€” Crochet Lily Flower :

Row 1 :

Make a magic circle, ch 3 (count as first dc), 11 dc into the centre of the magic circle, sl st into the first dc. Total: 10dc.

Row 2 :

Ch3 (count as a dc), dc into the same stitch, dc, *dc inc., dc * repeat* 3 times, sl st into the first dc. Total 15dc.

Row 3 :

Ch3 (count as dc), 14dc, sl st into the first dc. Total: 15dc.

Row 4 :

Ch1, *sc, sc, (dc, dc, picot, dc) into the same stitch* repeat * 4 times, sl st into the first sc, fasten off & weave in your ends. Total: 5 Petals.

β€” Stem :

Step 1 :

Cut a piece of florist wire 20cm long, insert wire in and out of row 1 (as shown on the photo below), twist wire behind the flower to keep firm.

β€” Crochet Leaf :

Make 6 – Row 1 :

Ch 28, sc in the 2nd from the hook. 6hdc, 14dc, 5hdc, sc in final stitch. Fasten off & weave in your ends. Cut a piece of florist wire 15cm longer than your leaf, weave the wire in & out of the foundation chain until the tip.

β€” Flower Assembly :

Info :

Once you have made your required number of crochet bluebells arrange the wires together to create a flower bunch. About 10cm below the lowest flower arrange the leaves around the central stem & mould the leaves into your desired form.

Info :

Congratulations you have made your Crochet Bluebells Flowers! Thank you for subscribing to Moara Crochet, I would love to see your finished products. Please visit my website for more crochet patterns & free crochet knowledge.

Assembly Instructions

  • Attach each wired flower by twisting the wire stems together to form a central stem, positioning flowers at staggered heights to create a natural cluster.
  • About 10cm below the lowest flower, arrange and secure the wired leaves around the central stem, twisting their wires together with the stem for stability.
  • Mould the wired leaves into a natural curve and bend the leaf tips to your desired shape after wiring them through the foundation chain.
  • Weave any loose yarn ends into the back of the flowers and leaves before final assembly to keep the finished piece neat and tidy.
  • Use cutting pliers to trim excess florist wire and wrap any exposed wire ends neatly to prevent sharp edges.

Important Notes

  • πŸ’‘Use the smallest crochet hook you can with your chosen yarn to create tight stitches so the petals keep their form and do not flop.
  • πŸ’‘Work the flowers in the round and count stitches each round to ensure consistent petal shape and stitch totals.
  • πŸ’‘Make 6-8 flowers per stem for a full-looking bunch and make leaves individually with wire inserted into the foundation chain.
  • πŸ’‘Cut florist wire pieces to the recommended lengths (20cm for stems, 15cm longer than each leaf) and twist firmly to secure.
  • πŸ’‘Fasten off and weave in ends after petal row so the front of the flower remains neat before wiring and assembly.

This Crochet Bluebell pattern makes a timeless, handmade floral accent perfect for desks, shelves or gifts. Create delicate wired stems and sculpted leaves that will last for years and never wilt. Try different yarn weights and colours to make custom bouquets for every room. 🧢🌿

You ask,

we answer.

FAQs

What size will the finished piece be?

The finished bluebell flower in the sample measures approximately 2 cm in diameter when made with lace yarn and a 1mm hook; leaves can be about 14 cm when using doubled yarn and a 2.2mm hook.

Can I use different yarn weights for this pattern?

Yes, you can use different yarn weights but this will change the final size; use a suitably small hook to keep stitches tight for petals and adjust wire lengths for stems and leaves accordingly.

Do I need prior crochet experience for this pattern?

This pattern is beginner friendly and uses basic stitches (ch, sc, hdc, dc, picot) so basic crochet knowledge is helpful but the steps are straightforward and well suited to newer crocheters.

How long does this project typically take to complete?

Most crafters can make a full stem with multiple flowers and leaves in about 2-3 hours, depending on how many flowers and how much assembly is required.