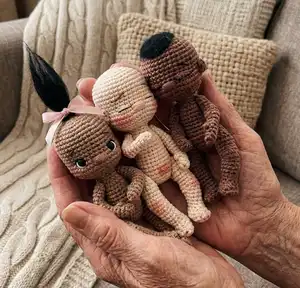
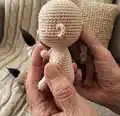
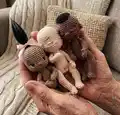
Make a sweet, pocket-sized baby doll with this detailed crochet pattern. Youll learn shaping for the head, body, arms and legs plus face placement techniques for open or closed eyes. The pattern includes step-by-step rounds, photo-tutorial guidance for eye placement and facial details, and assembly tips so your doll looks polished and adorable.
Progress Tracker
0% Complete
— Head / Body :
Info :
Using Yarn Under (x-stitch). 1.5mm hook. Using skin tone yarn (of your choice).
Round 3 :
(1sc, INC) x6 (18)
Round 4 :
(1sc, INC, 1sc) x6 (24)
Round 5 :
(3sc, INC) x6 (30)
Round 6 :
(2sc, INC, 2sc) x6 (Fig. 1) (36)
Round 7-12 :
36sc (6 rounds) (Fig. 2) (36)
Round 13 :
8sc, inv DEC, 16sc, inv DEC, 8sc (34)
Round 14 :
10sc, (INC) x5, 4sc, (INC) x5, 10sc (44)
Round 15 :
2sc, inv DEC, 36sc, inv DEC, 2sc (Fig. 3) (42)
Round 16 :
7sc, inv DEC, 24sc, inv DEC, 7sc (40)
Round 17 :
(inv DEC, 4sc) x6, inv DEC, 2sc (33)
Round 18 :
(inv DEC, 2sc) x7, inv DEC, 3sc (25)
Info :
If using safety eyes (open eyes option), insert now. (Fig. 4) For closed eyes option, continue with the next round.
Round 19 :
(1sc, inv DEC) x8, 1sc (17)
Info :
Stuff head firmly with fiber fill. (Fig. 5) Tip: Be sure to fill out the cheeks with fiber fill, stretching the increases.
Round 20 :
(inv DEC, 1sc) x5, 2sc (12) (Starting neck)
Round 21-22 :
12sc (2 rounds) (12)
Round 23 :
(INC) x12 (Fig. 6) (24) (Starting body)
Round 24-26 :
24sc (3 rounds) (Fig. 7) (24)
Round 27 :
2sc, inv DEC, (4sc, inv DEC) x3, 2sc (20)
Round 28-29 :
20sc (2 rounds) (20)
Round 30 :
2sc, INC, (4sc, INC) x3, 2sc (24)
Info :
Note: The previous increase along with the next 3 increases will form the baby's bottom, and should be centered across the back of the baby.
Round 32 :
INC, 1sc, (INC) x2, 21sc (28)
Round 33-34 :
28sc (2 rounds) (Fig. 8) (28)
Round 35 :
(2sc, inv DEC) x7 (21)
Info :
Stuff the body with fiber fill. (Fig. 9)
Round 36 :
(1sc, inv DEC) x7 (14)
Round 37 :
(inv DEC) x7 (7)
Info :
Close hole, leaving a long tail.
Item Name (Making Baby's Bottom) :
Thread tail onto a tapestry needle, *(insert into the closing hole, and bring out through the center of the back around Rnd 29 or 30.) Repeat from * 2 more times so that the yarn is doubled, pull yarn tight to indent and sew in end. (See photos below.)
— Inserting Safety Eyes :
Info :
Find center, between Row 13 and 14. Safety eyes will go 4 stitches out from the center for each eye. Use a larger hook to widen the hole if needed. Poke safety eye through and fasten the back.
— Making Eye Indents :
Info :
Thread a tapestry needle with a length of skin tone colored yarn. Needle goes in through the neck and out at the bottom of the eye, insert needle back in at the top of the eye, bring needle out at the top of the other eye, insert needle back in at the bottom of the eye and out through the neck. Help the yarn go to the outside edge of the eyes and pull on yarn ends until the yarn slips under the safety eyes. Pull yarn to make indents under the safety eyes. Knot yarn ends and hide inside fiber fill.
— Creating the Face - Open Eyes Option :
Info :
Insert a tapestry needle (threaded with white yarn) under chin, bring up at the bottom of the eye. Insert needle at the top of the same eye and bring through the top of the other eye. Insert needle into bottom of the same eye and out the original hole under the chin. Get a little craft glue on your tapestry needle and place some glue on the outer edge of the eye to keep the yarn in place. Finished whites of eyes.
— Creating the Face - Embroidery and Placement :
Info :
Placement guide: for black eye line and brown eyebrow, both are approximately 3 sts in length and 1 st in height. Thin some black yarn to 2 strands and thread a tapestry needle. Insert needle into the back of head and bring through outside of eye (one stitch from side of safety eye). Insert needle into inner top corner of eye and pull through inner top corner of opposite eye. Finish black eye lines. Thin some brown yarn to 2 strands and thread a tapestry needle, bring needle from back of head and come through at outside corner of the eyebrow. Insert needle into inside corner of eyebrow and come out at inside corner of opposite eyebrow. Finished eyebrows. Use skin colored yarn under chin to make nose (4-5 sts in width). Knot and hide ends as instructed.
— Belly Button :
Info :
Ch 3, join into circle and leave tail. Pull tight forming a knot. Insert each tail (using a tapestry needle) through body to the back (about 1 stitch apart), then pull from the back to indent belly button. Tie ends into knot, sew them in, and hide inside body with a hook or tapestry needle.
— Ears :
Info :
Do not join. Leave tail and position approximately 2-3sc away from corners of eyes. Sew to head in a LYING FLAT POSITION, sewing down the front half of the ear, keeping rounded side less attached (like a real ear).
— Left Leg :
Info :
Note: Additional Photo Tutorial for Rnds 1-4 on pgs. 18-20. Start with Ch 5.
Round 1 :
Starting in 2nd ch from hook, 2sc, INC, 3sc in next ch (across end of row of chains), (now working opposite side) 2sc, INC (Fig. 10) (11)
Round 2 :
5sc in next st, 9sc, 1slst (Note: heel will start to form) (Fig. 11) (15)
Round 3 :
Place a marker in the back loops of each of the next 2 stitches you will be working into (these are stitches from the previous round). [FLO - (1hdc, 1slst) in next stitch] x2 (Fig. 13), Bobble stitch (Fig. 14), 1sc* (tacks down the bobble) (Fig. 15), 9sc, inv DEC (Fig. 16) (16)
Round 4 :
(Skipping toes and working on the inside of the foot) (1sc in next marked back loop) x2 (Fig. 17), 1sc (working into stitch just past the bobble), 1sc, inv DEC, 7sc (Fig. 18) (12)
Round 5 :
(inv DEC) x2, 8sc (Fig. 19) (10)
Round 6 :
inv DEC, 8sc (Fig. 20) (9)
Round 7 :
4sc, INC, 4sc (Fig. 21) (10)
Round 8 :
6sc, INC, 3sc (Fig. 22) (11)
Round 9 :
5sc, INC, 5sc (Fig. 23) (12)
Round 10 :
4sc, INC, 2sc, inv DEC, 1sc, inv DEC (Fig. 24) (11)
Round 11 :
4sc, BLO - (5sc), 2sc (Fig. 25) (11)
Round 12 :
(INC) x2, 2sc, 5slst, 2sc (Fig. 26) (13) (Note: the 5slst will end up hidden inside the leg)
Round 13 :
6sc, 5sc in front loops from Rnd 11 (from BLO sts) (see Fig. 25, 27), 2sc (back on current row) (Fig. 28, 29) (13)
Round 14 :
1sc, (inv DEC) x2, 3sc, inv DEC, 3sc (Fig. 30) (10)
Round 15 :
1sc, INC, 5sc, INC, 2sc (12)
Round 16 :
7sc, INC, 1sc, INC, 2sc (Fig. 31) (14)
Round 17 :
INC, 3sc, INC, 9sc (Fig. 32) (16)
Round 18-19 :
16sc (2 rounds) (Fig. 33) (16) Stuff leg lightly with fiber fill (keeping its shape and not over stretching). (Fig. 34)
Round 20 :
(2sc, inv DEC) x4 (12)
Round 21 :
(1sc, inv DEC) x4 (Fig. 35) (8)
Info :
Close hole (whip stitch through front loops). Leave a long tail and set aside.
— Additional Photo Tutorials & Notes :
Info :
Photo tutorials show eye placement, eye indents, how to create open eye whites and embroidery for eye lines and eyebrows, and a photo tutorial for rounds 1-4 of the left foot for clarity. Refer to photos for placement and technique details (fig numbers shown in pattern).
This Mini Baby Doll pattern gives you a compact and heartwarming project you can finish in a weekend. Add tiny custom details—different skin tones, embroidered brows, or a soft mohair tuft—to make each doll unique. Share them as thoughtful handmade gifts or keep a little friend for yourself. 🧸🧶