๐Ÿงถ Beautiful โœจ Detailed ๐Ÿ’ Adorable

Mike Wazowski Amigurumi Pattern

Mike Wazowski Amigurumi Pattern
4.6โ˜… Rating
2-3 Hours Time Needed
1.4K Made This
โœ‚๏ธ

Beginner Friendly Level

Perfect for those just starting their crochet journey, with clear instructions and simple techniques

โฑ๏ธ

Bite-Sized Project

Finishes in 2-4 hoursโ€”perfect for an afternoon of creative relaxation.

๐Ÿงธ

Cute Companion

An adorable friend to cherish, handcrafted with love to bring comfort and joy for years to come.

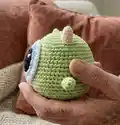
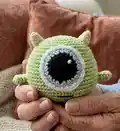
About This Mike Wazowski Amigurumi Pattern

This pattern shows you how to crochet a tiny Mike Wazowski-inspired amigurumi with full step-by-step rounds and photos. You will make the body, feet, hands, horns and a layered eye, then join and embroider the finishing details. The pattern uses 2.0 mm hook and mercerized cotton yarn for a neat, firm finish. It is designed to be quick to work up and perfect for gifting or decoration.

Mike Wazowski Amigurumi Pattern crochet pattern - detailed view of completed project

Clear abbreviations and exact round counts are included so you can follow along easily. Photographs demonstrate assembly and placement for professional-looking results.

Why You'll Love This Mike Wazowski Amigurumi Pattern

I absolutely love this pattern because it captures so much personality in a very small, simple form. I enjoy how fast it works up โ€” you can crochet a finished little friend in just a few hours. The layered eye detail is charming and gives the piece real character, and I love that the construction uses straightforward rounds anyone can follow. Making several in different colors is a fun way to personalize gifts and practice amigurumi techniques.

Mike Wazowski Amigurumi Pattern step 1 - construction progress Mike Wazowski Amigurumi Pattern step 2 - assembly progress Mike Wazowski Amigurumi Pattern step 3 - details and accessories Mike Wazowski Amigurumi Pattern step 4 - final assembly and finishing

Switch Things Up

I love how easy it is to customize this pattern by changing colorsโ€”try pastel greens or bright neons for a different mood.

Make a tiny keychain version by using thinner yarn and a smaller hook, or go chunky with thicker yarn for a plush bedside buddy.

I often add embroidered eyebrows or lashes to alter the expression and personality of the face.

Swap the horn color and make a matching pair of monsters in complementary shades for a set.

You can replace the embroidered mouth with felt for a different texture and cleaner line if you prefer not to embroider.

I like adding a little accessory, like a tiny crocheted hat or bow, to personalize each finished piece.

Try different yarn fibers for varied drape: a cotton blend gives crisp stitches, while acrylic adds softness.

If you want a poseable toy, consider inserting a small piece of wire into the arms to allow gentle posing.

Experiment with eye placement and size to create characters with different personalitiesโ€”higher placement looks surprised, lower looks friendlier.

I recommend making multiple versions with slight changes so you can compare and keep your favorite tweaks for future projects.

Common Mistakes & How to Fix Them

โœ— Skipping stitch counts during increase rounds leads to wrong shaping; always count your stitches at the end of each round to keep the profile correct. โœ— Forgetting to stuff gradually results in lumps or flat spots; add stuffing small amounts at a time and shape as you go for a smooth finish. โœ— Not anchoring the eye accurately will make it sit off-center; use pins to mark starting points before joining and check placement from different angles. โœ— Stuffing the hands will change their look and placement; follow the instruction 'DON'T STUFF' for hands to keep them floppy and proportional.

Mike Wazowski Amigurumi Pattern

Make your own adorable Mike Wazowski amigurumi with this clear, photo-guided crochet pattern. You will create a small, palm-sized monster with a single detailed eye and cute little limbs. The pattern uses simple rounds and easy assembly steps so you can finish a charming toy in an afternoon. Suitable for crafters who enjoy small, quick projects with satisfying results.

Beginner Friendly 2-3 Hours

Materials Needed for Mike Wazowski Amigurumi Pattern

โ€” Main Fabric

  • 01
    2 mm Yarn 100% Mercerized Cotton - Green (main body) - small amount (recommended for 2.0 mm hook)
  • 02
    2 mm Yarn 100% Mercerized Cotton - Yellow (horns) - small amount
  • 03
    2 mm Yarn 100% Mercerized Cotton - Black (eye center and mouth) - small amount
  • 04
    2 mm Yarn 100% Mercerized Cotton - Blue (eye ring) - small amount
  • 05
    2 mm Yarn 100% Mercerized Cotton - White (eye highlight and outer ring) - small amount

โ€” Tools Required

  • 01
    Crochet Hook 2.0 mm
  • 02
    2 mm yarn (100% mercerized cotton) in listed colors
  • 03
    Stitch marker
  • 04
    Pins
  • 05
    Wool needle / yarn needle
  • 06
    Stuffing
  • 07
    Scissors

Progress Tracker

0% Complete

โ€” Body :

Round 1 :

Magic ring 8 sc (8 sc)

Round 2 :

8 inc (16 sc)

Round 3 :

(1 sc, 1 inc) x 8 (24 sc)

Round 4 :

(2 sc, 1 inc) x 8 (32 sc)

Round 5 :

(3 sc, 1 inc) x 8 (40 sc)

Round 6 :

1 sc in each of the 40 sc (40 sc)

Round 7 :

(4 sc, 1 inc) x 8 (48 sc)

Round 8 :

(5 sc, 1 inc) x 8 (56 sc)

Round 9 :

(6 sc, 1 inc) x 8 (64 sc)

Round 10 to 13 :

1 sc in each of the 64 sc (64 sc)

Round 14 :

(15 sc, 1 inc) x 4 (68 sc)

Round 15 to 16 :

1 sc in each of the 68 sc (68 sc)

Round 17 :

(16 sc, 1 inc) x 4 (72 sc)

Round 18 to 19 :

1 sc in each of the 72 sc (72 sc)

Round 20 :

(17 sc, 1 inc) x 4 (76 sc)

Round 21 to 24 :

1 sc in each of the 76 sc (76 sc)

Round 25 :

(2 sc, 1 dec) x 19 (57 sc)

Round 26 :

(1 sc, 1 dec) x 19 (38 sc)

Round 27 :

(2 sc, 1 dec) x 9, 1 dec (28 sc)

Round 28 :

(2 sc, 1 dec) x 7 (21 sc)

Info :

STUFF.

Round 29 :

(1 sc, 1 dec) x 7 (14 sc)

Round 30 :

7 dec (7 sc)

Info :

NOTE: Using a wool needle: Close the hole.

โ€” Feet :

Round 1 :

Magic ring 8 sc (8 sc)

Round 2 :

8 inc (16 sc)

Round 3 :

(1 sc, 1 inc) x 8 (24 sc)

Round 4 to 5 :

1 sc in each of the 24 sc (24 sc)

Round 6 :

12 dec (12 sc)

Info :

STUFF.

โ€” Hands :

Round 1 :

Magic ring 6 sc (6 sc)

Round 2 to 4 :

1 sc in each of the 6 sc (6 sc)

Info :

DON'T STUFF.

โ€” Horns :

Round 1 :

Magic ring 6 sc (6 sc)

Round 2 :

1 sc in each of the 6 sc (6 sc)

Round 3 :

(1 sc, 1 inc) x 3 (9 sc)

Round 4 :

1 sc in each of the 9 sc (9 sc)

Info :

STUFF.

โ€” Eye :

Round 1 :

Magic ring 8 sc (8 sc)

Round 2 :

8 inc hdc (16 hdc)

Round 3 :

(3 sc, 1 inc) x 4 (20 sc) (Change the black-colored yarn to the blue one)

Round 4 :

(1 hdc, 1 inc) x 10 (30 hdc) (Change the blue-colored yarn to the white one)

Round 5 :

(2 sc, 1 inc) x 10 (40 sc)

Info :

NOTE: Begin to join. Using a wool needle: 1.- Join the eye to the body, starting on round number 8.

โ€” Assembly :

Step 1 :

Join the eye to the body, starting on round number 8 using a wool needle.

Step 2 :

Join the feet to the body.

Step 3 :

Join the hands to the body.

Step 4 :

Join the horns to the body.

Step 5 :

Embroider the detail in the eye using the white-colored yarn.

Step 6 :

Embroider the mouth using the black-colored yarn.

Assembly Instructions

  • Join the eye to the body, starting on round number 8, positioning it centered and sewing through every stitch of the eye outer round with a wool needle for a flat, secure finish.
  • Position and sew the two feet to the bottom of the body so they are evenly spaced and allow the toy to stand; use pins to test placement before sewing.
  • Attach the two hands to the sides of the body between the rows shown in the photos, sewing through inner loops and securing with multiple passes but do not stuff the hands.
  • Sew the two horns to the top of the head, spacing them symmetrically and slightly angling them outward so they mirror the photos.
  • Embroider the small white highlight on the eye and other eye details with white yarn for personality, following the photograph reference for placement and size.
  • Embroider the mouth using black yarn beneath the eye as shown in photos, using satin or back stitch to create a clean line.

Important Notes

  • ๐Ÿ’กUse a wool needle to close the final hole securely after finishing the body to prevent stuffing from escaping.
  • ๐Ÿ’กStuff the body and feet firmly but evenly to maintain a round shape; add small amounts of stuffing at a time.
  • ๐Ÿ’กDo not stuff the hands, as leaving them unstuffed keeps their intended floppy look and correct proportions.
  • ๐Ÿ’กPin all parts in place and check symmetry before sewing to ensure the eye, feet, hands and horns are aligned correctly.

This playful Mike Wazowski amigurumi pattern is perfect for quick gifts and happy display pieces.๐Ÿงถ It works up fast with a 2.0 mm hook and mercerized cotton yarn for a smooth, tidy finish.โœจ Share smiles and handmade magic by crocheting this tiny green monster for friends and family.๐Ÿ˜Š

You ask,

we answer.

FAQs

What size will the finished piece be?

The finished amigurumi measures approximately 11 cm tall when using the recommended 2.0 mm hook and 2 mm mercerized cotton yarn.

Can I use different yarn weights for this pattern?

Yes, you can use different yarn weights, but this will affect the final size and stitch tension; choose an appropriate hook size if substituting yarn.

Do I need prior crochet experience for this pattern?

This pattern is beginner friendly, but you should be comfortable working in rounds and know basic stitches like sc, hdc, increases and decreases.

How long does this project typically take to complete?

Most crocheters complete this project in 2-3 hours depending on experience and how much time you spend on finishing and embroidery.