🧢 Beautiful ✨ Detailed πŸ’ Adorable

Marshmallow Kittie Amigurumi Pattern

Marshmallow Kittie Amigurumi Pattern
4.6β˜… Rating
5-7 Hours Time Needed
3.4K Made This
βœ‚οΈ

Intermediate Level

Ideal for those with basic crochet experience, featuring slightly more advanced stitches and techniques to expand your skills.

⏱️

Weekend Treat

Takes 5-7 hours, making it an enjoyable project to finish over a couple of days.

🧸

Cute Companion

An adorable friend to cherish, handcrafted with love to bring comfort and joy for years to come.

About This Marshmallow Kittie Amigurumi Pattern

This pattern teaches you to crochet a plush Marshmallow Kittie with soft velvet yarn and gentle shaping for a rounded, cuddly form. You will create the head, body, tail and two ears with color spots and embroidered facial features. The pattern includes clear round-by-round instructions, stuffing tips, and photos for visual guidance.

Marshmallow Kittie Amigurumi Pattern crochet pattern - detailed view of completed project

Finished size is approximately 35 cm (~14") using the recommended yarn and hook sizes. The pattern uses continuous spiral rounds and simple color changes to add spots and details.

Why You'll Love This Marshmallow Kittie Amigurumi Pattern

I absolutely love this pattern because it transforms simple stitches into a charming, huggable companion that feels luxurious due to the velvet yarn. I enjoyed designing the subtle color spots and the sweet embroidered face that give the kitty so much personality. The shaping is very satisfying β€” you can see it take form as you stuff and adjust it. I also love that it finishes at a generous size, perfect for cuddles and gifting, and fits many skill levels with a little patience.

Marshmallow Kittie Amigurumi Pattern step 1 - construction progress Marshmallow Kittie Amigurumi Pattern step 2 - assembly progress Marshmallow Kittie Amigurumi Pattern step 3 - details and accessories Marshmallow Kittie Amigurumi Pattern step 4 - final assembly and finishing

Switch Things Up

I love how easy it is to personalize this Marshmallow Kittie by changing the spot colors β€” swap the yellow for pastel blue or lavender for a softer look.

You can make a mini keychain version by using thinner yarn and a smaller hook; try fingering weight yarn with a 2.5 mm hook for a tiny collectible.

For a chunkier, cuddlier toy, use a bulkier velvet yarn and a larger hook (for example, a 6 mm hook) to make a plush, oversized version perfect for pillows.

I often add embroidered eyelashes or blush using a little pink chalk or paint to change the expression and give each kitty its own personality.

Try different ear shapes β€” slightly pointier ears or folded ears β€” by changing the ear rounds or sewing technique to alter the silhouette.

If you want the kitty to be poseable, consider inserting a thin wire into the tail or neck area, or crocheting a removable scarf to give it a different look.

I like to experiment with textured stitches on the body to create a subtle pattern; alternating a round of half double crochet or working in back loop only can create interesting effects.

To make a safer version for small children, avoid embroidery with long tails and use securely sewn felt features instead of loose threads.

I sometimes add small crocheted accessories like a tiny bow, flower or heart β€” these are made separately and sewn on for an adorable finishing touch.

Don’t be afraid to combine two yarn types for contrast: a velvet body with cotton embroidery gives a lovely tactile combination and visual interest.

Common Mistakes & How to Fix Them

βœ— Skipping stitch markers during continuous rounds leads to miscounting and mismatched shaping; place a marker at the first stitch of each round and move it as you go to stay accurate. βœ— Under-stuffing the body or head can leave the amigurumi limp and poorly shaped; stuff in small increments, shaping as you go to achieve a smooth, rounded finish. βœ— Changing colors without securing tails can cause loose strands inside the work; when switching yarns, leave inside tails long enough to weave in or knot slightly and tuck them into the stuffing. βœ— Forgetting to check stitch counts after increases and decreases results in uneven rounds; count stitches at the end of each round, especially after color changes and shaping rounds.

Marshmallow Kittie Amigurumi Pattern

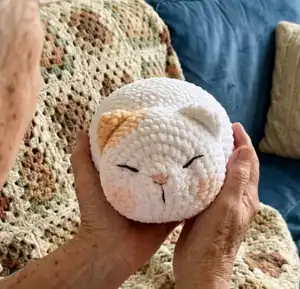
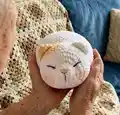
Make a soft, squishy Marshmallow Kittie using plush velvet yarn β€” a cuddly amigurumi perfect for nurseries or cozy gifts. This pattern guides you step-by-step through shaping, color spots, ears, tail and charming embroidered features. Clear photos and notes help you achieve a smooth, professional finish. Ideal for making a huggable 35 cm (approx. 14") kitty you'll love to gift or keep.

Intermediate 5-7 Hours

Materials Needed for Marshmallow Kittie Amigurumi Pattern

β€” Main Fabric

  • 01
    Himalaya Velvet (#90001) - one skein (main white color)
  • 02
    Himalaya Velvet (#90033) - approximately a quarter skein (accent/yellow spot)
  • 03
    Semi-cotton yarn (Yarnart Jeans) - small amounts for embroidery (dark brown and pink)
  • 04
    Polyester fiberfill stuffing - sufficient to firmly stuff head, body and tail

β€” Tools Required

  • 01
    Crochet hook 4.00 mm or 4.50 mm
  • 02
    Tapestry needle for sewing and weaving ends
  • 03
    Scissors
  • 04
    Pins for holding pieces during sewing
  • 05
    Stitch marker or contrast color yarn
  • 06
    Pink blush makeup powder or pink acrylic paint for cheek/nose shading
  • 07
    Optional: small safety eyes if preferred (pattern uses embroidered features)

Progress Tracker

0% Complete

β€” Notes :

Info :

Work in a continuous spiral unless otherwise stated. Do not join rounds. Use a stitch marker or a piece of yarn to mark the beginning of round.

Info :

Proper stuffing is an important step in creating a well-shaped and appealing crochet animal. Take your time, use small amounts of stuffing at a time, and shape and adjust as needed to achieve the desired result. Insert more fiber stuffing into the part of your crochet animal that you want to stuff, such as the cheeks or belly. It's like you are playing with clay. Create a stuffed animal that belongs to you even though you use my pattern. The magic will happen if you put your mind into this stuffing. It will be very interesting!

β€” Change Color :

Info :

With the two loops from the previous yarn on the hook, wrap the new yarn around the hook, then pull the new yarn through the two loops of the stitch. When the color changes are widely spread, I usually cut a inside strands and tie them together.

β€” Head :

Info :

Begin with white yarn. Ch 4, start in second chain from the hook. Working in both sides of a chain (3 first rounds).

Round 1 :

1 inc, 1 sc, 3 sc into the last stitch, continue the other side of the foundation chain: 2 sc. (8)

Round 2 :

2 inc, 1 sc, 3 inc, 1 sc, 1 inc. (14)

Round 3 :

14 sc. (14)

Round 4 :

2 sc, 8 inc, 4 sc. (22)

Round 5 :

1 sc, 3 inc, (1 sc, inc) x 6 times, 3 inc, 3 sc. (34)

Round 6 :

1 sc, (1 sc, inc) x 4 times, (2 sc, inc) x 4 times, 2 sc, (inc, 1 sc) x 4 times, 3 sc. (46)

Round 7 :

46 sc. (46)

Round 8 :

white (W) 24 sc, yellow (Y) 5 sc, (W) 13 sc, 2 dec. (44)

Round 9 :

(W) 23 sc, (Y) 8 sc, (W) 6 sc, dec, 5 sc. (43)

Round 10 :

(W) 5 sc, dec, 16 sc, (Y) 9 sc, (W) 11 sc. (42)

Round 11 :

(W) 22 sc, (Y) 9 sc, (W) 11 sc. (42)

Round 12 :

(W) 22 sc, (Y) 9 sc, (W) 5 sc, dec, 4 sc. (41)

Round 13 :

(W) 4 sc, dec, 17 sc, (Y) 7 sc, (W) 11 sc. (40)

Round 14 :

(W) 3 sc, (dec, 6 sc) x 2 times, dec, 2 sc, (Y) 4 sc, dec, (W) 6 sc, dec, 3 sc. (35) --> cut yellow yarn.

Round 15-16 :

35 sc (2 rounds) (35)

Info :

Stuff the head firmly with fiberfill.

Info :

TIPS: For the nose part, after being crocheted, it will be pretty point. However, we can make it sink by embroidering the nose after stuffed it.

Info :

You can use semi-cotton yarn (Yarnart Jeans) for embroider the nose and the eyes: Embroider the nose with dark brown yarn (Rnd 1-2), 2 stitches wide. Embroider the eyes with dark brown yarn between Rnd 4-6, 3 stitches wide, the distance between 2 eyes is 8 sts. Use pink yarn to embroider the interior of the nose.

β€” Body :

Info :

Continue to crochet the body after finishing Round 16 of the head.

Round 17 :

8 sc, (inc, 4 sc) x 4 times, inc, 6 sc. (40)

Round 18 :

7 sc, (inc, 5 sc) x 4 times, inc, 8 sc. (45)

Round 19 :

9 sc, (inc, 6 sc) x 4 times, inc, 7 sc. (50)

Round 20 :

50 sc. (50)

Round 21 :

12 sc, (inc, 7 sc) x 4 times, inc, 5 sc. (55)

Round 22-23 :

55 sc. (2 rounds) (55)

Round 24 :

5 sc, (8 sc, inc) x 5 times, 5 sc. (60)

Round 25 :

60 sc. (60)

Round 26 :

(W) 28 sc, (Y) 6 sc, (W) 26 sc. (60)

Round 27 :

(W) 26 sc, (Y) 10 sc, (W) 24 sc. (60)

Round 28-30 :

(W) 26 sc, (Y) 11 sc, (W) 23 sc. (3 rounds) (60)

Round 31 :

(W) 27 sc, (Y) 9 sc, (W) 24 sc. (60)

Round 32 :

(W) 28 sc, (Y) 8 sc, (W) 24 sc. (60) --> cut yellow yarn.

Round 33-34 :

(W) 60 sc. (2 rounds) (60)

Round 35 :

12 sc, (dec, 6 sc) x 6 times. (54)

Round 36 :

12 sc, (dec, 5 sc) x 6 times. (48)

Round 37 :

10 sc, (dec, 4 sc) x 6 times, 2 sc. (42)

Info :

Start stuffing the body.

Round 38 :

10 sc, (dec, 3 sc) x 6 times, 2 sc. (36)

Round 39 :

(4 sc, dec) x 6 times. (30)

Round 40 :

(3 sc, dec) x 6 times. (24) --> cut white yarn.

Info :

Stuff the body firmly with fiberfill.

β€” Tail :

Info :

Continue with yellow yarn.

Round 41 :

24 sc. (24)

Round 42 :

(2 sc, dec) x 6 times. (18)

Round 43-47 :

18 sc. (5 rounds) (18)

Round 48 :

2 dec, 10 sc, 2 dec. (14)

Round 49 :

dec, 10 sc, dec. (12)

Info :

Stuff the tail firmly with fiberfill.

Round 50 :

dec, 8 sc, dec. (10)

Round 51 :

dec, 6 sc, dec. (8)

Round 52 :

dec, 4 sc, dec. (6)

Info :

Fasten off and leave a long tail. Weave the yarn tail through the front loops of the last round and pull it tight to close the hole. Hide the yarn tail inside the body.
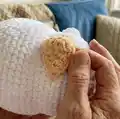
β€” Ears :

Info :

We need to make two ears, one is yellow and the other is white.

Round 1 :

6 sc into a MR. (6)

Round 2 :

6 inc. (12)

Round 3 :

(1 sc, inc, 1 sc) x 4 times. (16)

Info :

Fasten off and leave a long tail for sewing. Bring the ending yarn to sew the open side of the ear together.

Info :

Sew the ears on the head between Rnd 11-12, the distance between 2 ears is 5 sts.

β€” Finishing / Assembly :

Info :

Embroider the nose with dark brown yarn (Rnd 1-2), 2 stitches wide. Embroider the eyes with dark brown yarn between Rnd 4-6, 3 stitches wide; the distance between 2 eyes is 8 sts. Use pink yarn to embroider the interior of the nose. Use pins to position pieces before sewing for symmetry.

Assembly Instructions

  • Embroider the nose with dark brown yarn on the head where indicated (after head is stuffed); make the nose 2 stitches wide (as worked in Rnd 1-2) and fill the interior with pink yarn.
  • Embroider the eyes with dark brown yarn between Rnd 4-6, creating 3-stitch wide eyes and leaving a distance of 8 stitches between them for correct placement.
  • Sew the two ears to the head between Rnd 11-12, spacing them approximately 5 stitches apart; bring the ending yarn to sew the open side of the ear together before attaching.
  • Weave the yarn tail from the tail through the front loops of the last round, pull tight to close the hole, and hide the yarn tail inside the body for a neat finish.

Important Notes

  • πŸ’‘Use stitch markers to keep track of the beginning of each round when working in continuous spiral to avoid miscounting.
  • πŸ’‘Stuff firmly but gradually: add small amounts of fiberfill and shape as you go to achieve an even, rounded silhouette.
  • πŸ’‘Cut and secure color tails neatly when changing yarns and tuck them into the stuffing or weave them in for a tidy interior.

This cuddly Marshmallow Kittie is perfect for nursery snuggles and heartfelt handmade gifts. It uses plush velvet yarn for a luxuriously soft finish and whimsical embroidered features to give it personality. Make one for yourself or surprise a loved one with a huggable companion full of charm. πŸ§ΆπŸ’–πŸ±

You ask,

we answer.

FAQs

What size will the finished piece be?

The finished amigurumi measures approximately 35 cm (~14") tall when using the recommended Himalaya Velvet yarn and a 4.0–4.5 mm hook.

Can I use different yarn weights for this pattern?

Yes, you can use different yarn weights, but this will change the final size and texture. Use an appropriate hook for your chosen yarn and be prepared to adjust stuffing amounts and stitch counts if needed.

Do I need prior crochet experience for this pattern?

This pattern is rated Intermediate, so basic knowledge of single crochet, increases, decreases and working in continuous spiral rounds is recommended for best results.

How long does this project typically take to complete?

Most crocheters complete this project in about 5-7 hours, though actual time will vary based on experience, speed, and how much detailing or embroidery you do.