🧢 Beautiful ✨ Detailed πŸ’ Adorable

Felted Bowl Trio Pattern

Felted Bowl Trio Pattern
3.9β˜… Rating
5-7 Hours Time Needed
1.3K Made This
βœ‚οΈ

Beginner Friendly Level

Perfect for those just starting their crochet journey, with clear instructions and simple techniques

⏱️

Weekend Treat

Takes 5-7 hours, making it an enjoyable project to finish over a couple of days.

🏑

Cozy Accent

A warm touch for your space that transforms ordinary corners into inviting nooks filled with handmade charm.

About This Felted Bowl Trio Pattern

This pattern creates a trio of nesting felted bowls in three sizes using non-superwash, worsted-weight 100% wool yarn. The bowls are crocheted in the round from the center-bottom outward and then fulled in the washing machine to achieve a soft felted finish. You can personalize each bowl with needle-felted details using a pen-style felting tool.

Felted Bowl Trio Pattern crochet pattern - detailed view of completed project

The instructions include full round-by-round directions for Large, Medium, and Small bowls plus finishing steps for felting and decorating. No exact gauge is required because the bowls are felted, making this a forgiving and fun project.

Why You'll Love This Felted Bowl Trio Pattern

I absolutely love this pattern because it transforms simple crochet into beautiful, functional home decor with a cozy felted finish. I enjoy how forgiving the felting process is β€” slight differences in size or tension blend together during fulling. The pattern is perfect for personalization; I often add needle-felted words or motifs to make each bowl unique. Making an entire nesting set feels very satisfying and the finished bowls are sturdy and useful around the house.

Felted Bowl Trio Pattern step 1 - construction progress Felted Bowl Trio Pattern step 2 - assembly progress Felted Bowl Trio Pattern step 3 - details and accessories Felted Bowl Trio Pattern step 4 - final assembly and finishing

Switch Things Up

I love customizing these bowls by mixing and matching color combinations; try a neutral outer color with a bright rim for a modern look.

I sometimes switch yarn colors mid-round to create a marled or heathered felt effect when the piece is fulled.

If you want a chunkier, sturdier bowl, I change to a bulkier wool and a larger hook and then felt more aggressively in the washer.

To make a mini keychain or charm version, I use lighter weight wool and a smaller hook and skip the machine felting, finishing with a firm hand-felt.

I often add embroidered or needle-felted words like yarn, keys, or love to personalize gifts and make the bowls more functional.

Try adding a non-slip base by felting a contrasting color into the bottom or by gluing a small round of felt to the underside after drying.

I sometimes braid three thin strands of leftover wool and felt them to create a decorative trim around the rim before finishing.

For a holiday set, I use seasonal colors and needle-felt small motifs like stars or hearts onto the bowls after felting.

If you want a textured surface, experiment with surface crochet before felting and see how the texture softens during fulling for a unique look.

I recommend testing a small swatch to see how your chosen yarn felts and how much shrinkage occurs before committing to a full trio.

Common Mistakes & How to Fix Them

βœ— Skipping the stitch marker at the start of rounds makes it easy to lose your place; place a contrasting marker at the first post of each increase round to track rounds accurately. βœ— Using superwash wool will not felt properly and may ruin the final texture; use non-superwash 100% wool yarn to ensure successful felting. βœ— Pulling the beginning yarn tail too tightly when closing the adjustable ring can distort the center; pull gently to close the hole while keeping the first round even. βœ— Not weaving in ends before felting can cause loose strands to tangle or felt unpredictably; weave in ends or secure them before machine felting for a clean finish.

Felted Bowl Trio Pattern

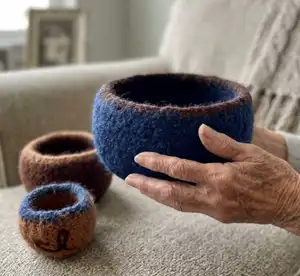
Create a charming set of nesting felted bowls to organize your space and celebrate your love of yarn. This pattern guides you from the center-bottom of each bowl to the finished felted shape with clear, step-by-step rounds and finishing notes. Youll learn basic single crochet increases and decreases, how to transition colors for a rim, and how to personalize with needle felting for a decorative finish.

Beginner Friendly 5-7 Hours

Materials Needed for Felted Bowl Trio Pattern

β€” Main Fabric

  • 01
    Non-superwash, worsted weight, 100% wool yarn - Color A (blue) - approximately 115 yards
  • 02
    Non-superwash, worsted weight, 100% wool yarn - Color B (dark brown) - approximately 85 yards
  • 03
    Non-superwash, worsted weight, 100% wool yarn - Color C (light golden brown) - approximately 50 yards

β€” Tools Required

  • 01
    Crochet hook size L (8.0 mm) or size needed to obtain gauge
  • 02
    Locking stitch markers
  • 03
    Tapestry needle
  • 04
    Pen-style felting tool (needle felting tool) for decorating
  • 05
    Washing machine (for felting to finish the bowls)

Progress Tracker

0% Complete

β€” Finished Size :

Info :

Bowls measure about 11 (18, 26)” in circumference before felting and 9 (12.75, 17)” after felting.

β€” Gauge :

Info :

Work the first 5 rnds of Large Bowl Directions, circle measures about 4" [10 cm] in diameter. Because the bowls will be felted, obtaining an exact gauge is not necessary for this project.

β€” Materials :

Infos :

Non-superwash, worsted weight, 100% wool yarn in 3 colors: 115 yards of color A (blue). 85 yards of color B (dark brown). 50 yards of color C (light golden brown). Size L (8.0 mm) crochet hook or size needed to obtain gauge. Locking stitch markers. Tapestry needle. Pen-style felting tool.

β€” Notes :

Info :

Some white or off-white wool yarns will not felt well. Bowl is worked in the round from the center-bottom, out. Decreases at the top edge keep bowl from stretching out of shape. Details are added later using a pen-style felting tool to attach strands of yarn to the bowl.

β€” Instructions :

For Large Bowl :

Rnd 1: Using A, make an adjustable ring, 6 sc in ring, pull on beg yarn tail to close hole – 6 sts, do not join, but work in the rnd. Use stitch marker to keep track of beg of rnds.

Round 2 :

Rnd 2: 2 sc in each st around – 12 sts.

Round 3 :

Rnd 3: [Sc in next st, 2 sc in next st] 6 times – 18 sts.

Round 4 :

Rnd 4: [2 sc in next st, sc in next 2 sts] 6 times – 24 sts.

Round 5 :

Rnd 5: [1 sc in next 2 sts, 2 sc in next st, sc in next st] 6 times – 30 sts.

Round 6 :

Rnd 6: [1 sc in next 4 sts, 2 sc in next st] 6 times – 36 sts.

Round 7 :

Rnd 7: [1 sc in next 2 sts, 2 sc in next st, sc in next 3 sts] 6 times – 42 sts.

Round 8 :

Rnd 8: [1 sc in next 5 sts, 2 sc in next st, sc in next st] 6 times – 48 sts.

Round 9 :

Rnd 9: [1 sc in next 1 sts, 2 sc in next st, sc in next 5 sts] 6 times – 54 sts.

Round 10 :

Rnd 10: Sc around.

Round 11 :

Rnd 11: [1 sc in next 3 sts, 2 sc in next st, sc in next 5 sts] 6 times – 60 sts.

Round 12 :

Rnd 12: Sc around.

Round 13 :

Rnd 13: [1 sc in next 9 sts, 2 sc in next st] 6 times – 66 sts.

Round 14-21 :

Rnds 14 – 21: Sc around. Use contrasting st marker to mark post of first st of Rnd 14. This will help keep track of how many rnds have been worked even.

Round 22 :

Rnd 22: [1 sc in next 9 sts, sc2tog] 6 times – 60 sts.

Round 23 :

Rnd 23: [1 sc in next 3 sts, sc2tog, sc in next 5 sts] 6 times, sl st in first st of rnd – 54 sts.

Round 24 :

Rnd 24: Yo with B and pull up loop, pull on A yarn tail until last A loop disappears, ch 1 (does not count as a stitch), sc around, sl st in first sc to fasten off.

Info :

Weave in ends.

For Medium Bowl :

Using B, work Rnds 1 – 6 of Large Bowl directions.

Round 7 :

Rnd 7: Sc around.

Round 8 :

Rnd 8: [1 sc in next 2 sts, 2 sc in next st, sc in next 3 sts] 6 times – 42 sts.

Round 9 :

Rnd 9: Sc around.

Round 10 :

Rnd 10: [1 sc in next 5 sts, 2 sc in next st, sc in next st] 6 times – 48 sts.

Round 11-15 :

Rnds 11 – 15: Sc around. Use contrasting st marker to mark post of first st of Rnd 11. This will help keep track of how many rnds have been worked even.

Round 16 :

Rnd 16: [1 sc in next 6 sts, sc2tog] 6 times – 42 sts.

Round 17 :

Rnd 17: [1 sc in next 3 sts, sc2tog, sc in next 2 sts] 6 times, sl st in first st of rnd – 36 sts.

Round 18 :

Rnd 18: Yo with C and pull up loop, pull on B yarn tail until last B loop disappears, ch 1 (does not count as a stitch), sc around, sl st in first sc to fasten off.

Info :

Weave in ends.

For Small Bowl :

Using C, work Rnds 1 – 3 of Large Bowl directions.

Round 4 :

Rnd 4: Sc around.

Round 5 :

Rnd 5: [2 sc in next st, sc in next 2 sts] 6 times – 24 sts.

Round 6 :

Rnd 6: Sc around.

Round 7 :

Rnd 7: [1 sc in next 2 sts, 2 sc in next st, sc in next st] 6 times – 30 sts.

Round 8-10 :

Rnds 8 – 10: Sc around. Use contrasting st marker to mark post of first st of Rnd 8. This will help keep track of how many rnds have been worked even.

Round 11 :

Rnd 11: [1 sc in next 4 sts, sc2tog] 6 times-24 sts.

Round 12 :

Rnd 12: Yo with A and pull up loop, pull on C yarn tail until last C loop disappears, ch 1 (does not count as a stitch), sc around, sl st in first sc to fasten off.

Info :

Weave in ends.

Finishing :

Felt bowls in washing machine. Shape with hands and air dry after felting is complete. Add strands of yarn to bowls with needle felting tool to decorate.

Assembly Instructions

  • Weave in all yarn ends securely before felting to prevent loose strands from tangling during the fulling process.
  • Use a contrasting stitch marker to mark the post of the first stitch of the designated round (Rnd 14 for Large, Rnd 11 for Medium, Rnd 8 for Small) so you can easily count even rounds while working.
  • After felting in the washing machine, reshape the bowl with your hands while still damp and allow it to air dry to set the finished form.
  • Decorate the felted bowls by attaching short strands or motifs with a pen-style needle felting tool, securing designs without additional sewing.
  • When switching colors at the rim, follow the final round instructions (yo with new color and pull through) to create a clean color finish and fasten off.

Important Notes

  • πŸ’‘Use non-superwash 100% wool yarn for successful felting; superwash yarns may not felt properly and can produce poor results.
  • πŸ’‘Place a stitch marker at the start of the indicated rounds to track how many rounds of even single crochet you have worked.
  • πŸ’‘Weave in and secure yarn tails before felting to avoid tangling or unexpected felting results during machine fulling.
  • πŸ’‘Shape and dry the bowls by hand immediately after felting to achieve the desired curve and stability.

These nesting felted bowls are a beautiful and functional addition to your home, perfect for holding small treasures or yarn scraps. Add a personal touch with needle-felted initials, hearts, or words to make each bowl uniquely yours. Enjoy the satisfying transformation from crocheted rounds to a soft felted finish that lasts. 🧢✨

You ask,

we answer.

FAQs

What size will the finished piece be?

Bowls measure about 11 (18, 26) inches in circumference before felting and 9 (12.75, 17) inches after felting, depending on size.

Can I use different yarn weights for this pattern?

You should use non-superwash worsted weight 100% wool for best felting results; changing yarn weight will change the finished size and may affect felting performance.

Do I need prior crochet experience for this pattern?

This pattern is beginner friendly and uses basic single crochet increases and decreases, so basic crochet skills are sufficient to complete the bowls.

How should I felt the bowls?

Felt the bowls in your washing machine following the instructions, then shape with your hands while damp and allow them to air dry. Use a pen-style felting tool to add decorative strands afterwards.