🧢 Beautiful ✨ Detailed πŸ’ Adorable

Magic Potion Amigurumi Pattern

Magic Potion Amigurumi Pattern
4.2β˜… Rating
2-3 Hours Time Needed
3.8K Made This
βœ‚οΈ

Intermediate Level

Ideal for those with basic crochet experience, featuring slightly more advanced stitches and techniques to expand your skills.

⏱️

Bite-Sized Project

Finishes in 2-4 hoursβ€”perfect for an afternoon of creative relaxation.

🧸

Cute Companion

An adorable friend to cherish, handcrafted with love to bring comfort and joy for years to come.

About This Magic Potion Amigurumi Pattern

This pattern creates a small, decorative Magic Potion bottle amigurumi with a separate cork stopper and a decorative hanging tendril. It includes full round-by-round instructions for the bottle, cork, and decoration in clear steps. The finished piece is ideal for display, gifting, or as part of a fantasy-themed collection.
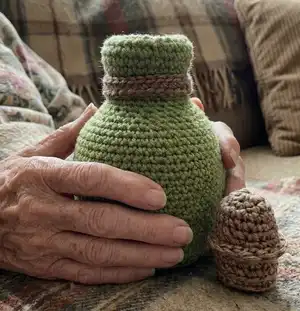
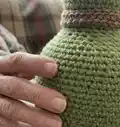
Magic Potion Amigurumi Pattern crochet pattern - detailed view of completed project

Worked in medium/worsted weight yarn with a 3.5mm hook, the bottle measures approximately 6 inches tall and 4 inches wide. The pattern uses simple shaping techniques like increases, decreases, BLO/FLO work, and a few finishing tricks for a neat result.

Why You'll Love This Magic Potion Amigurumi Pattern

I absolutely love this pattern because it turns simple stitches into a charming, storybook-style potion bottle that feels magical to hold. I enjoy the shaping rhythm as the bottle grows round and the cork fits just so, and the decorative tendrils are a fun finishing touch. The pattern is compact yet satisfying, perfect for an afternoon project that yields a polished result. I also appreciate how easy it is to customize with colors and small ornaments to make a whole set of potions.

Magic Potion Amigurumi Pattern step 1 - construction progress Magic Potion Amigurumi Pattern step 2 - assembly progress Magic Potion Amigurumi Pattern step 3 - details and accessories Magic Potion Amigurumi Pattern step 4 - final assembly and finishing

Switch Things Up

I love changing up the colors to create unique potion effects; try deep purples, smoky greys, or gradient yarns for magical variation.

I sometimes switch to a bulkier yarn and larger hook to create a chunky, oversized potion bottle for a bold display piece.

If you want a tiny keychain version, use fingering weight yarn and a smaller hook to scale the bottle down and add a keyring.

I like to add beads, sequins, or a tiny embroidered label to give the bottle extra character and storytelling flair.

You can replace the cork with a crocheted or felted cap in a contrasting colour for a whimsical look and easier swapping of tops.

I often make a set of bottles in different heights and colours to create a potion shelf display or a themed gift set.

Try using metallic or sparkly yarn for the decoration tendrils to simulate magical glittering bindings around the neck.

Embroider tiny symbols or initials on the bottle body to personalize each potion for a friend or special occasion.

Consider inserting a small rolled note or dried herbs inside (secure and sealed) for a mixed-media magic prop or gift.

I recommend experimenting with stuffing levels in the cork so you can customize how snugly the stopper sits and how easy it is to remove.

Common Mistakes & How to Fix Them

βœ— Skipping stitch markers during rounds can cause you to lose track of the beginning of rounds; place a marker at the start of every round to stay aligned. βœ— Not checking stitch counts after increases and decreases will create misshapen areas; count your stitches at the end of each round to confirm accuracy. βœ— Overstuffing the cork makes it difficult to fit into the bottle neck and can distort the stopper; stuff gradually and test fit as you go for the best result. βœ— Ignoring front or back loop instructions (FLO/BLO) will change the look of the neck detail; follow FLO/BLO directions exactly to achieve the intended rolled top effect. βœ— Weaving in ends poorly can cause the seam to open after handling; weave ends securely and hide them inside the piece for a clean finish.
Magic Potion Amigurumi Pattern

Create a whimsical Magic Potion bottle complete with a cork stopper and decorative tendrils. This pattern guides you through the bottle body, the cork stopper, and the little hanging decoration so you can craft a charming miniature potion bottle. Perfect for gifting, shelf decor, or adding to a fantasy amigurumi collection.

Intermediate 2-3 Hours

Materials Needed for Magic Potion Amigurumi Pattern

β€” Main Fabric

  • 01
    Sheepjes Stonewash XL or any medium/worsted weight yarn (main bottle color)
  • 02
    Color: Canada Jade - used for bottle (specified color in the sample)
  • 03
    Color: Boulder Opal - used for cork stopper and decoration (specified color in the sample)
  • 04
    Small amount of contrast yarn for decoration (approx 10-25g depending on yarn)

β€” Tools Required

  • 01
    Crochet hook size 3.5mm
  • 02
    Scissors
  • 03
    Polyfill stuffing for cork
  • 04
    Tapestry needle
  • 05
    Stitch markers
  • 06
    Yarn needle for finishing

Progress Tracker

0% Complete

β€” Pattern Details :

Info :

Yarn: Sheepjes Stonewash XL or any medium/worsted yarn

Info :

Bottle: Canada Jade

Info :

Cork and Decoration: Boulder Opal

Info :

Hook: 3.5mm hook

Info :

Size: 6 inches tall, 4 inches wide

Info :

Abbreviations: Ch=Chain. HDC= half double crochet. Sc=single crochet. Stitch=st. BLO= back loops only. FLO= front loops only. Slip stitch=sl st. Invisible decrease= dec.

Info :

*numbers in parenthesis at the end of each row is the number of stitches you will have

Info :

What you will need: Yarn, scissors, polyfill for cork, tapestry needle, stitch markers, 3.5mm hook

β€” Bottle :

Round 1 :

6 sc in a magic circle

Round 2 :

Inc in all 6 st (12)

Round 3 :

(inc in next st, sc in next st) repeat 6 times (18)

Round 4 :

(inc in the next st, sc in the next 2 st) repeat 6 times (24)

Round 5 :

(sc in the next 2 st, inc in the next st, sc in the next st) repeat 6 times (30)

Round 6 :

(inc in the next st, sc in the next 4 st) repeat 6 times (36)

Round 7 :

(sc in the next 3 st, inc in the next st, sc in the next 2 st) repeat 6 times (42)

Round 8 :

(inc in the next st, sc in the next 6 st) repeat 6 times (48)

Round 9-19 :

sc in all 48 st (48)

Round 20 :

(dec in the next st, sc in the next 6 st) repeat 6 times (42)

Round 21 :

(sc in the next 3 st, dec in the next st, sc in the next 2 st) repeat 6 times (36)

Round 22 :

(dec in the next st, sc in the next 4 st) repeat 6 times (30)

Round 23 :

(sc in the next st, dec in the next st, sc in the next 2 st) repeat 6 times (24)

Round 24 :

(sc in the next 6 st, dec in the next st) repeat 3 times (21)

Round 25-30 :

sc in all 21 st (21)

Round 31 :

sc in the FLO of all 21 st (21) Ex A&B

Round 32-34 :

sc in all 21 st (21)

Info :

*fasten off and weave in end, roll down top of bottle*

β€” Cork :

Round 1 :

6 sc in a magic circle (6)

Round 2 :

Inc in all 6 st (12)

Round 3-4 :

sc in all 12 st (12)

Round 5 :

(sc in the next 4 st, inc in the next st). repeat 2 times. Sc in the last 2 st (14)

Round 6 :

sc in all 14 st (14)

Round 7-8 :

sc in the BLO in all 14 st (14) Ex A

Round 9 :

sc in all 14 st (14) *stuff, as you go along you can try the cork in the bottle and stuff more or less for a good fit*

Round 10-11 :

repeat rows 7 and 8 (14) Ex B

Round 12 :

dec in all 14 st (7)

Info :

*fasten off leaving long tail and using a tapestry needle weave in and out through each front loop and pull to close Ex C&D Pull the tail up through the center of the bottom through the top and pull to get the flat appearance at the bottom of stopper Ex E&F Fasten off at top to hold shape and hide inside.

Info :

Decoration: make a slip knot and put your crochet hook in the loops closest to the top that we did the back loop sc in and ch1 to anchor. Sc around in each st and slip st into the st we ch1 into and fasten off.

β€” Decoration :

Info :

In Boulder Opal *Leave a long starting tail if you want to use it to tie into a bow*

Round 1 :

ch 26 starting in the second chain from the hook HDC in all 25 st, ch1 and turn (25) Ex A

Round 2 :

we're going to do the following pattern to create the hanging tendrils: sl st in the first st and in the same st ch 10- sl st back along in all 9 st and sl st into the next 4 st repeat until end, 5 times. Ex B&C

Info :

*pull yarn through last sl st and using a needle thread it through to match the other side and either sew ends together around bottle neck or tie them in a bow Ex D*

Assembly Instructions

  • Roll down the top of the bottle to create the neck edge after finishing and fastening off the bottle top as instructed.
  • Stuff the cork as you work and test fit it into the bottle neck, adjusting stuffing for a snug but removable fit before completing the closing round.
  • After finishing the cork, weave the long tail through front loops and pull to close the bottom, then pull the tail up through the stopper center and secure inside.
  • Attach the decoration around the bottle neck by matching the ends and either sewing them together around the neck or tying them into a bow as shown in the decoration instructions.
  • Weave in and hide all remaining tails inside the bottle or cork to keep the finish neat and secure.

Important Notes

  • πŸ’‘Use stitch markers to keep track of the start of each round and maintain consistent stitch counts throughout shaping.
  • πŸ’‘Stuff the cork gradually and test fit inside the bottle to achieve the desired snugness without overstuffing.
  • πŸ’‘Work the FLO/BLO rounds carefully to create the neck detail and follow examples A and B for placement and technique.
  • πŸ’‘Weave in ends securely and hide tails inside the piece to prevent unraveling and preserve a clean finish.

This Magic Potion amigurumi makes a delightful handmade addition to any shelf or craft display. πŸ§ͺ The pattern is compact, cute, and perfect for gifting to fantasy lovers or using as a prop in imaginative play. ✨ Grab your yarn and hook and bring a little magic into your homeβ€”happy crocheting! 🧢

You ask,

we answer.

FAQs

What size will the finished piece be?

The finished amigurumi measures approximately 6 inches tall and 4 inches wide using medium/worsted yarn and a 3.5mm hook.

Can I use different yarn weights for this pattern?

Yes, you can use different yarn weights, but the final size and cork fit will change; choose an appropriate hook for your yarn and check gauge by adjusting stuffing and fit.

Do I need prior crochet experience for this pattern?

This pattern is rated intermediate and uses techniques like BLO, FLO, invisible decreases, and shaping, so basic amigurumi and stitch knowledge is recommended.

How long does this project typically take to complete?

Most crocheters finish this bite-sized project in about 2-4 hours, depending on experience, customization, and finishing details.