🧶 Beautiful ✨ Detailed 💝 Adorable

Low Sew Spider Amigurumi Pattern

Low Sew Spider Amigurumi Pattern
4.1★ Rating
5-7 Hours Time Needed
1.2K Made This
✂️

Intermediate Level

Ideal for those with basic crochet experience, featuring slightly more advanced stitches and techniques to expand your skills.

⏱️

Weekend Treat

Takes 5-7 hours, making it an enjoyable project to finish over a couple of days.

🧸

Cute Companion

An adorable friend to cherish, handcrafted with love to bring comfort and joy for years to come.

About This Low Sew Spider Amigurumi Pattern

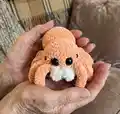
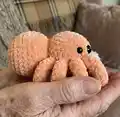
This pattern creates a plush, roughly 8-inch low-sew spider made with super-soft plush yarn and fuzzy accent yarn for little fangs. It uses simple amigurumi techniques — magic circle, single crochet, increases and decreases — and minimal sewing. The design is low-sew: legs are attached as you crochet, reducing finishing work.

Low Sew Spider Amigurumi Pattern crochet pattern - detailed view of completed project

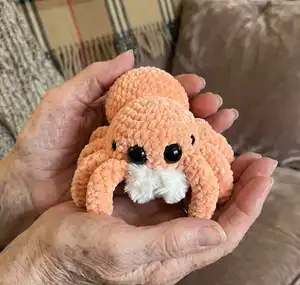
You'll make eight stuffed legs, a shaped head with eye placement notes, fuzzy fangs, and a round body that sews on with a long tail. The pattern includes material suggestions, hook sizes, and photo-based placement tips.

Why You'll Love This Low Sew Spider Amigurumi Pattern

I absolutely love this pattern because it turns ultra-soft plush yarn into an irresistibly squishy companion that is quick to stitch up. I enjoy the low-sew construction as it reduces tedious sewing at the end and lets you attach legs as you go for perfect placement. The fuzzy fangs add a delightful texture contrast that always makes mine extra cute. I also appreciate that this pattern is flexible — you can use different plush yarns or eye sizes to change the character completely.

Low Sew Spider Amigurumi Pattern step 1 - construction progress Low Sew Spider Amigurumi Pattern step 2 - assembly progress Low Sew Spider Amigurumi Pattern step 3 - details and accessories Low Sew Spider Amigurumi Pattern step 4 - final assembly and finishing

Switch Things Up

I love customizing this pattern by swapping yarns to change size and texture; using a bulkier plush yarn makes a chunkier, cuddlier spider while a lighter plush creates a smaller, neater toy.

I often change eye sizes and spacing to alter the expression — larger eyes give a cuter, more cartoon look while smaller eyes look more realistic.

Try different fang materials: fuzzy eyelash yarn gives a fluffy mouth, felt pieces create a flat look, and embroidery can make tiny teeth for a whimsical style.

For posable legs, insert thin craft wire into the legs before stuffing to allow bending and playful posing; seal the wire ends so they are safe inside the stuffing.

I sometimes crochet the body in a contrast color for a striped or segmented spider; this is an easy way to add personality and color blocking to the design.

Want a mini keychain? Use a thinner plush or worsted yarn with smaller hook and 12mm eyes to make micro versions perfect for bags and gifts.

I like to add tiny accessories like a crocheted bow, hat, or scarf to turn each spider into a character — these small props are quick to make and fun to mix-and-match.

To make standing or stable pieces, slightly flatten the bottom of the body by reducing stuffing and adding a felt disc sewn to the base for extra stability.

If you prefer less sewing, attach the body with invisible mattress stitch using the long tail and stitch through both rounds evenly for a low-sew finish that still looks neat.

Experiment with color gradients or variegated plush yarns to create unique textures; I often start with soft pastel shades for a gentle look or bright colors for playful décor.

Common Mistakes & How to Fix Them

✗ Skipping the stitch marker during continuous rounds can cause you to lose track of round starts; use a marker at the beginning of each round to prevent shape errors. ✗ Forgetting to stuff the legs as you go results in uneven or floppy limbs; stuff small amounts while crocheting to keep consistent shape and smooth seams. ✗ Attaching eyes too high or low will change the expression and balance; follow the placement notes between rows 7-8 and mark the 7-st space so eyes are symmetric. ✗ Not leaving long yarn tails for sewing makes assembly difficult; always leave a long tail when finishing the body and head for secure attachment.

Low Sew Spider Amigurumi Pattern

Make a sweet, pocket-sized plush spider using cozy plush yarn — perfect for gifts or a quick handmade companion. This pattern guides you through low-sew assembly so you can attach legs and body with minimal sewing. With clear step-by-step rounds, simple shaping, and suggested materials, you'll create an adorable, squishy spider in one weekend.

Intermediate 5-7 Hours

Materials Needed for Low Sew Spider Amigurumi Pattern

— Main Fabric

  • 01
    Plush yarn of choice (recommended: Parfait Chunky) - Parfait chunky: 75 grams
  • 02
    Sweet Snuggles Lite (alternative plush yarn) - amount as needed for similar size
  • 03
    Small amount of fuzzy/eyelash yarn or accent yarn for fangs - small scraps (two short pieces)
  • 04
    Polyfil stuffing - small bag for stuffing head, body, and legs

— Tools Required

  • 01
    Crochet hook 5.0 mm (for Parfait chunky)
  • 02
    Crochet hook 6.0 mm (for Sweet Snuggles Lite if using that yarn)
  • 03
    Darning needle (yarn needle) for sewing and weaving ends
  • 04
    Safety eyes: 20 mm (main) & 12 mm (smaller outer eyes) — as listed
  • 05
    Scissors
  • 06
    Stitch markers (recommended)
  • 07
    Pins for positioning parts (optional)

Progress Tracker

0% Complete

— Legs :

Info :

Make 8. Be sure to stuff the leg as you go.

Round 1 :

4 sc in mc (4)

Round 2 :

sc, (inc x3) (7)

Round 3-7 :

sc around (7)

Info :

Start Stuffing and continue as you go.

Round 8 :

2 sc, inc, 2 sc, dec (7)

Round 9-10 :

repeat round 8 (7)

Round 11 :

sc around (7)

Round 12 :

2 sc. (5 sts left unworked)

Round 13 :

sl st, FO

Info :

*Note: if you would like floppy legs that can be easily posed you can close the legs with 3 sc. This is an option and will make them move more. I like stiffer legs so I leave mine open.

— Fangs :

Info :

Make 2 using fuzzy yarn. Leave a yarn tail on both ends because we tie them on later.

Instruction :

Chain 5, starting in second chain from hook sc 4.

— Head :

Info :

We will be working from the top of the head down.

Round 1 :

9 sc in mc (9)

Round 2 :

inc x 9 (18)

Round 3 :

(2 sc, inc) x 6 (24)

Round 4 :

(3 sc, inc) x 6 (30)

Round 5 :

(4 sc, inc) x 6 (36)

Round 6 :

(5 sc, inc) x 6 (42)

Round 7-8 :

sc around (42)

Info :

The next round we will attach the legs. Refer to the photos to make sure they are attached correctly so when you flip it over they point down.

Round 9 :

3 sc with first leg, go through the front and back sts of the leg then through the body as shown (3 sts per leg). Repeat till you have attached 4 legs, 7 sc (this is the front where the eyes will be placed), 3 sc with leg x4, sc 11. (42)

Round 10 :

sc around (42)

Info :

Stop and secure the leg tails with knots. Attach eyes between row 7-8 above legs in the 7 st space. 3 sts between the center eyes. Smaller outer eyes are placed 2-3 sts back. Some testers liked to place the smaller eyes between rows 6-7.

Round 11 :

(5 sc, dec) x 6 (36)

Info :

Attach the fangs on row 8 below the eyes, 1-2 sts apart. Note they have a natural curve. Place them so they curve into the head. I just slip my yarn tail through and tie a knot on the inside.

Round 12 :

(4 sc, dec) x 6 (30)

Round 13 :

(3 sc, dec) x 6 (24)

Round 14 :

(2 sc, dec) x 6 (18)

Info :

STUFF

Round 15 :

dec x 9 (9)

Round 16 :

sl st, FO

Info :

close.

— Body :

Round 1 :

6 sc in mc (6)

Round 2 :

inc x 6 (12)

Round 3 :

sc around (12)

Round 4 :

(sc, inc) x 6 (18)

Round 5 :

(2 sc, inc) x 6 (24)

Round 6 :

sc around (24)

Round 7 :

(3 sc, inc) x 6 (30)

Round 8 :

(4 sc, inc) x 6 (36)

Round 9 :

(5 sc, inc) x 6 (42)

Round 10-13 :

sc around (42)

Round 14 :

(5 sc, dec) x 6 (36)

Round 15 :

sc around (36)

Round 16 :

(4 sc, dec) x 6 (30)

Round 17 :

sc around (30)

Round 18 :

(3 sc dec) x 6 (24)

Round 19 :

sl st & FO. Leave a long yarn tail for attaching.

Info :

STUFF

Info :

Attach the body 4 rounds from the center of head and 4 rounds from the bottom of the head. I attach my body right up against the legs.

Assembly Instructions

  • Attach legs during round 9 of the head: work 3 sc with the first leg by going through the front and back stitches of the leg then through the body (3 sts per leg) and repeat until 4 legs are attached on the front and 4 on the back, maintaining a total of 42 sts in the round.
  • Secure leg tails with knots after round 10 and tuck or weave the tails inside the head to hide them.
  • Place safety eyes between rows 7-8 above the legs in the 7-st space with 3 stitches between the center eyes; place the smaller outer eyes 2-3 sts back or between rows 6-7 if preferred.
  • Attach the fuzzy fangs on row 8 below the eyes spaced 1-2 stitches apart, slip yarn tails through to the inside and tie a secure knot to fasten.
  • Sew the body to the head using the long tail left on the body: align the body so it sits 4 rounds from the center and 4 rounds from the bottom of the head and whipstitch or ladder stitch evenly around.

Important Notes

  • 💡Use stitch markers to keep track of your rounds, especially during the leg attachment round and when counting spaces for eyes.
  • 💡Stuff legs and head gradually while shaping to avoid lumps; small amounts of stuffing at a time yield smooth results.
  • 💡Leave long yarn tails when finishing pieces (particularly the body) for secure sewing and easier placement during assembly.
  • 💡Secure safety eyes properly and consider placement before tightening to ensure symmetry and desired expression.

This low-sew spider is a cuddly little companion that comes together quickly and with minimal finishing work. It's perfect for making as a gift or a playful decor piece, and it showcases cozy plush yarn beautifully. Have fun customizing colors and eye sizes to make each spider unique. 🧶✨🕷️

You ask,

we answer.

FAQs

What size will the finished piece be?

The finished amigurumi measures approximately 8 inches long when using the recommended plush yarn and the specified hook sizes.

Can I use different yarn weights for this pattern?

Yes, you can substitute yarns but this will change the final size; adjust your hook size to match the chosen yarn and check gauge visually for similar density.

Do I need advanced crochet skills to complete this pattern?

This pattern is rated intermediate — you should be comfortable working in the round, using magic circles, increases, decreases, and basic assembly to follow it confidently.

How should I attach the legs to the head?

Legs are attached during round 9 of the head by crocheting through the leg and body (3 sts per leg) as described; this low-sew method secures legs while you work and reduces finishing sewing.