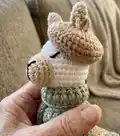
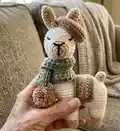
Make a charming Louisa Llama amigurumi with this full crochet pattern. You will create a sweet stuffed llama complete with a blanket, scarf with pom-poms and a beret. Clear step-by-step rounds and helpful notes make this pattern enjoyable to follow for an afternoon or weekend project.
Progress Tracker
0% Complete
— Materials :
Info :
Medium weight cotton/ acrylic/ polyester yarn in your choice of colours for the body, feet, muzzle, ears and tail. Black yarn for embroidering facial features. Use size E/3.5mm hook for the llama body and H/5.0mm hook for scarf and beret as specified. Polyester fiberfill, yarn needle, stitch markers and scissors.
— Abbreviations & Stitches :
Infos :
MR: Magic Ring. St(s): Stitch(es). SC: Single Crochet. HDC: Half Double Crochet. DC: Double Crochet. Ch: Chain stitch. Sl st: Slip stitch. Inc: Increase (Stitch 2 SC into the stitch). DC Inc: Double Crochet Increase (Stitch 2 DC into the stitch). Dec: Invisible decrease (Stitch 2 SC together using the invisible method). (...) x n: Repeat instructions in brackets n times.
— Notes :
Info :
This pattern is written using US crochet terms. Crochet in a spiral, unless otherwise specified. A stitch marker at the start/ end of each round can help keep track of stitches. Crochet tightly enough that the filler doesn’t show. If your tension tends to be looser, choose a smaller hook. The size of the finished piece can vary depending on the yarn, tension and filling. The white llama pictured (using acrylic yarn) stands at 9 inch/ 23cm tall. The beige llama (using poly yarn) stands at 10 inch/ 26cm. A tutorial video for the legs is included. This pattern is for personal use only.
— Instructions :
Info :
Use 3.5mm hook for entire llama body unless otherwise specified in accessory sections.
— Legs :
Info :
(Make 4) Start with cream yarn
Round 1 :
6 SC in a MR (6)
Round 2 :
(2 SC, inc) x 2 (8)
Round 4 :
(3 SC, inc) x 2 (10)
Info :
Change to main body yarn
Round 7 :
(4SC, inc) x 2 (12)
Info :
(See tutorial on the next section of the legs here)
For legs 1 and 3 :
sl st and close after R9. Cut the yarn and weave in the tail
For legs 2 and 4 :
Do not close after R9. Chain 4, then join to legs 1 and 3 respectively with a SC (it helps to place a marker in this st) Do not cut the yarn. So leg 2 connects to leg 1, and leg 4 connects to leg 3
— Legs/ Belly :
Info :
(For each of the two sets of joined legs) After the SC done in the previous step:
Round 1 :
8 SC, 3 inc, 4 SC (in the 4 ch between legs), 3 inc, 13SC (takes you to end of ch) sl st back into the SC with the stitch marker (38)
Info :
Close and cut the yarn. Weave in the ends.
— Body :
Info :
Line up the two leg sets on their flatter sides, and stitch 12 sl sts to attach them together (Use the middle 12 sts as per the image)
Info :
Ch 1 (put stitch marker in this ch, to mark where next round ends)
Round 1 :
54 SC around (26 SC, 1 SC in between the legs, 26 SC, 1 SC in marked ch stitch)
Round 2 :
13 SC, dec, 24 SC, dec, 13 SC (52)
Round 3 :
12 SC, dec, 24 SC, dec, 12 SC (50)
Info :
Crochet 1 or 2 SC to get to the middle of the back of the llama and start next round from here
Round 7 :
4 SC, dec, 38 SC, dec, 4 SC (48)
Round 8 :
3 SC, dec, 38 SC, dec, 3 SC (46)
Round 9 :
2 SC, dec, 38 SC, dec, 2 SC (44)
Round 10 :
SC, dec, 38 SC, dec, SC (42)
Info :
Crochet 1 or 2 SC to get to the middle of the back of the llama
Info :
Make 12 sl sts to join two sides of back together (leave the one stitch at the very back unstitched)
Info :
This leaves 17 SC left over for the neck
— Neck :
Round 1 :
17 SC around, and 1 SC in middle line (18)
Info :
Stuff the legs and body of the llama, making sure to get filling all the way down the legs, and that all 4 legs touch the ground at once
Round 3 :
(7 SC, dec) x 2 (16)
Round 5 :
(6 SC, dec) x 2 (14)
Round 7 :
(5 SC, dec) x 2 (12)
Info :
Do not close. The head continues straight from here
— Head :
Round 1 :
(SC, inc) x 6 (18)
Round 2 :
(2 SC, inc) x 6 (24)
Round 3 :
(3 SC, inc) x 6 (30)
Round 4-8 :
30 SC (5 rows of 30)
Round 9 :
(3 SC, dec) x 6 (24)
Round 10 :
(2 SC, dec) x 6 (18)
Round 11 :
(SC, dec) x 6 (12)
Info :
Close and cut the yarn, sew the hole closed and weave in the tail
— Tail :
Round 1 :
4 SC in a MR (4)
Info :
Close with a sl st and cut the yarn, leaving a long tail for sewing
Info :
Sew the tail to the body, above the first slip stitches that join the back
— Muzzle :
Round 1 :
6 SC in a MR (6)
Round 3 :
(SC, inc) x 6 (18)
Info :
Close with a sl st and cut the yarn, leaving a long tail for sewing
Info :
Sew muzzle to head, stuffing before you reach the end
— Ears :
Round 1 :
4 SC in a MR (4)
Round 2 :
(SC, inc) x 2 (6)
Round 3 :
(2 SC, inc) x 2 (8)
Round 4 :
(3 SC, inc) x 2 (10)
Info :
Flatten the ear and sl st closed along the top
Info :
Close and cut the yarn, leaving a long tail for sewing
Info :
Pinch the base of the ear and sew in place, before sewing on to the head
— Face :
Info :
Embroider the face using black yarn
— Blanket :
Info :
Use size E/3.5mm hook. Colour change after each row if desired, using preferred method. Alternate 3 colours if pictured. Crochet over the ends as you go or weave in ends on underside of blanket at the end.
Round 1 :
Make a slip knot, ch 19, 1 SC into 2nd ch from hook, 17 SC (18)
Round 2-5 :
Ch 1, turn, 18 SC (18)
Info :
Close with a sl st, cut the yarn and weave in the tails.
— Blanket Border :
Info :
Using border colour yarn, sl st on to the edge of the blanket and ch 1 (you can start in the corner if you prefer)
Info :
SC all the way around, with 3 SC in each of the corners
Info :
Sl st back into 1st st, close and cut the yarn and weave in the tail
Info :
Tie the blanket to the body by wrapping a piece of yarn around 2 or 3 times, and securing with a knot under the belly
— Scarf :
Info :
Use size H/5mm crochet hook
Round 1 :
Make a slip knot, ch 62, HDC into 3rd ch from hook, 59 HDC (60)
Round 2 :
Ch 2, turn, 60 HDC (60)
Info :
Close and cut the yarn, and weave in the ends.
— Pom Poms for Scarf :
Info :
(Make 2) You can use a small pom pom maker instead if you have one, or use another method if you prefer
Step 1 :
Cut a piece of cardboard to 5cm (2 inch) wide
Step 2 :
Cut a slit down the middle of the cardboard, 3/4 of the way down
Step 3 :
Cut a piece of yarn around 25cm (10 inch) long and insert it between the slit, sliding it to the bottom of the opening
Step 4 :
Wrap the working yarn around the cardboard 80 or more times (the more times, the fuller the pom pom will be). Cut the working yarn
Step 5 :
Pull down on the 25cm (10 inch) length of yarn that’s in the slit in the cardboard. Tie it tightly around the wraps and secure it with a knot
Step 6 :
Slide the pom pom off the cardboard. Tie an extra piece of yarn around the middle and knot to ensure it’s tight
Step 7 :
Cut the ends of the loops. Trim the pom pom where necessary, making sure to leave two long ends for sewing on to the scarf
Info :
Use the long pieces of yarn from the pom poms to sew on to each end of the scarf and secure with a double knot. Fold the scarf in half, place around the llama’s neck and pull the ends through the loops to fit snugly.
— Beret :
Info :
Use size E/3.5mm hook. This is made using joined rounds, not a continuous spiral.
Round 1 :
Start with a MR, leaving a 20cm (8 inch) tail for the beret’s loop. Ch 3 (count as a st), 10 DC (11)
Round 2 :
Sl st into 3rd ch of last round, ch 3 (count as a st), DC in same st, ch 4, sk 2, DC inc x 8 (22)
Round 3 :
Sl st into 3rd ch of last round, ch 3 (count as a st), DC inc, 6 DC in ch 4 space, (1 DC, DC inc) x 8 (33)
Round 4 :
Sl st into 3rd ch of last round, ch 3 (count as a st), DC around (33)
Round 5 :
Sl st into 3rd ch of last round, ch 1 (count as a st), inv dec, (SC, inv dec) x 10 (22)
Info :
Close with a sl st, cut the yarn and weave in the tail. Make a loop with yarn tail on top of the beret. Sew in a few stitches to secure, and finish with a knot inside the beret. Put the beret on the llama’s head, with the hole over one ear.
Congratulations — your Louisa Llama is complete and ready to charm! This little llama makes a thoughtful handmade gift or a sweet shelf sitter for your home. Enjoy styling your llama with different blanket and scarf colours to match seasons or decor. 🧶✨